<?xml version="1.0" encoding="utf-8"?><feed xmlns="http://www.w3.org/2005/Atom" ><generator uri="https://jekyllrb.com/" version="3.10.0">Jekyll</generator><link href="https://www.andrewdenty.com/blog/feed.xml" rel="self" type="application/atom+xml" /><link href="https://www.andrewdenty.com/blog/" rel="alternate" type="text/html" /><updated>2026-03-19T12:36:11+00:00</updated><id>https://www.andrewdenty.com/blog/feed.xml</id><title type="html">Andrew Denty</title><subtitle>Thoughts on design</subtitle><entry><title type="html">Introducing Gay Places</title><link href="https://www.andrewdenty.com/blog/2026/03/19/kicking-off-gay-places.html" rel="alternate" type="text/html" title="Introducing Gay Places" /><published>2026-03-19T09:00:00+00:00</published><updated>2026-03-19T09:00:00+00:00</updated><id>https://www.andrewdenty.com/blog/2026/03/19/kicking-off-gay-places</id><content type="html" xml:base="https://www.andrewdenty.com/blog/2026/03/19/kicking-off-gay-places.html"><![CDATA[<p><img src="/blog/assets/img/gay-places-graphic.png" alt="Gay Places" /></p>

<p>I’ve recently started a new side project called <a href="https://www.gayplaces.co/" target="_blank">Gay Places</a>, a curated guide to gay bars, clubs, and queer spaces around the world.</p>

<p>The aim is to build something quieter, more considered, and more useful than the usual listings, especially for people exploring a city through its gay scene.</p>

<p>It’s early days, but I’m excited to see where it goes. I’d love to hear in the comments if you have any ideas or suggestions for where to take this!</p>]]></content><author><name></name></author><category term="Side Projects" /><category term="LGBTQ+" /><category term="Travel" /><summary type="html"><![CDATA[]]></summary><media:thumbnail xmlns:media="http://search.yahoo.com/mrss/" url="https://www.andrewdenty.com/blog/assets/img/gay-places-graphic.png" /><media:content medium="image" url="https://www.andrewdenty.com/blog/assets/img/gay-places-graphic.png" xmlns:media="http://search.yahoo.com/mrss/" /></entry><entry><title type="html">How to Install Pi-hole on Windows 11</title><link href="https://www.andrewdenty.com/blog/2022/03/13/installing-pi-hole-on-windows-11.html" rel="alternate" type="text/html" title="How to Install Pi-hole on Windows 11" /><published>2022-03-13T08:05:00+00:00</published><updated>2022-03-13T08:05:00+00:00</updated><id>https://www.andrewdenty.com/blog/2022/03/13/installing-pi-hole-on-windows-11</id><content type="html" xml:base="https://www.andrewdenty.com/blog/2022/03/13/installing-pi-hole-on-windows-11.html"><![CDATA[<p><img src="/blog/assets/img/install-pihole-on-windows-11-using-docker.png" alt="Pi-hole on Windows 11" /></p>

<h3 id="what-is-pi-hole-and-why-run-it-on-windows">What is Pi-hole and why run it on Windows?</h3>

<p>Two years ago I wrote a step by step guide explaining <a href="/blog/2020/01/25/installing-pi-hole-on-windows-10.html">how to install Pi-hole on Windows 10</a> to block ads on your home network.</p>

<p>I definitely was not prepared for the response! The post received hundreds of thousands of visits and heaps of helpful comments that helped me improve and refine the instructions.
I wrote the blog so that I’d have a go-to guide in case I ever had to set up Pi-hole on a new Windows install. However I somehow accidentally became the creator of an online resource that helps a community of tinkerers have a slightly better online life.</p>

<p>Anyway, times move on. Pi-hole and Windows have continued to evolve over the past two years. I recently built a new computer and moved to Windows 11. So here’s an updated guide of how to Install Pi-hole on Windows 11.</p>

<p>If you’re wondering if it’s worth running Pi-hole on Windows, or should I just buy a Raspberry Pi, take a look at my <a href="/blog/2020/04/24/review-living-with-pi-hole-on-windows-10.html">review of Pi-hole on Windows</a>.</p>

<h3 id="what-youll-need">What you’ll need</h3>
<p>A Windows 11 PC which you’re happy to leave on all of the time. Preferably a power efficient, quiet PC. In my case I’m using an Intel NUC. Don’t forget to change your power settings to prevent your PC from going to sleep.</p>

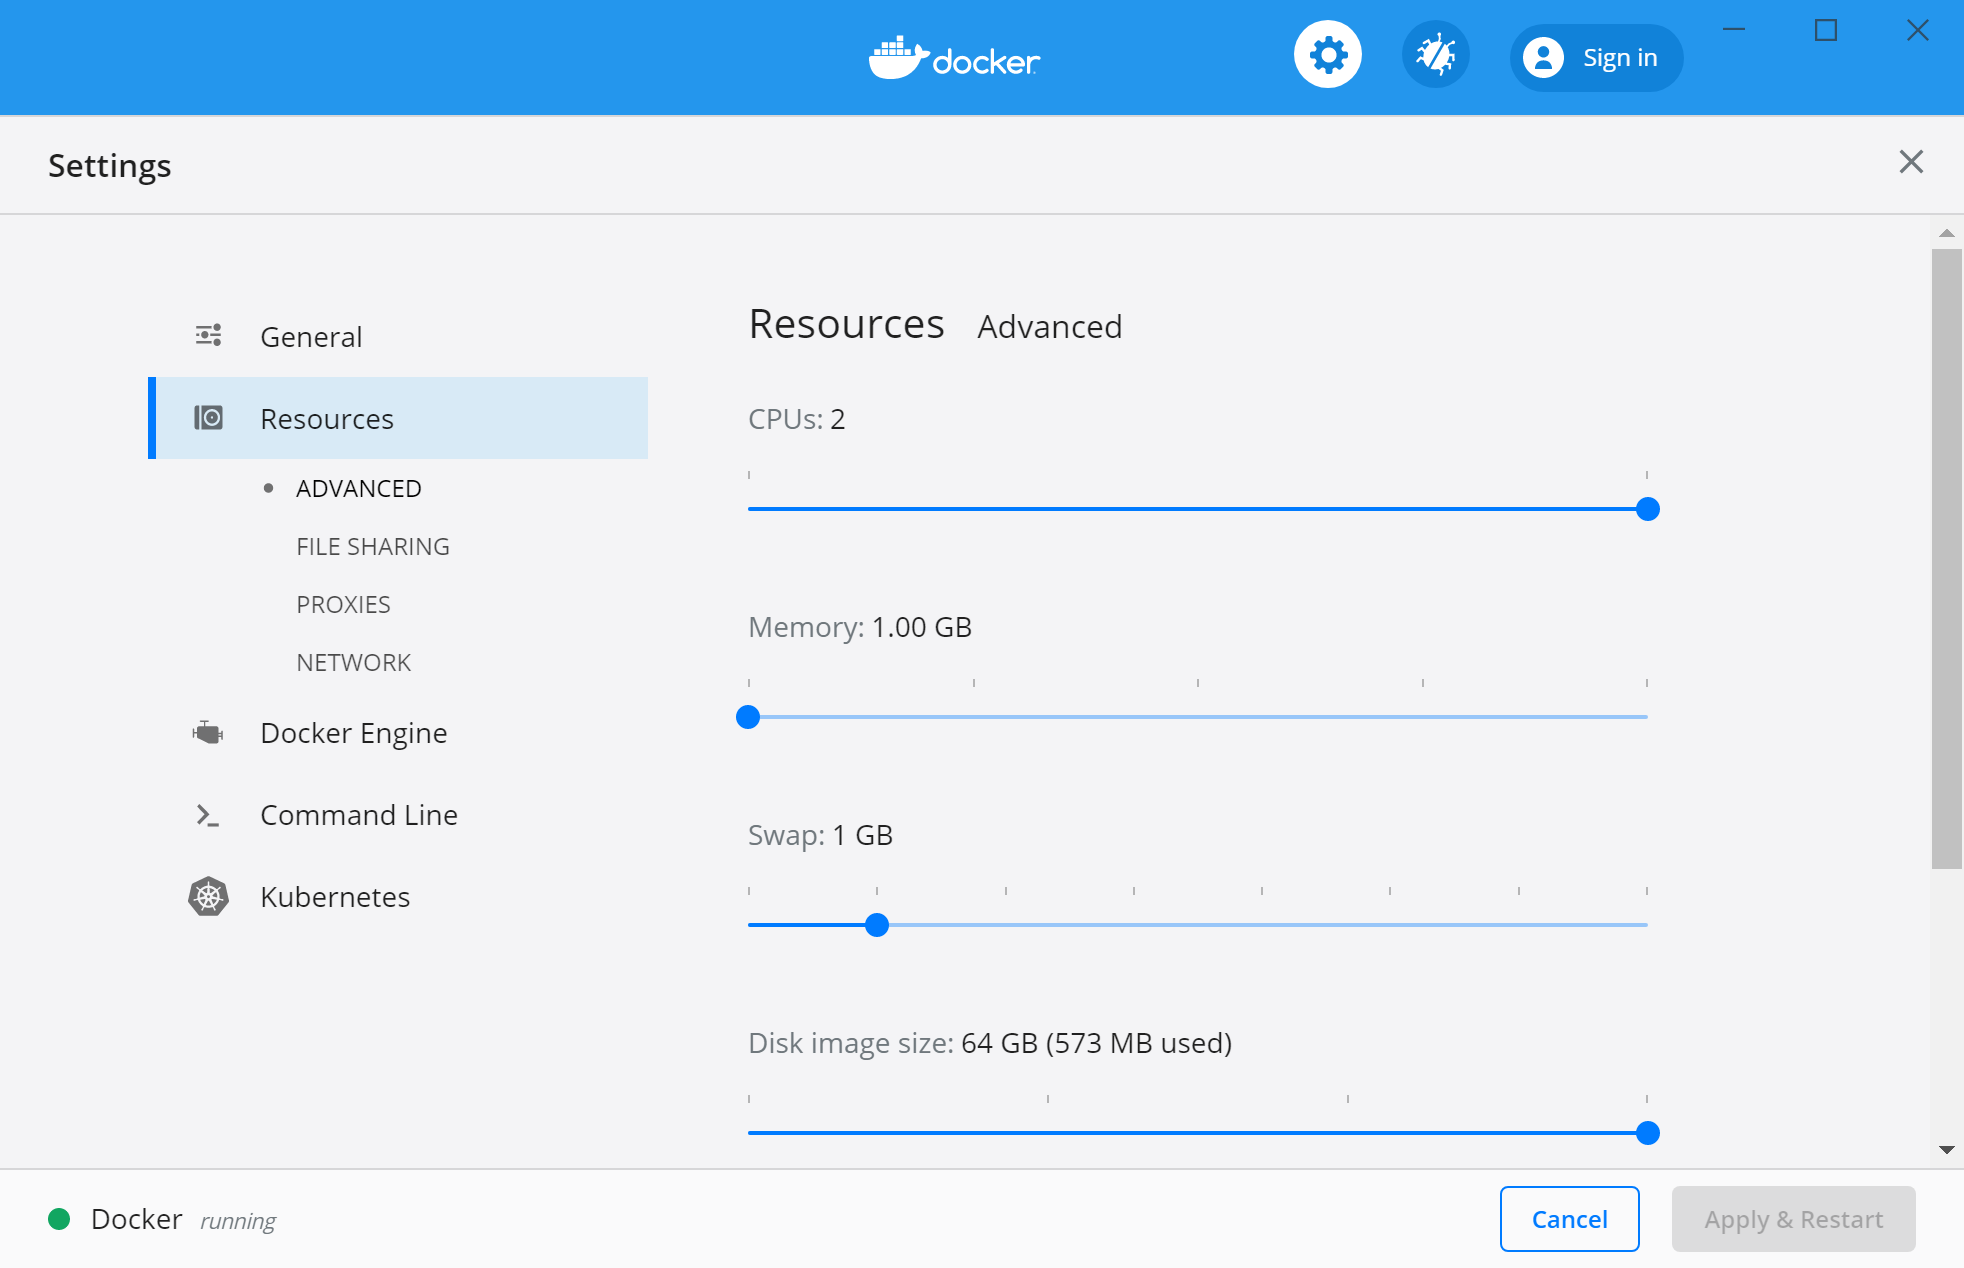
<p>Since the original version of this guide, it’s now possible to install Docker on both Home and Professional versions of Windows. This is thanks to a new technology called Windows Subsystem for Linux (WSL).</p>

<p>If you have a Mac, you can also install Pi-hole on MacOS using a similar process to the one described below.</p>

<h3 id="step-by-step-instructions">Step by step instructions</h3>
<h4 id="step-1---download-and-install-docker-for-windows">Step 1 - Download and install Docker for Windows</h4>
<p><a href="https://www.docker.com/products/docker-desktop" target="_blank">Download Docker for Windows</a>.There used to be a requirement to create a Docker account, but luckily this is no longer required for personal use.</p>

<p><img src="/blog/assets/img/1-download-docker-windows-11.png" alt="Download Docker for Windows" />
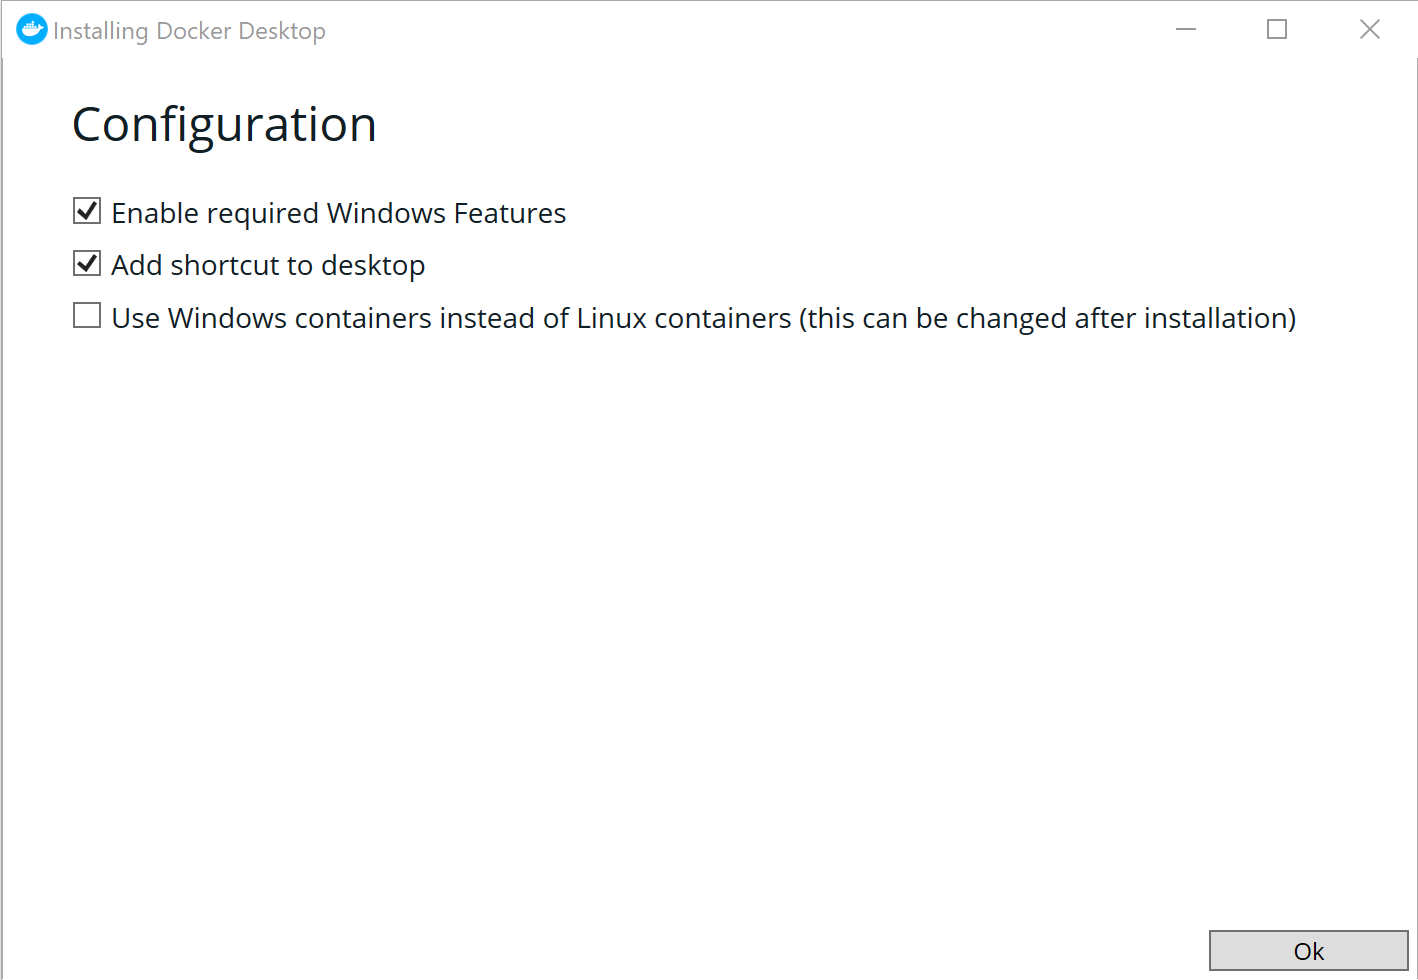
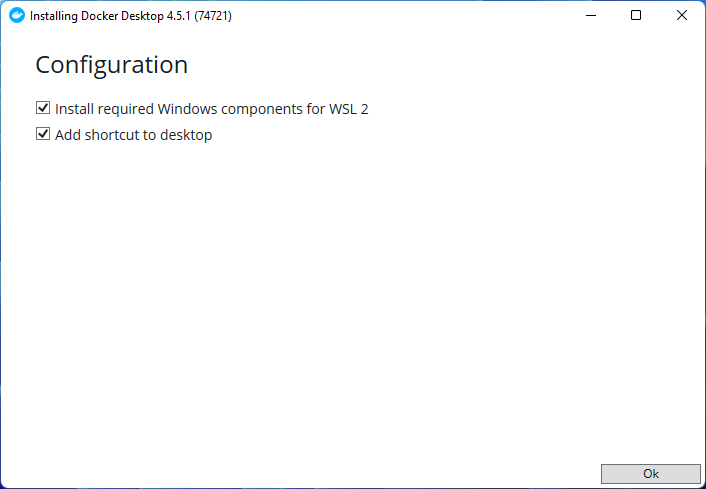
Once downloaded, install Docker. Make sure to leave the “<strong>Install required Windows components for WSL 2</strong>” option ticked.</p>

<p><img src="/blog/assets/img/2-install-docker-windows-11.png" alt="Docker for Windows install options" />
After installing you will need to reboot. Once your computer restarts, Docker should automatically start.</p>
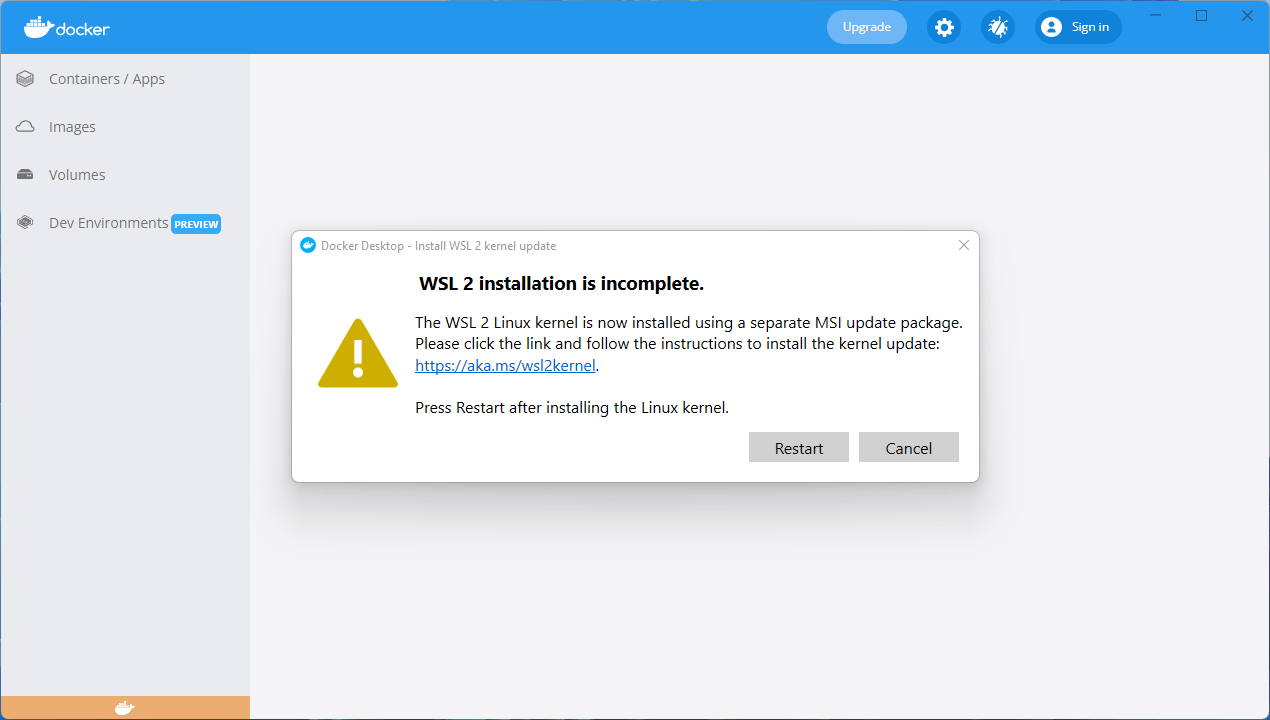
<p><img src="/blog/assets/img/3-docker-complete-wsl2-installation.png" alt="WSL 2 Installation Incomplete" />
If you don’t already have WSL 2 installed, you may be prompted to download and install it separately from the <a href="https://docs.microsoft.com/en-gb/windows/wsl/install-manual#step-4---download-the-linux-kernel-update-package" target="_blank">Microsoft Website</a>.</p>
<p>This is a small download and the installation completes very quickly. Once this is done, head back to Docker and click “Restart”. Docker should now be ready to use.</p>

<p>Docker will present you with a tutorial. Either walk through the tutorial, or click skip if you want to dive right in.</p>

<h4 id="step-2---download-pi-hole">Step 2 - Download Pi-hole</h4>
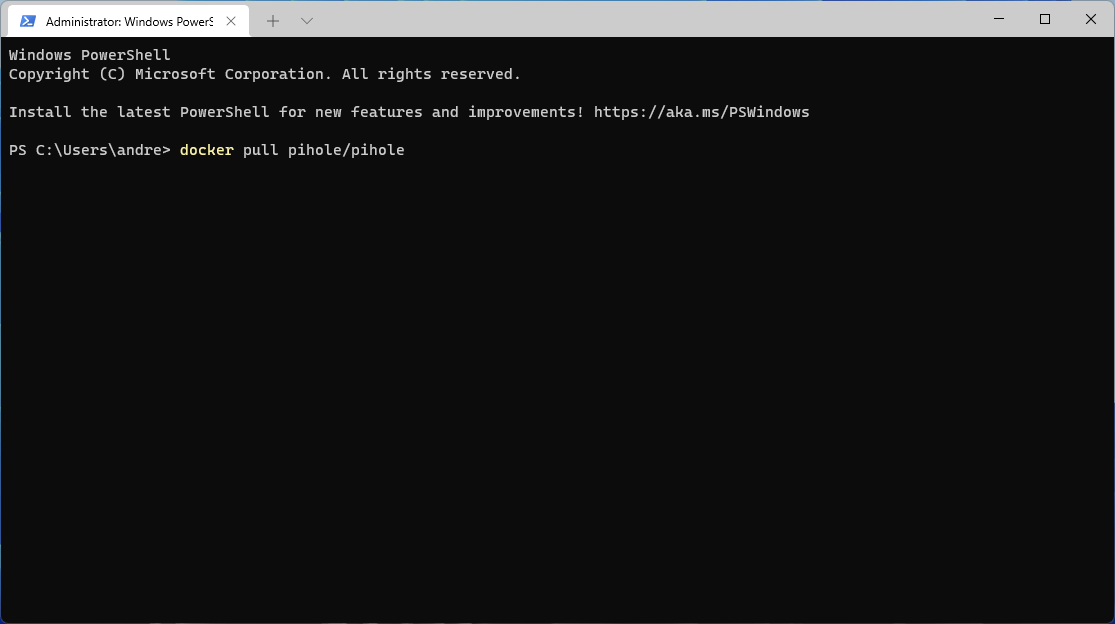
<p>To download the Pi-hole container, open Windows Command Prompt as an administrator and type the following command: <code class="language-plaintext highlighter-rouge">docker pull pihole/pihole</code> 
Pi-hole will now download into a Docker container.</p>

<p><img src="/blog/assets/img/4-download-pi-hole-windows-command-prompt.png" alt="Downloading Pi-hole from the Windows Command Prompt" /></p>
<h4 id="step-3---give-your-pc-a-static-ip-address">Step 3 - Give your PC a static IP address</h4>
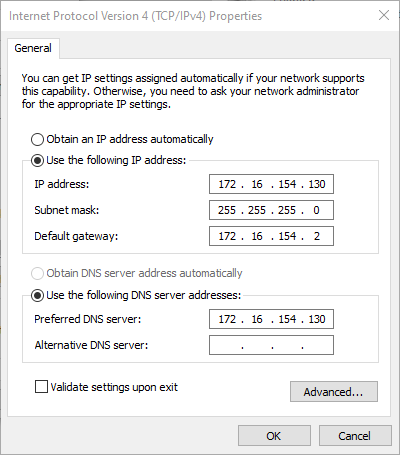
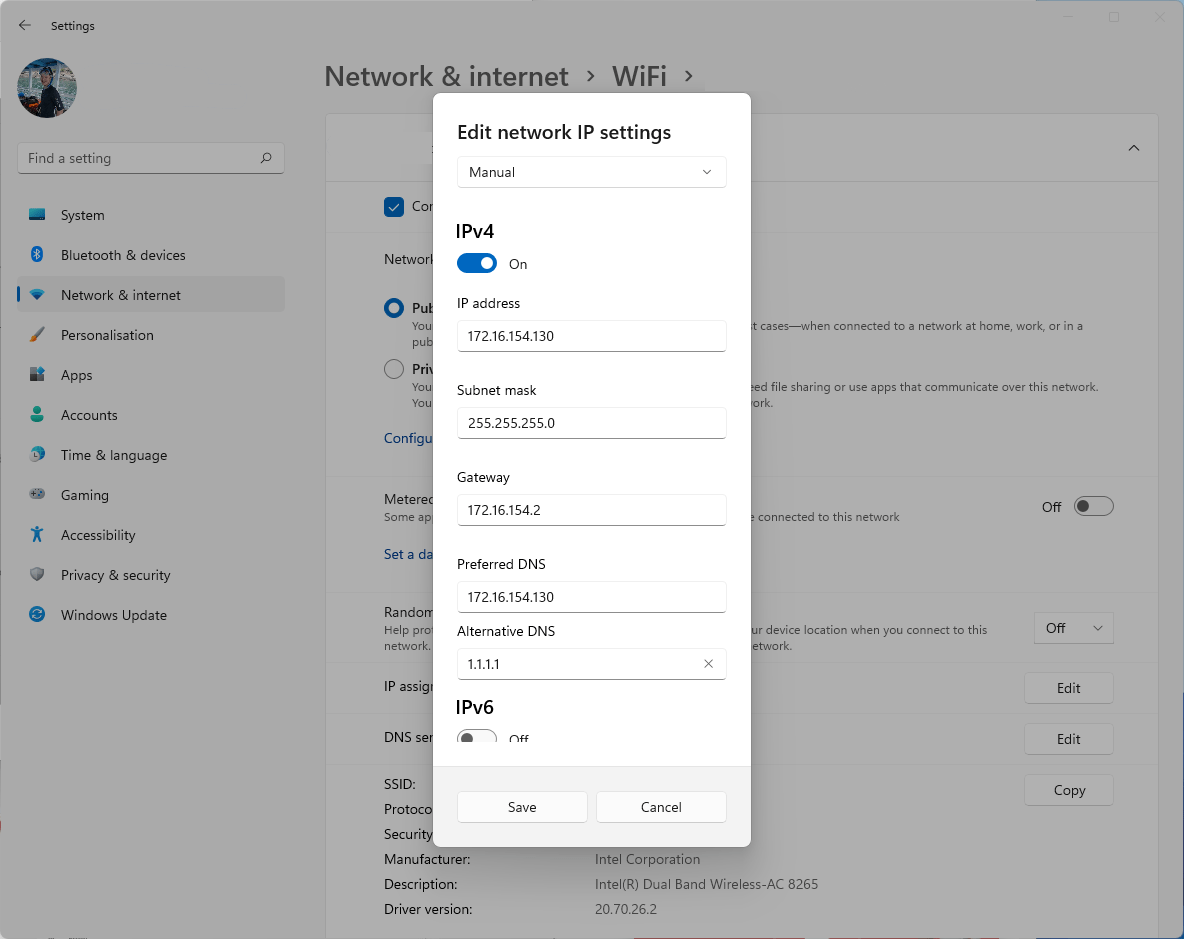
<p>The next step is to give your Windows PC a static IP address so it can be reliably reached on your network. To do this, head to Windows Settings (right click on the start button and click “<strong>Settings</strong>”).</p>

<ol>
  <li>Select “<strong>Network &amp; internet</strong>” from the sidebar menu.</li>
  <li>Click on <strong>WiFi</strong>, (or Ethernet if you’re using a wired connection). Then click on the network properties item. This will most likely be prefaced with your network name.</li>
  <li>Half way down the page, click “<strong>Edit</strong>” alongside IP assignment.</li>
  <li>This will launch the “<strong>Edit network IP settings</strong>” dialog. Select manual from the dropdown list.</li>
  <li>In the dialog that pops up, set a manual IP address.</li>
</ol>

<p><img src="/blog/assets/img/5-windows-11-set-static-ip-address.png" alt="Windows 11 IP address settings" />
<strong>Tips for setting a static IP address:</strong></p>
<ul>
  <li>Set a manual IP address. If you are unsure what to use for the subnet mask or default gateway, type <code class="language-plaintext highlighter-rouge">ipconfig</code> in the command prompt and reuse the same values for the IP address.</li>
  <li>I recommend increasing the last number of your IP address by 50 or so to make IP address conflicts less likely on your network. For example, if your IP address was 192.168.0.5 try 192.168.0.55.</li>
  <li>For DNS settings, use the IP address of your machine you have just set and for an alternative use <code class="language-plaintext highlighter-rouge">1.1.1.1.</code> (this is <a href="https://1.1.1.1/dns/" target="_blank">Cloudflare’s DNS service</a>).</li>
  <li>You only need to configure IPv4.</li>
</ul>

<h4 id="step-4---create-a-customized-docker-command">Step 4 - create a customized Docker command</h4>
<p>Now Docker is running and Pi-hole is downloaded we can configure and start it. You will need to customise your script. Here’s a base:</p>

<p><code class="language-plaintext highlighter-rouge">docker run -d --name pihole -e ServerIP=172.16.154.130 -e WEBPASSWORD=password -e TZ=Europe/Copenhagen -e DNS1=127.17.0.1 -e DNS2=1.1.1.1 -e DNS3=1.0.0.1 -p 80:80 -p 53:53/tcp -p 53:53/udp -p 443:443 --restart=unless-stopped pihole/pihole:latest</code></p>

<p><strong>You will need to replace:</strong></p>
<ul>
  <li><code class="language-plaintext highlighter-rouge">ServerIP</code> with your IP address</li>
  <li><code class="language-plaintext highlighter-rouge">WEBPASSWORD</code> with a password of your choosing (you’ll use this to access Pi-hole’s settings)</li>
  <li><code class="language-plaintext highlighter-rouge">TZ=</code> this is optional. You can specify your timezone in the <a href="https://en.wikipedia.org/wiki/List_of_tz_database_time_zones" target="_blank">TZ format</a></li>
</ul>

<p>Note: <code class="language-plaintext highlighter-rouge">DNS1</code> needs to be left as <code class="language-plaintext highlighter-rouge">127.17.0.1</code> in order for Pi-hole to work. If you’re curious, 127.17.0.1 is the IP address for Localhost (or in other words <em>this computer</em>). You can change <code class="language-plaintext highlighter-rouge">DNS2</code> and <code class="language-plaintext highlighter-rouge">DNS3</code> to whatever you like.</p>

<p>The base script above will get you up and running, however if you want to customise how Pi-hole works, there are a <a href="https://github.com/pi-hole/docker-pi-hole#environment-variables" target="_blank">number of variables you can set as part of this script</a>.</p>

<p>You’ll also find more information and documentation on the <a href="https://github.com/pi-hole/docker-pi-hole" target="_blank">Docker Pi-hole Docker Github page</a>.</p>

<h4 id="step-5---run-your-script-and-start-your-pi-hole-server">Step 5 - run your script and start your Pi-hole server</h4>
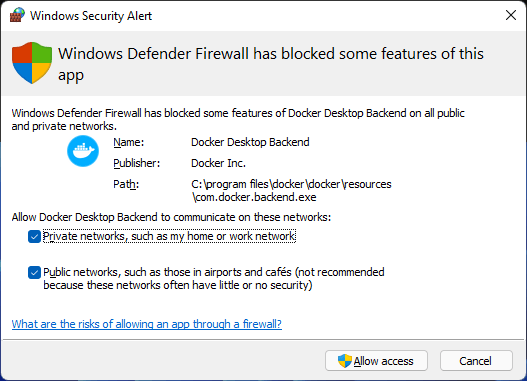
<p>Open command prompt as an administrator again and paste in your customised command and press enter. This will create your Pi-hole Docker container and run it.
You may receive a Windows Firewall pop-up. I’d recommend allowing access to both public and private networks to avoid any problems.
And that’s it!</p>

<p><img src="/blog/assets/img/6-windows-11-firewall-dialog-pi-hole.png" alt="Windows 11 Firewall dialog" /></p>
<h4 id="step-6---check-pi-hole-is-up-and-running">Step 6 - Check Pi-hole is up and running</h4>

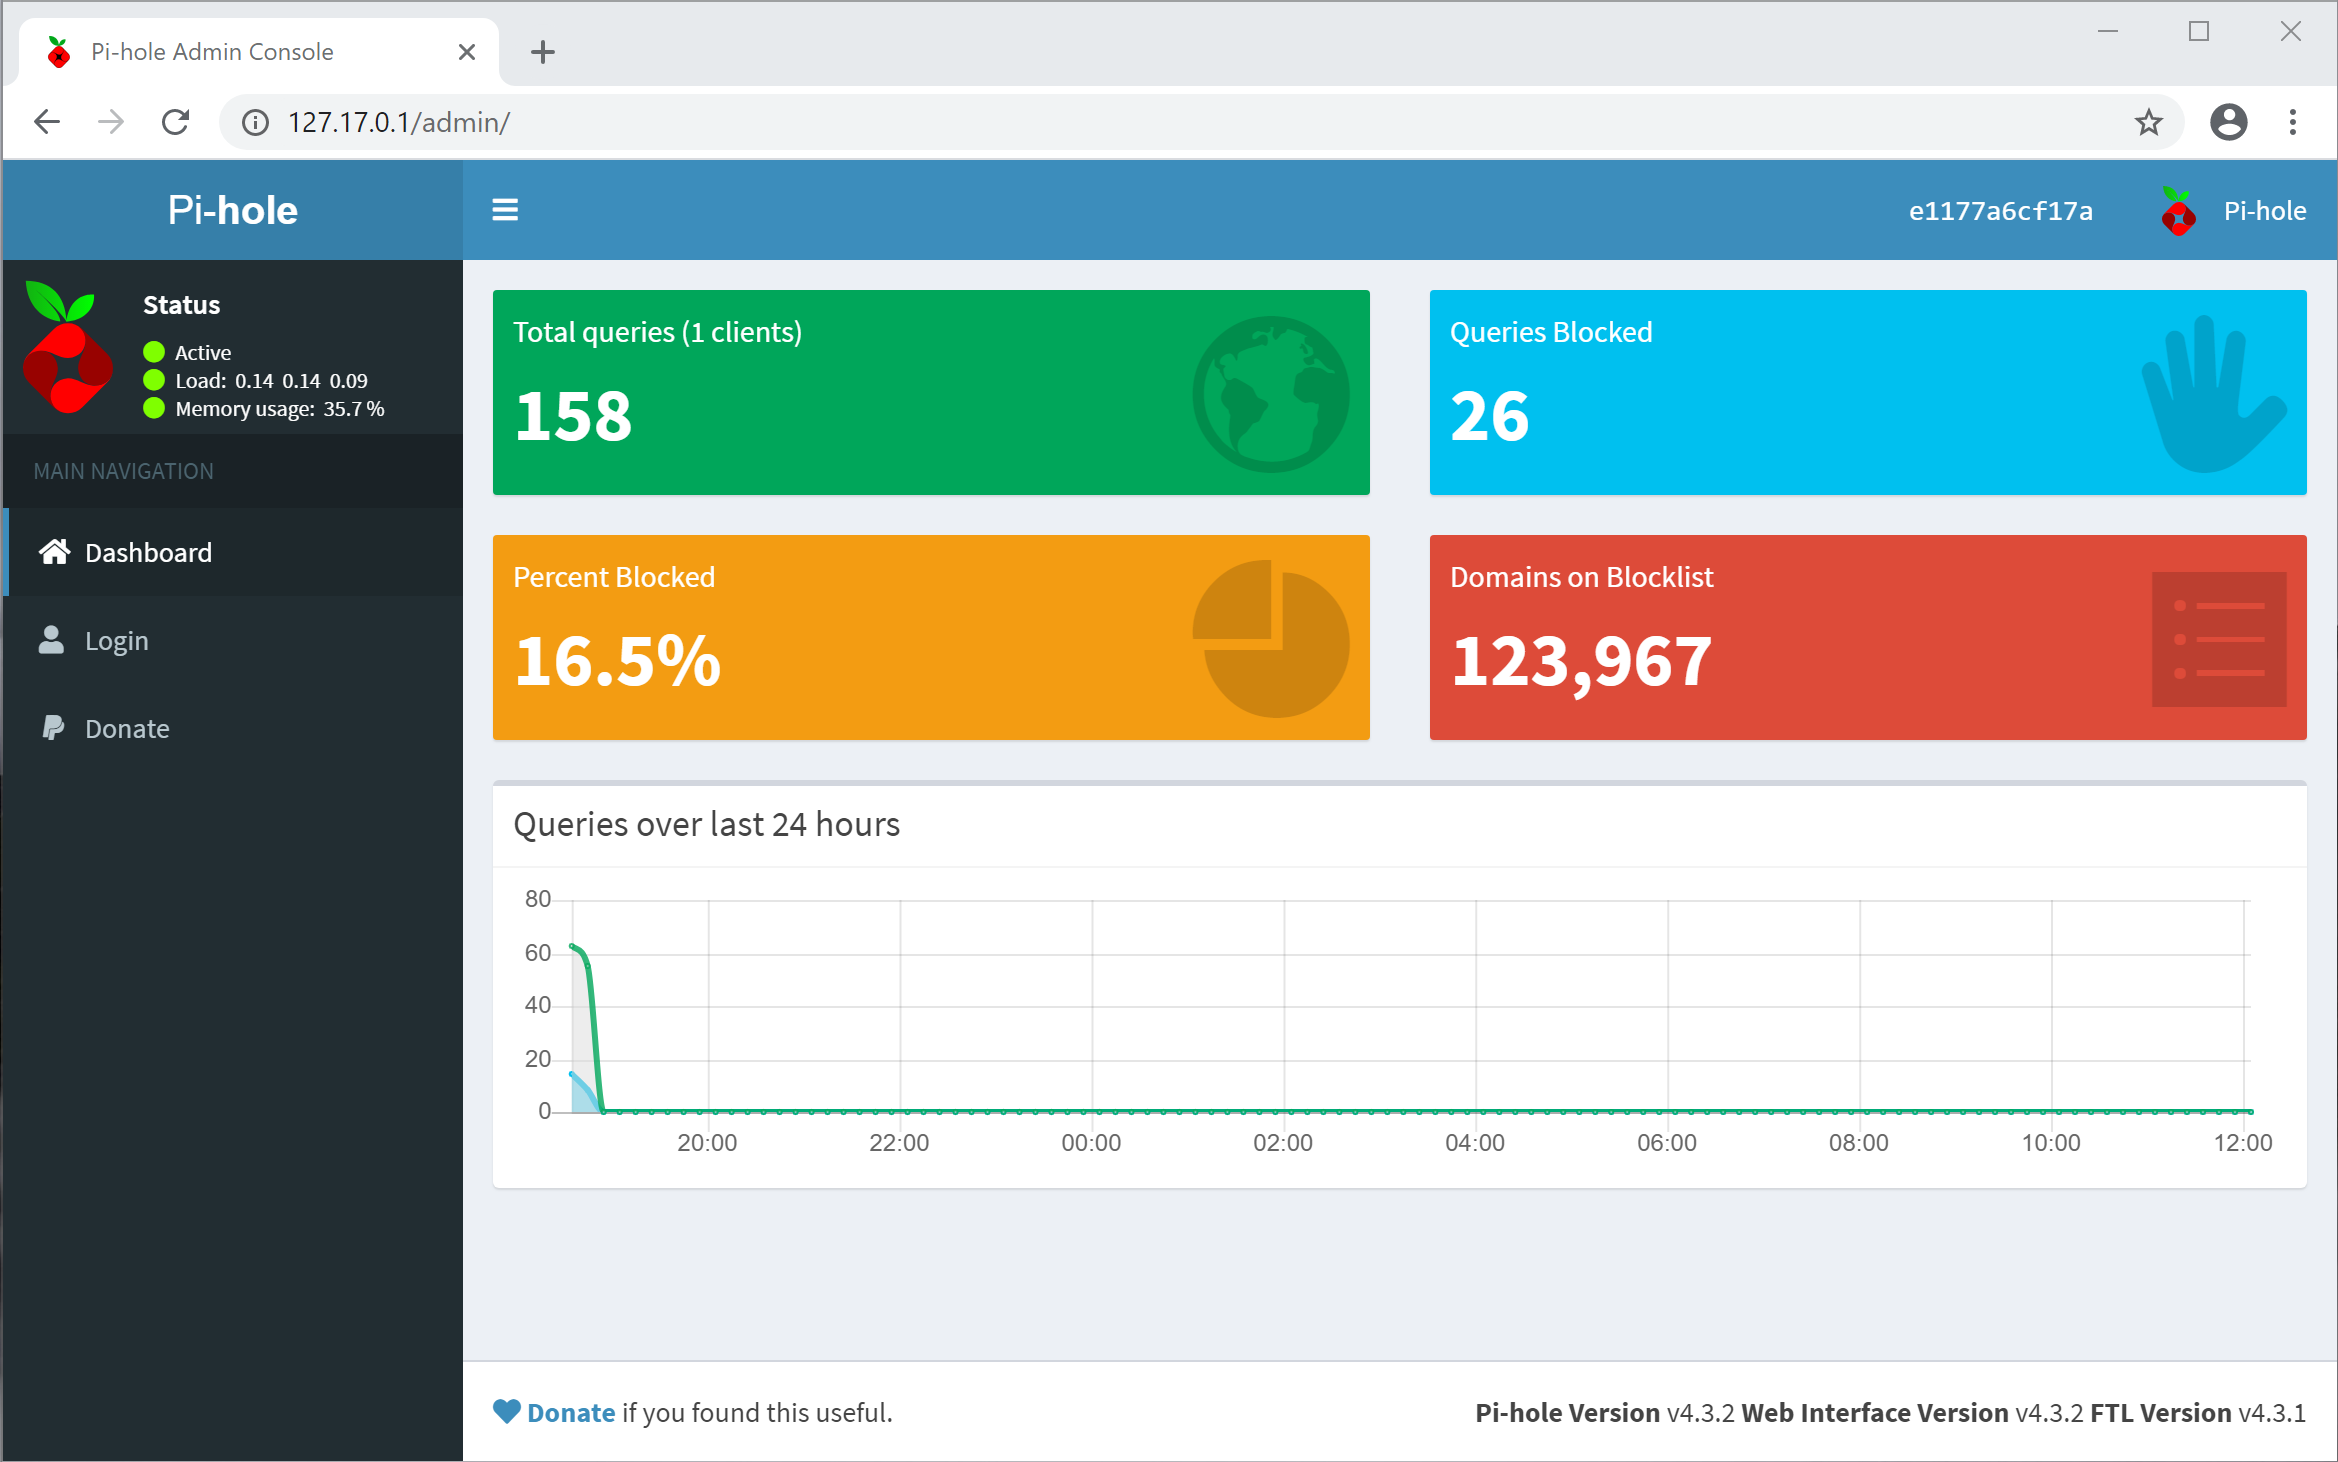
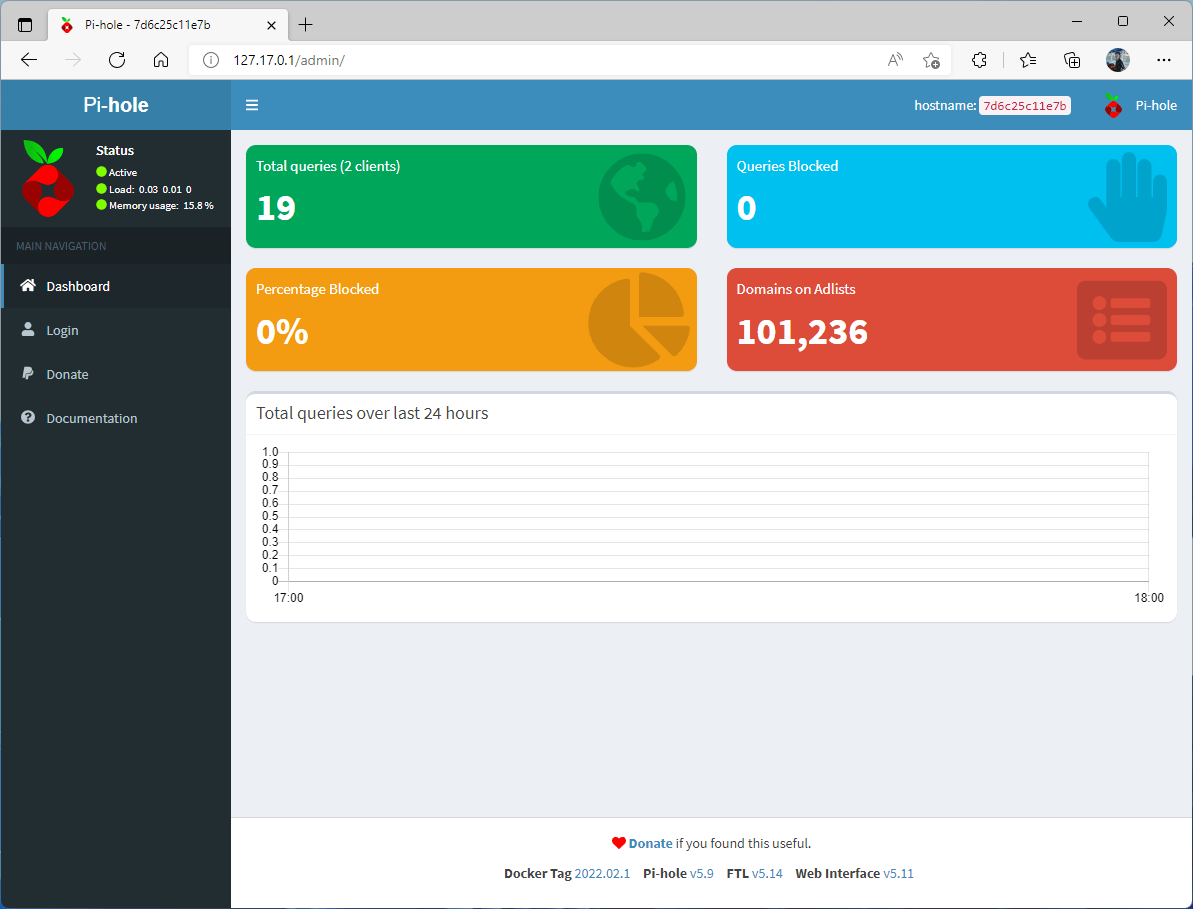
<p>Go to your web browser and type - <a href="http://127.17.0.1/admin/" target="_blank">http://127.17.0.1/admin/</a> or http://localhost/admin/  you should see the Pi-hole admin console. This means you’re up and running!</p>

<p><img src="/blog/assets/img/windows-11-pi-hole-dashboard.png" alt="Pi-hole admin interface" />
The Pi-hole admin console lets you configure the advanced settings of Pi-hole, see which domains have been blocked as well as  blacklisting or whitelisting new domains.</p>

<h4 id="step-7---configure-your-router">Step 7 - Configure your router</h4>
<p>The final step is to change the DNS server on your router to point to your PC. In my case this is <code class="language-plaintext highlighter-rouge">172.16.154.130</code>. This will ensure all of the devices on your network get Pi-hole’s ad blocking magic.</p>

<p>Congratulations! At this point, you should have a Pi-hole protected home. I’ll make sure to update this guide from time-to-time. In the meantime, feel free to comment with any questions or feedback!</p>

<h3 id="faqs">FAQs</h3>
<p>There’s an extensive <a href="/blog/2020/01/25/installing-pi-hole-on-windows-10.html">FAQ section</a> on my previous article focused on setting up Pi-hole on Windows 10. A lot of the FAQs are still relevant.</p>]]></content><author><name></name></author><category term="Pi-hole" /><category term="Docker" /><category term="Ad-blocking" /><category term="hacker project" /><category term="Windows 11" /><category term="Privacy" /><summary type="html"><![CDATA[]]></summary><media:thumbnail xmlns:media="http://search.yahoo.com/mrss/" url="https://www.andrewdenty.com/blog/assets/img/install-pihole-on-windows-11-using-docker.png" /><media:content medium="image" url="https://www.andrewdenty.com/blog/assets/img/install-pihole-on-windows-11-using-docker.png" xmlns:media="http://search.yahoo.com/mrss/" /></entry><entry><title type="html">How transparency helps us become better designers</title><link href="https://www.andrewdenty.com/blog/2020/10/29/how-transparency-helps-us-become-better-designers.html" rel="alternate" type="text/html" title="How transparency helps us become better designers" /><published>2020-10-29T06:49:00+00:00</published><updated>2020-10-29T06:49:00+00:00</updated><id>https://www.andrewdenty.com/blog/2020/10/29/how-transparency-helps-us-become-better-designers</id><content type="html" xml:base="https://www.andrewdenty.com/blog/2020/10/29/how-transparency-helps-us-become-better-designers.html"><![CDATA[<p><img src="/blog/assets/img/design-transparency-cover.png" alt="How transparency helps us become better designers" />
Ever since becoming a Product Designer I’ve been on a gradual journey of realising that being open and transparent with your work is almost always better. At first working in an open and transparent fashion felt counter-intuitive.</p>

<p>Don’t designers need to lock themselves away in a basement and wait for inspiration to strike?  In most cases this couldn’t be further from the truth. In my experience, the more (and earlier) cycles of feedback and input you get on any project almost always result in a tighter, more useful end product.</p>

<p>This is an article I wrote recently for The Org exploring the benefits of adopting a transparent design process.</p>

<p><strong>Link</strong> - <a href="https://theorg.com/insights/how-transparency-helps-us-become-better-designers" target="_blank">How transparency helps us become better designers (Andrew Denty on The Org Insights)</a></p>]]></content><author><name></name></author><category term="Design Process" /><category term="Transparency" /><category term="The Org" /><category term="Figma" /><category term="Product Design" /><summary type="html"><![CDATA[Ever since becoming a Product Designer I’ve been on a gradual journey of realising that being open and transparent with your work is almost always better. At first working in an open and transparent fashion felt counter-intuitive.]]></summary><media:thumbnail xmlns:media="http://search.yahoo.com/mrss/" url="https://www.andrewdenty.com/blog/assets/img/transparency-thumb.jpg" /><media:content medium="image" url="https://www.andrewdenty.com/blog/assets/img/transparency-thumb.jpg" xmlns:media="http://search.yahoo.com/mrss/" /></entry><entry><title type="html">How to pause your Audible subscription without losing your credits</title><link href="https://www.andrewdenty.com/blog/2020/10/27/how-to-pause-your-audible-subscription-without-losing-your-credits.html" rel="alternate" type="text/html" title="How to pause your Audible subscription without losing your credits" /><published>2020-10-27T20:10:00+00:00</published><updated>2020-10-27T20:10:00+00:00</updated><id>https://www.andrewdenty.com/blog/2020/10/27/how-to-pause-your-audible-subscription-without-losing-your-credits</id><content type="html" xml:base="https://www.andrewdenty.com/blog/2020/10/27/how-to-pause-your-audible-subscription-without-losing-your-credits.html"><![CDATA[<p><img src="/blog/assets/img/audible/pause-audible.png" alt="How to pause your Audible subscription" />
I love Audible.</p>

<p>It’s a fantastic way to absorb books. A few years ago I had a daily cycle commute across Copenhagen which meant I was cycling for almost an hour every day. During this time Audible helped me use this time to devour books.</p>

<p>However since then I’ve moved apartments and jobs. I still find Audible valuable, I just can’t get through audiobooks in the way that I used to. I’ve often found my Audible credits are building up faster than I can get through audiobooks.</p>

<p>There is one thing I don’t like about Audible though. The dark patterns it employs in its attempts to keep users from unsubscribing. In fact I’d argue they’re downright nefarious. At every step of the cancellation process Audible’s design does its best to obscure your choices. You are repeatedly told that if you cancel, you will lose your valuable credits. To be clear you can pause your subscription for 30, 60 or 90 days at any time.</p>

<p>Therefore I thought it was only fair to demystify the process of pausing your subscription</p>

<h3 id="how-to-pause-your-audible-subscription">How to pause your Audible Subscription</h3>
<h4 id="step-one">Step one</h4>
<p>Head to the “Account Details” section under the profile menu.</p>

<p><img src="/blog/assets/img/audible/pause-audible-step-1.png" alt="Pause Audible Step 1" /></p>
<h4 id="step-two">Step two</h4>
<p>Click “Cancel membership”.</p>

<p><img src="/blog/assets/img/audible/pause-audible-step-2.png" alt="Pause Audible Step 2" /></p>
<h4 id="step-three">Step three</h4>
<p>This is the first step in the process which is a bit misleading as it implies clicking “continue cancelling” will result in losing your credits. This is not the case. Your credits are safe at this point. Click “continue cancelling”.</p>

<p><img src="/blog/assets/img/audible/pause-audible-step-3.png" alt="Pause Audible Step 3" /></p>
<h4 id="step-four">Step four</h4>
<p>At this point things seem to start seeming very final. Again this is not the case, simply keep “I don’t use it enough” selected and click “Cancel membership”.</p>

<p><img src="/blog/assets/img/audible/pause-audible-step-4.png" alt="Pause Audible Step 4" /></p>
<h4 id="step-five">Step five</h4>
<p>Finally the options! From here you can choose to either pause your membership, or select one of the other available offers. What you see here may vary slightly. In the past I have also been offered a 3 month membership period at half-price.</p>

<p><img src="/blog/assets/img/audible/pause-audible-step-5-the-options.png" alt="Pause Audible Step 5" /></p>
<h4 id="step-six">Step six</h4>
<p>Enjoy your membership break and use up those credits. Don’t forget that Audible credits expire 12 months after being issued. Pausing your membership won’t prevent credits expiring.</p>

<h3 id="what-about-annual-audible-plans">What about annual Audible plans?</h3>
<p>If you have an annual Audible plan, you won’t be able to pause your subscription. This is because you have effectively prepaid for the entire year upfront. However you can cancel your subscription and you will still be able to keep and access any audiobooks in your Library, even without a membership.</p>

<h3 id="looking-for-a-way-to-use-up-your-spare-credits">Looking for a way to use up your spare credits?</h3>
<p>If you have a few credits to use up and would like some book recommendations, these are some books I’ve thoroughly enjoyed on Audible:</p>
<ul>
  <li><a href="https://www.audible.co.uk/pd/Good-Strategy-Bad-Strategy-Audiobook/0593162927?qid=1603833187&amp;sr=1-1&amp;ref=a_search_c3_lProduct_1_1&amp;pf_rd_p=c6e316b8-14da-418d-8f91-b3cad83c5183&amp;pf_rd_r=5JFASJKHDJ4P35XGD8SX" target="_blank">Good Strategy Bad Strategy by Richard Rumelt</a></li>
  <li><a href="https://www.audible.co.uk/pd/Putin-Prisoner-of-Power-Audiobook/B07W4WVNXK?qid=1603830695&amp;sr=1-1&amp;ref=a_search_c3_lProduct_1_1&amp;pf_rd_p=c6e316b8-14da-418d-8f91-b3cad83c5183&amp;pf_rd_r=812CZ9E5J3AY3BKRPY6E" target="_blank">Putin: Prisoner of Power by Misha Glenny</a></li>
  <li><a href="https://www.audible.co.uk/pd/Alchemy-Audiobook/1473566800?ref=a_library_t_c5_libItem_&amp;pf_rd_p=da5752e8-6ae2-4c79-a3e2-1ab92e079358&amp;pf_rd_r=5YHD41QDSE93NXM2QGB1" target="_blank">Alchemy: The Surprising Power of Ideas That Don’t Make Sense by Rory Sutherland</a></li>
  <li><a href="https://www.audible.co.uk/pd/Atomic-Habits-Audiobook/1473565421?ref=a_library_t_c5_libItem_&amp;pf_rd_p=da5752e8-6ae2-4c79-a3e2-1ab92e079358&amp;pf_rd_r=CN439FNY4S2Y7WEZA0BX" target="_blank">Atomic Habits by James Clear</a></li>
  <li><a href="https://www.audible.co.uk/pd/The-Design-of-Everyday-Things-Audiobook/B07L5RH9LZ?ref=a_library_t_c5_libItem_&amp;pf_rd_p=da5752e8-6ae2-4c79-a3e2-1ab92e079358&amp;pf_rd_r=CN439FNY4S2Y7WEZA0BX" target="_blank">The Design of Everyday Things: Revised and Expanded Edition by Don Norman</a></li>
  <li><a href="https://www.audible.co.uk/pd/At-Home-A-Short-History-of-Private-Life-Audiobook/B004FTITV4?ref=a_library_t_c5_libItem_&amp;pf_rd_p=da5752e8-6ae2-4c79-a3e2-1ab92e079358&amp;pf_rd_r=CN439FNY4S2Y7WEZA0BX" target="_blank">At Home: A Short History of Private Life by Bill Bryson</a></li>
</ul>]]></content><author><name></name></author><category term="Audible" /><category term="Dark patterns" /><category term="life hacks" /><summary type="html"><![CDATA[I love Audible.]]></summary><media:thumbnail xmlns:media="http://search.yahoo.com/mrss/" url="https://www.andrewdenty.com/blog/assets/img/audible/pause-audible.png" /><media:content medium="image" url="https://www.andrewdenty.com/blog/assets/img/audible/pause-audible.png" xmlns:media="http://search.yahoo.com/mrss/" /></entry><entry><title type="html">Recreating an Apple event invite in Figma</title><link href="https://www.andrewdenty.com/blog/2020/10/07/reverse-engineering-apple-event-graphics.html" rel="alternate" type="text/html" title="Recreating an Apple event invite in Figma" /><published>2020-10-07T19:06:00+00:00</published><updated>2020-10-07T19:06:00+00:00</updated><id>https://www.andrewdenty.com/blog/2020/10/07/reverse-engineering-apple-event-graphics</id><content type="html" xml:base="https://www.andrewdenty.com/blog/2020/10/07/reverse-engineering-apple-event-graphics.html"><![CDATA[<p><img src="/blog/assets/img/apple-event-reverse-engineered.jpg" alt="Recreating an Apple event invite in Figma" /></p>

<p>This week as a side project I decided to recreate this year’s October Apple event invite in Figma.</p>

<h3 id="why-do-this">Why do this?</h3>

<p>Every Apple event has its own particular style with beautifully crafted graphics specific to that event. This October’s event was announced yesterday with an invite including almost luminous overlapping circles. Personally, this is one of my favourites; it reminds me of looking up into a <a href="https://www.louispoulsen.com/en/catalog/private/pendants/ph-5?v=90293-5741099812-01&amp;t=about" target="_blank">Louis Poulsen PH5 lamp</a> . This got me wondering what the actual inspiration was, and how it was created.</p>

<p>I then decided to have a go at recreating it this as one area I’d like to improve my skills is in creating illustrations. Most of my work is creating web pages and user interfaces, but rarely do I try something a little more whimsical.</p>

<h3 id="why-figma">Why Figma?</h3>
<p>Yep, I know Figma is absolutely the wrong tool to use for this task, but I really love how versatile Figma is, and I’m pretty comfortable using it as I use it for pretty much everything from flow charts to high fidelity interface mock-ups at work.</p>

<p>I wasn’t sure how to get started, but through the process of trial and error I’ve created a reasonably realistic knock-off of Apple’s original. Apple, please don’t sue me :-)</p>

<p>If you’re interested you’re more than welcome to take a look at the original in Figma. I’d love to know how it could be improved - there are certainly some areas where the lighting effects are not quite right.</p>

<p><a href="/blog/assets/img/apple-invite-comparison.png"><img src="/blog/assets/img/apple-invite-comparison.png" alt="Comparison of the Apple event invite and my Figma recreation" /></a></p>

<p><a href="https://www.figma.com/file/L2QZKwroB6UutnUPI1SbP8/Apple-Kata?node-id=0%3A1" target="_blank">View or fork the project in Figma</a></p>

<p>Let me know in the comments if you have any suggestions or tips for ways of improving it.</p>]]></content><author><name></name></author><category term="Graphic Design" /><category term="Figma" /><category term="Apple" /><category term="Visual design" /><summary type="html"><![CDATA[]]></summary><media:thumbnail xmlns:media="http://search.yahoo.com/mrss/" url="https://www.andrewdenty.com/blog/assets/img/apple-event-reverse-engineered.jpg" /><media:content medium="image" url="https://www.andrewdenty.com/blog/assets/img/apple-event-reverse-engineered.jpg" xmlns:media="http://search.yahoo.com/mrss/" /></entry><entry><title type="html">How to design for the almost offline edge case</title><link href="https://www.andrewdenty.com/blog/2020/08/02/how-to-design-for-the-almost-offline-edge-case.html" rel="alternate" type="text/html" title="How to design for the almost offline edge case" /><published>2020-08-02T12:02:00+00:00</published><updated>2020-08-02T12:02:00+00:00</updated><id>https://www.andrewdenty.com/blog/2020/08/02/how-to-design-for-the-almost-offline-edge-case</id><content type="html" xml:base="https://www.andrewdenty.com/blog/2020/08/02/how-to-design-for-the-almost-offline-edge-case.html"><![CDATA[<p><img src="/blog/assets/img/almost-offline-edge-case-design.png" alt="Almost offline edge case design" /></p>

<p>Here’s a lesson on designing for edge cases that I learned while travelling around Greece this summer.</p>

<p>We were lucky enough to be able to hike in the northern mountainous region of <a href="https://www.parttimebackpacker.com/blog/2016/6/27/zagoria-greeces-hidden-wilderness" target="_blank">Zagoria</a> and then spend some time on the island of the Milos where we mostly ate too much and sat on the beach. Either way, this post is not about my holiday, but about a usability edge case that it exposed me to…</p>

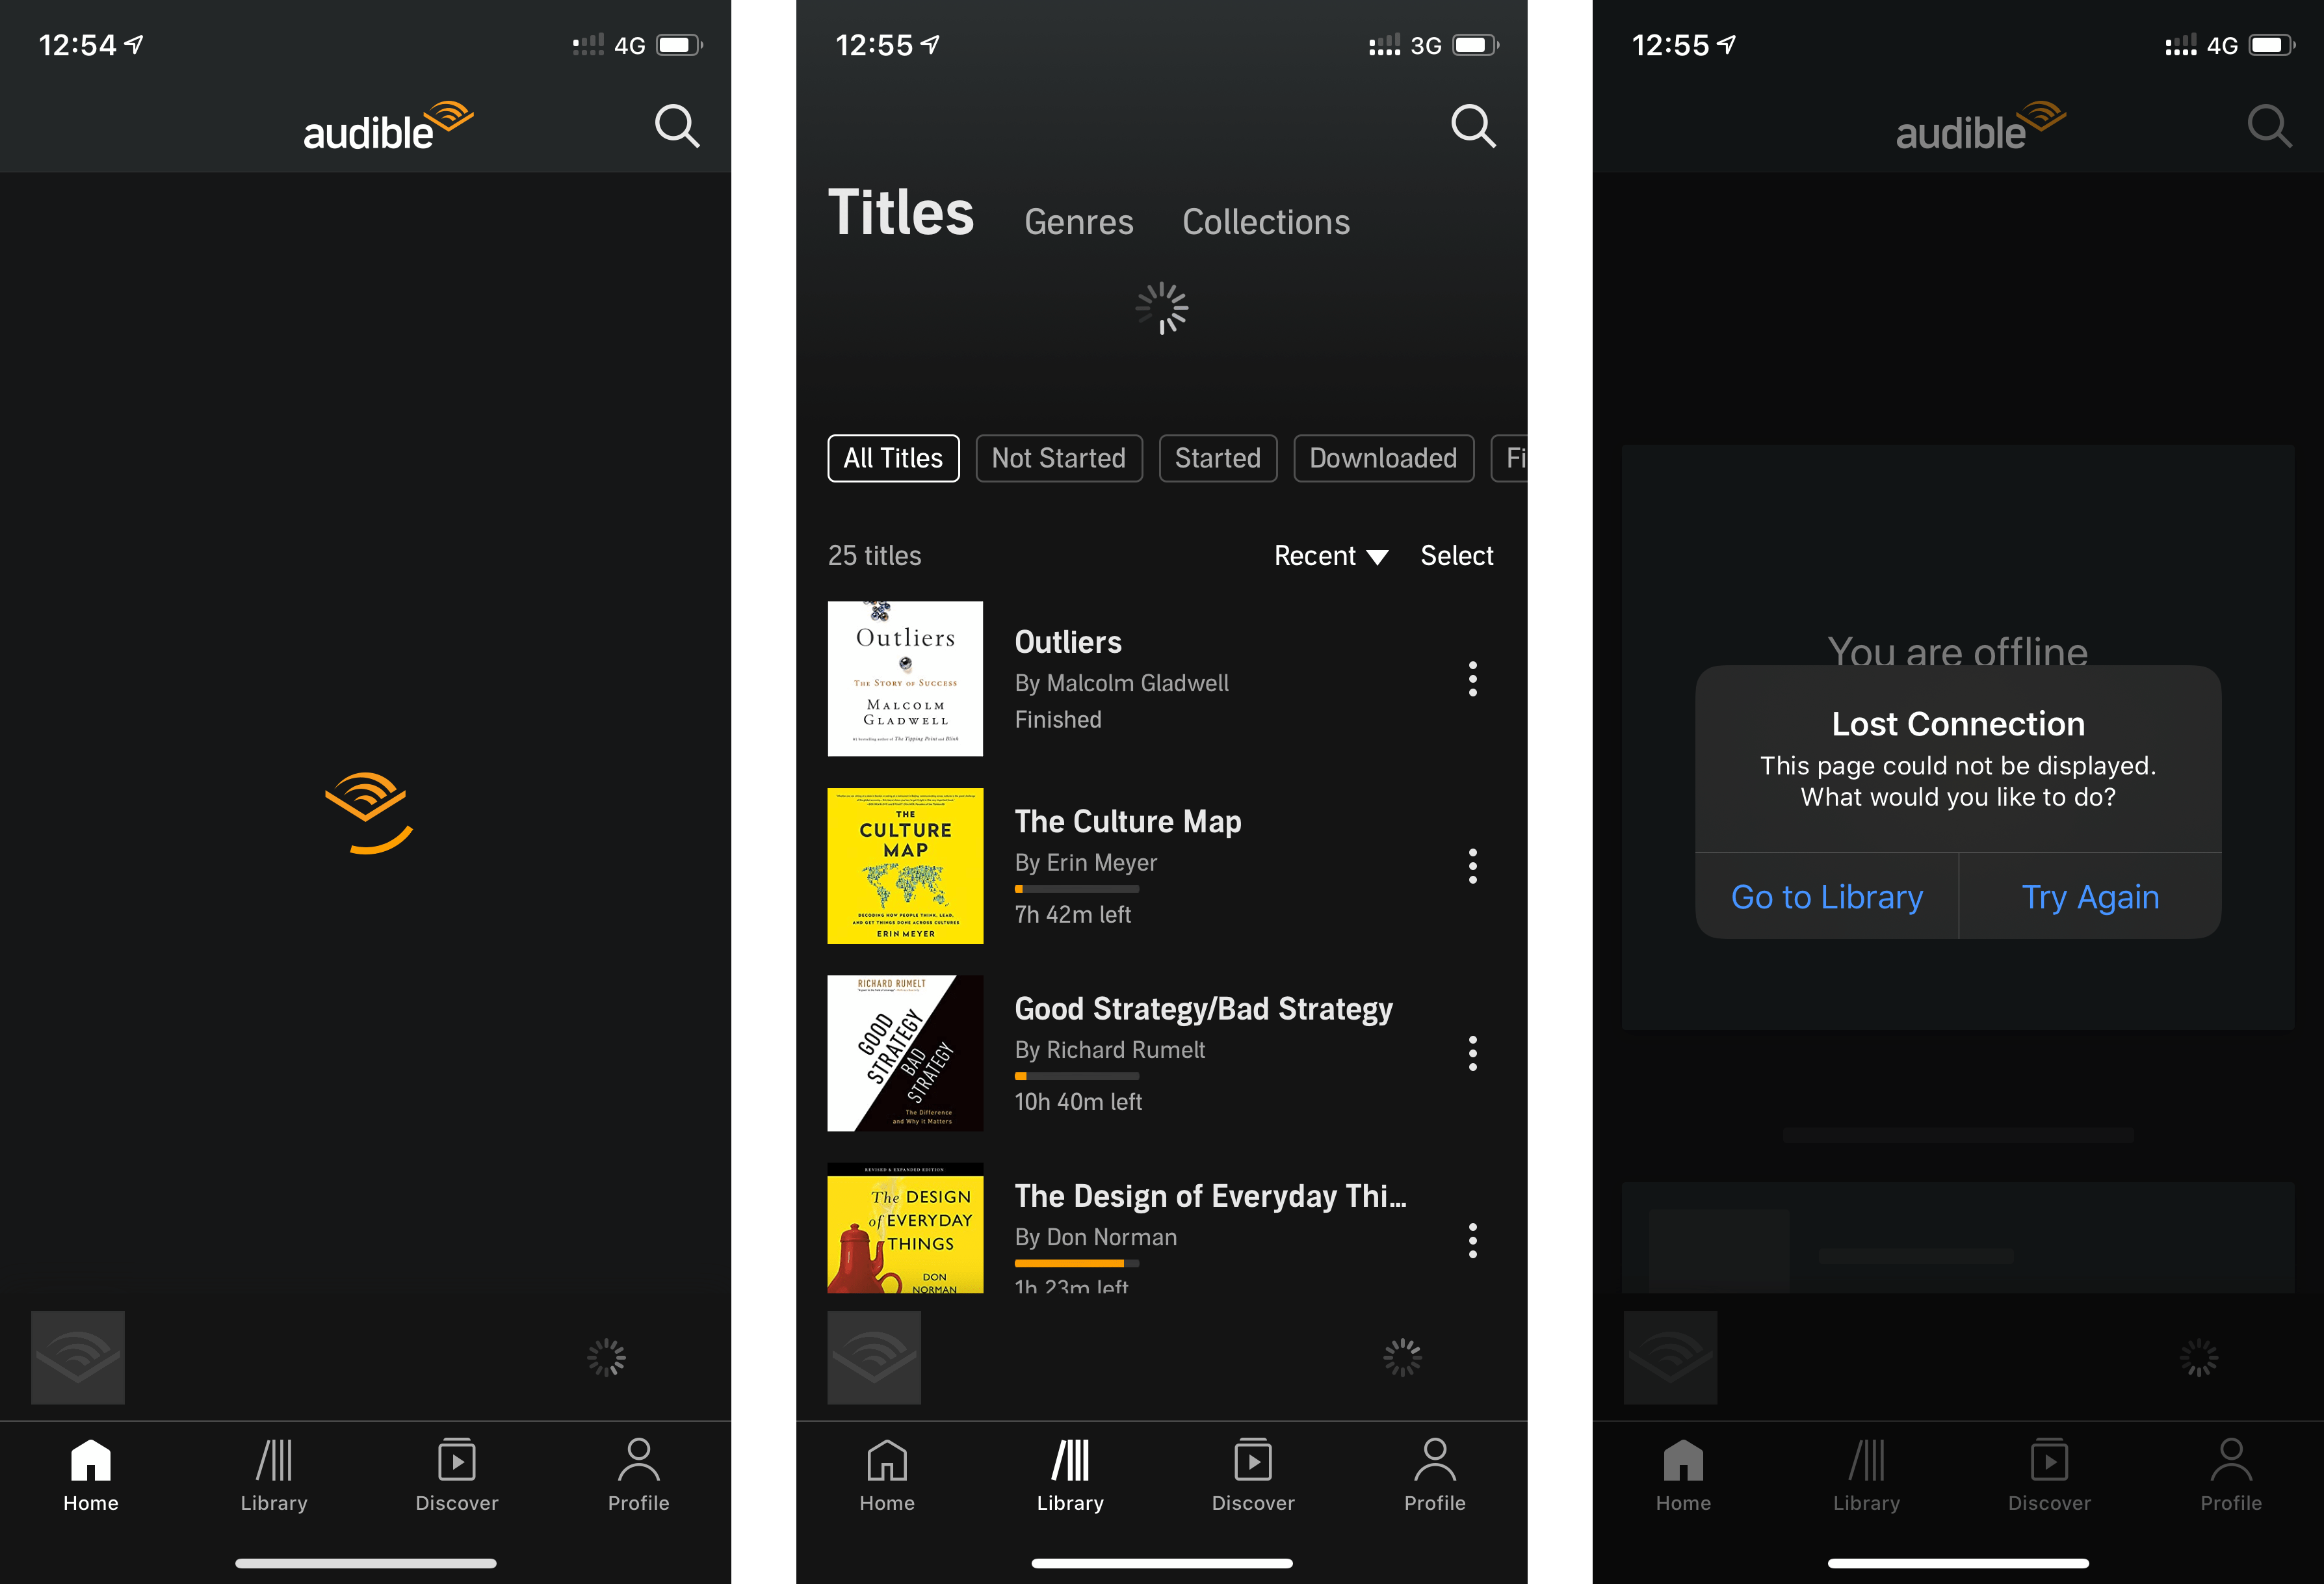
<p>Most of the islands and remote areas in Greece have very patchy reception. For the most part, seeing ‘3G’ on your phone essentially means no data, and ‘4G’ means slow, unreliable data. Eventually, you may be able to load a light web page, but this is mostly going to be a torturous experience.</p>

<p>Luckily before we travelled, I downloaded everything I would need. Mostly audiobooks, maps podcasts and music. Accessing content with limited internet connectivity has clearly been considered by most app developers. Or so I thought…</p>

<p>In reality, it turns out the way many app developers are approaching cached and offline content is broken.</p>

<p>For example, Google maps when opened in an area with crappy internet connectivity does not display the cached (or manually downloaded) map content, but instead displays a super, low-resolution version of the map. I assume this is because it is attempting to download a full resolution, up to date version of the content. While it’s good to show up to date information such as traffic, in a case where I needed to quickly glance at a map waiting for Google Maps to repeatedly attempt to access a map from Google’s servers which already exists on my device is the absolute worse experience.</p>

<p><img src="/blog/assets/img/where-am-i.png" alt="Where am I?(/blog/assets/img/where-am-i.png)" /></p>

<p>In many instances, the only way I could get Google Maps to work was by switching to Flight Mode in order to force the app to use downloaded maps.</p>

<p>This isn’t an isolated instance. For example, Audible exhibits the same behaviour. Before playing a downloaded audiobook the app first attempts to connect to Audible - possibly to check if there’s an updated play location. If the app can’t connect to Audible it will either show an error message stating the download content is corrupt (a bug?), or simply just not play the content. Again, the only workaround seems to be to briefly enter Flight Mode and be truly offline</p>
<p><a href="/blog/assets/img/where-is-my-book.png"><img src="/blog/assets/img/where-is-my-book.png" alt="Where is my book?" /></a></p>

<p>Obviously, not all apps are this bad at handling flaky connections. Spotify for example reliably allows access to and plays downloaded content immediately on an unreliable connection. Netflix also mostly gets this right provided you launch downloaded content from the downloads view in the iOS app.</p>

<p>I think many of these issues could be avoided if when designing new functionality, we as designers spend a little more time considering the edge cases. For example, offline usage, take the time to really understand all of the situations your users will be in when using your product.</p>

<p>In practice, this means broadening the definition of “offline” to include crappy internet connections. The reason the user downloaded is likely because they knew they would have limited internet access, or possibly wanted to reduce their data usage. In this case, prioritise offline content until a working connection can be established. If the content is downloaded, let the user use it.</p>]]></content><author><name></name></author><category term="Interaction design" /><category term="Usability" /><category term="Edge case design" /><category term="Visual design" /><summary type="html"><![CDATA[]]></summary><media:thumbnail xmlns:media="http://search.yahoo.com/mrss/" url="https://www.andrewdenty.com/blog/assets/img/almost-offline-edge-case-design.png" /><media:content medium="image" url="https://www.andrewdenty.com/blog/assets/img/almost-offline-edge-case-design.png" xmlns:media="http://search.yahoo.com/mrss/" /></entry><entry><title type="html">Why macOS Big Sur is flatter than ever</title><link href="https://www.andrewdenty.com/blog/2020/07/10/why-macos-big-sur-is-flatter-than-ever.html" rel="alternate" type="text/html" title="Why macOS Big Sur is flatter than ever" /><published>2020-07-10T19:51:00+00:00</published><updated>2020-07-10T19:51:00+00:00</updated><id>https://www.andrewdenty.com/blog/2020/07/10/why-macos-big-sur-is-flatter-than-ever</id><content type="html" xml:base="https://www.andrewdenty.com/blog/2020/07/10/why-macos-big-sur-is-flatter-than-ever.html"><![CDATA[<p><img src="/blog/assets/img/why-macos-big-sur-is-flatter-than-ever.png" alt="Catalina vs Big Sur" /></p>

<p>Forget skeuomorphism, or even the newly coined neumorphism.</p>

<p>macOS Big Sur is flatter than ever.</p>

<p>In the last few weeks there have been a lot of suggestions that this is the start of a <a href="https://applypixels.com/blog/comeback" target="_blank">new “fun” era of visual design</a> and that Apple is returning to skeuomorphism, or even a new thing called <a href="https://www.inputmag.com/design/apple-macos-big-sur-the-rise-of-neumorphism" target="_blank">neumorphism</a>. Neumorphism is a design trend that focuses on creating an impression of a realistic 3D environment using shadow and lighting effects.</p>

<p>The times may well be changing, but in my view we are not returning to an age of textured writing paper and 
stitched leather. This is why.</p>

<h3 id="icons-icons-icons">Icons, icons, icons</h3>

<p>Since the unveiling of macOS Big Sur a lot has been made of its new iOS shaped icon set. Everyone seems to either love or hate the new icons.</p>
<p><a href="/blog/assets/img/macos-flat/macos-big-sur-icons.jpg"><img src="/blog/assets/img/macos-flat/macos-big-sur-icons.jpg" alt="macOS Big Sur icons" /></a></p>

<p>Don’t be mislead by the icons - macOS icons have always been richer and more detailed than iOS icons. They have also used shadows and to create a sense of depth. In my view desktop interfaces are often more detailed as desktop users tend to use them for longer periods of undistracted time compared to mobile devices. Therefore adding more detail and richness is appropriate. In short, for as long as technology has allowed, macOS icons have been rich, detailed and realistic looking. Here are a selection of macOS Catalina’s icons to illustrate this:</p>

<p><a href="/blog/assets/img/macos-flat/depth-in-macos-catalina.png"><img src="/blog/assets/img/macos-flat/depth-in-macos-catalina.png" alt="Detailed macOS Catalina icons" /></a></p>

<p>The new icon set in Big Sur is simply a convergence of the existing highly detailed macOS icons with the consistent shape of iOS icons. During the WWDC 20 keynote, Alan Dye, Apples VP of Human Interface explained the rationale behind the new icons:</p>

<blockquote>
  <p>“We wanted consistency throughout the ecosystem so users can move fluidly between their Apple devices, but we also love that Mac icons have a deep history and a distinct look and feel. So we retained many of the highly crafted details and th playful elements that make Mac icons unique”</p>
</blockquote>

<p>It’s also worth remembering that in many places the icons in macOS are simpler than before as Apple is porting its unified language of symbols from iOS. This means that in many places, existing detailed icons have become simple, monochrome 2D icons.</p>

<p><a href="/blog/assets/img/macos-new-ui/apple-music-podcasts/5-podcasts-preferences-macos-catalina-big-sur-comparison.png"><img src="/blog/assets/img/macos-new-ui/apple-music-podcasts/5-podcasts-preferences-macos-catalina-big-sur-comparison.png" alt="Icons in Podcast app's preferences" /></a></p>

<h3 id="big-sur-is-flatter-than-ever">Big Sur is flatter than ever</h3>

<p>This may surprise a few people, but if you look at the user interfaces in macOS Big Sur and compare it to the current release Catalina you won’t see richer shading and detailing. Also, while macOS Big Sur uses transparency, and shadows to create the impression of layers in the UI, this isn’t a new thing for macOS.</p>

<p>Actually, you’ll see a lot of the detail, texture and shadows have been removed. As a whole, macOS Big Sur’s interface is cleaner and more minimalist than ever. One of the aspects I’ve noticed most is there tends to be less contrast between UI elements. Apple has also completely dropped the aluminium inspired window chromes which can be traced back to Quicktime in the 1990s.</p>

<p><a href="/blog/assets/img/macos-flat/finder-toolbar-comparison.png"><img src="/blog/assets/img/macos-flat/finder-toolbar-comparison.png" alt="Comparison of Finder toolbars between macOS Catalina and Big Sur" /></a></p>

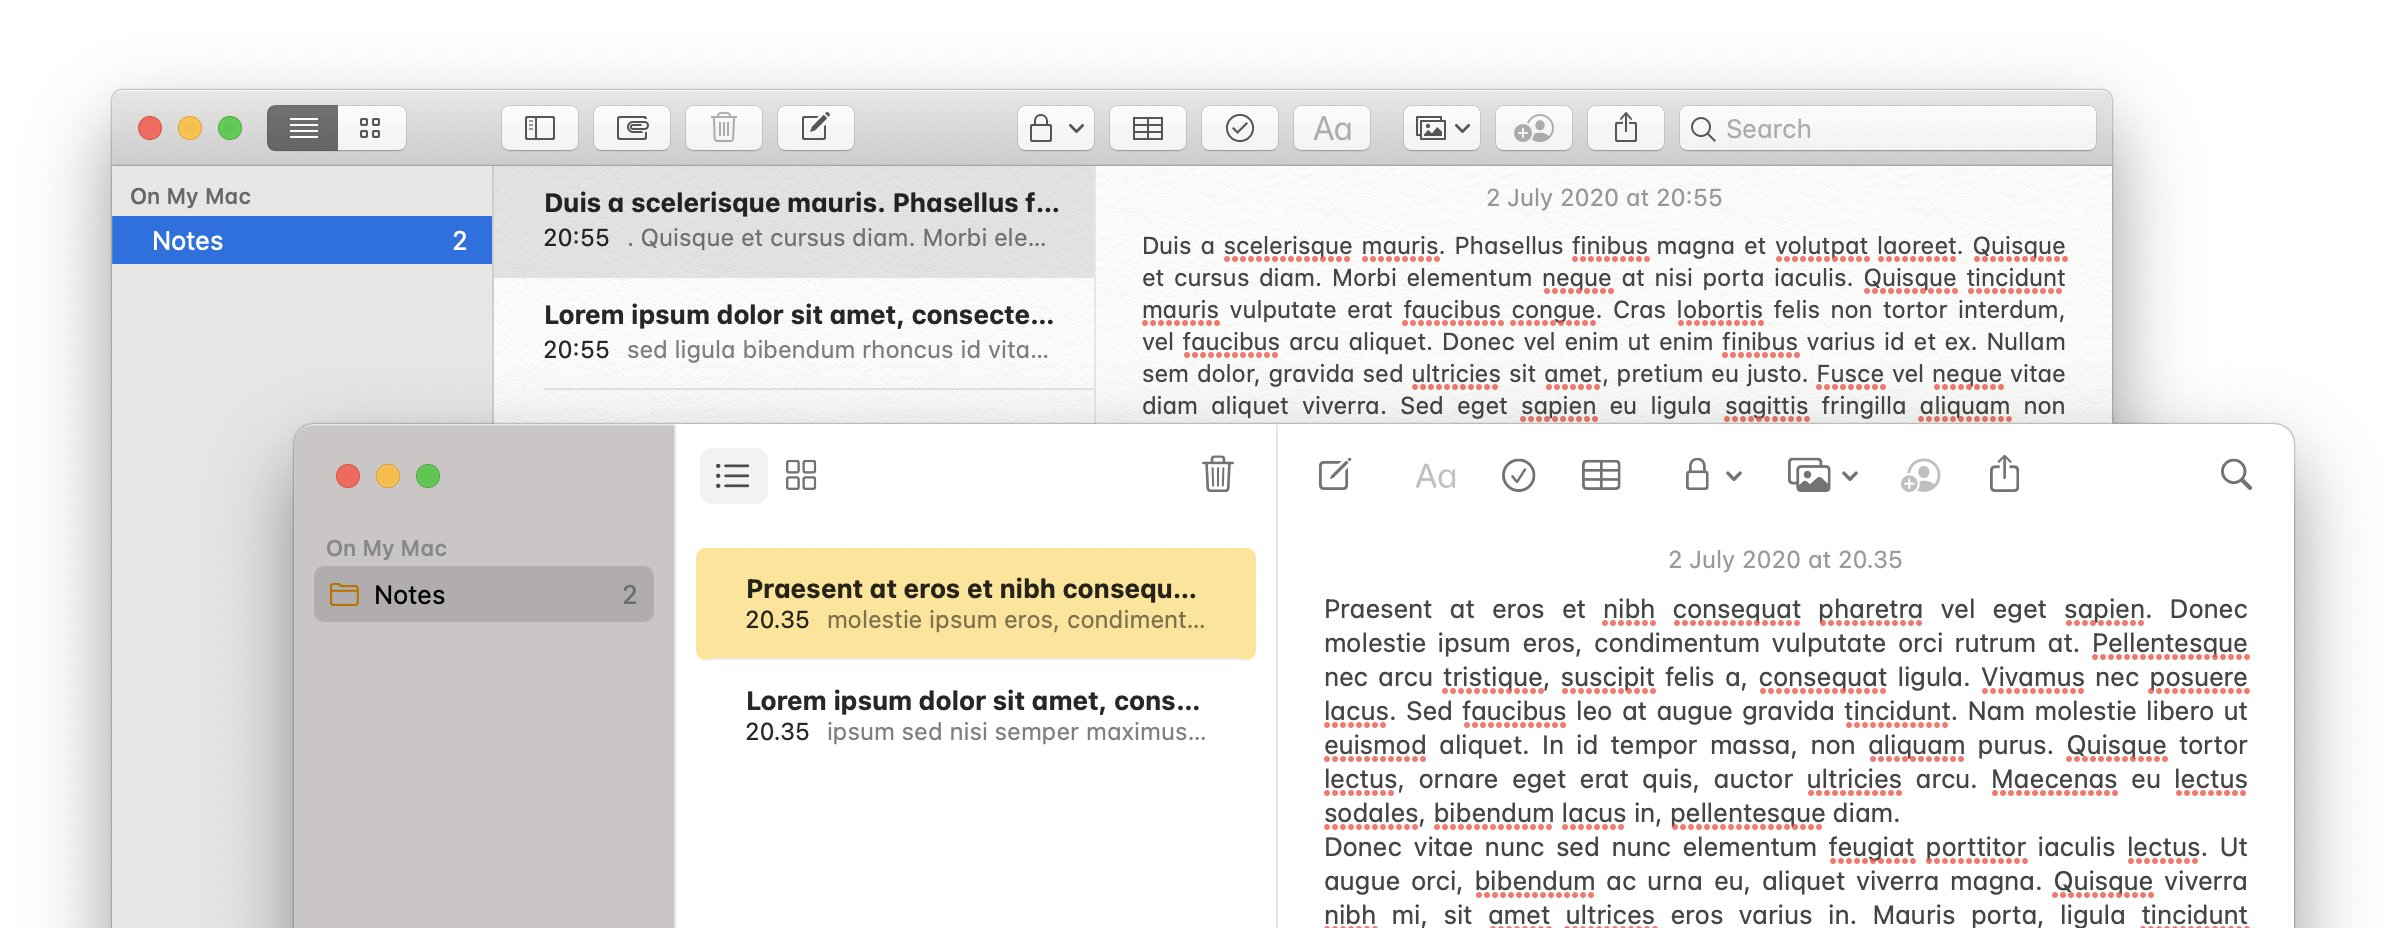
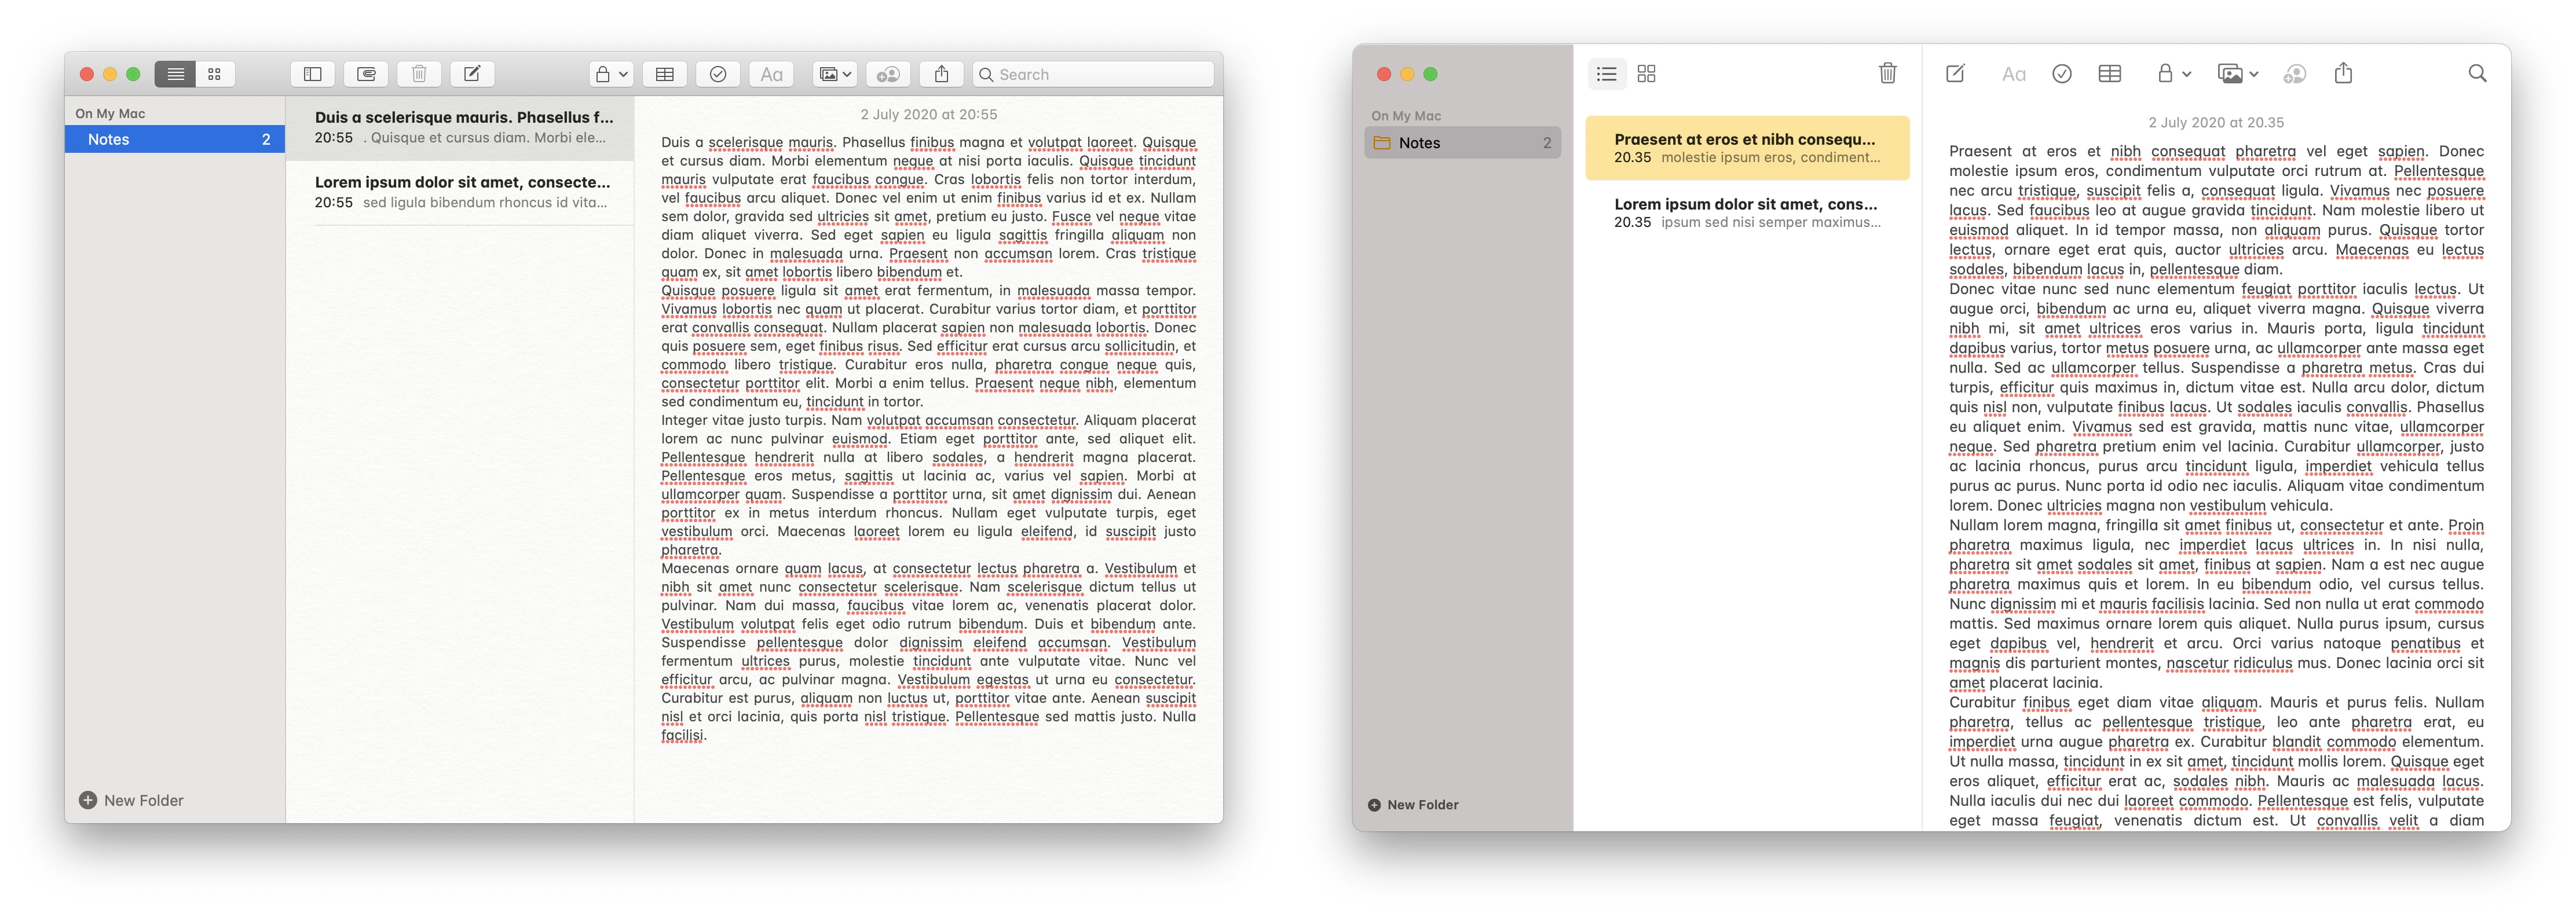
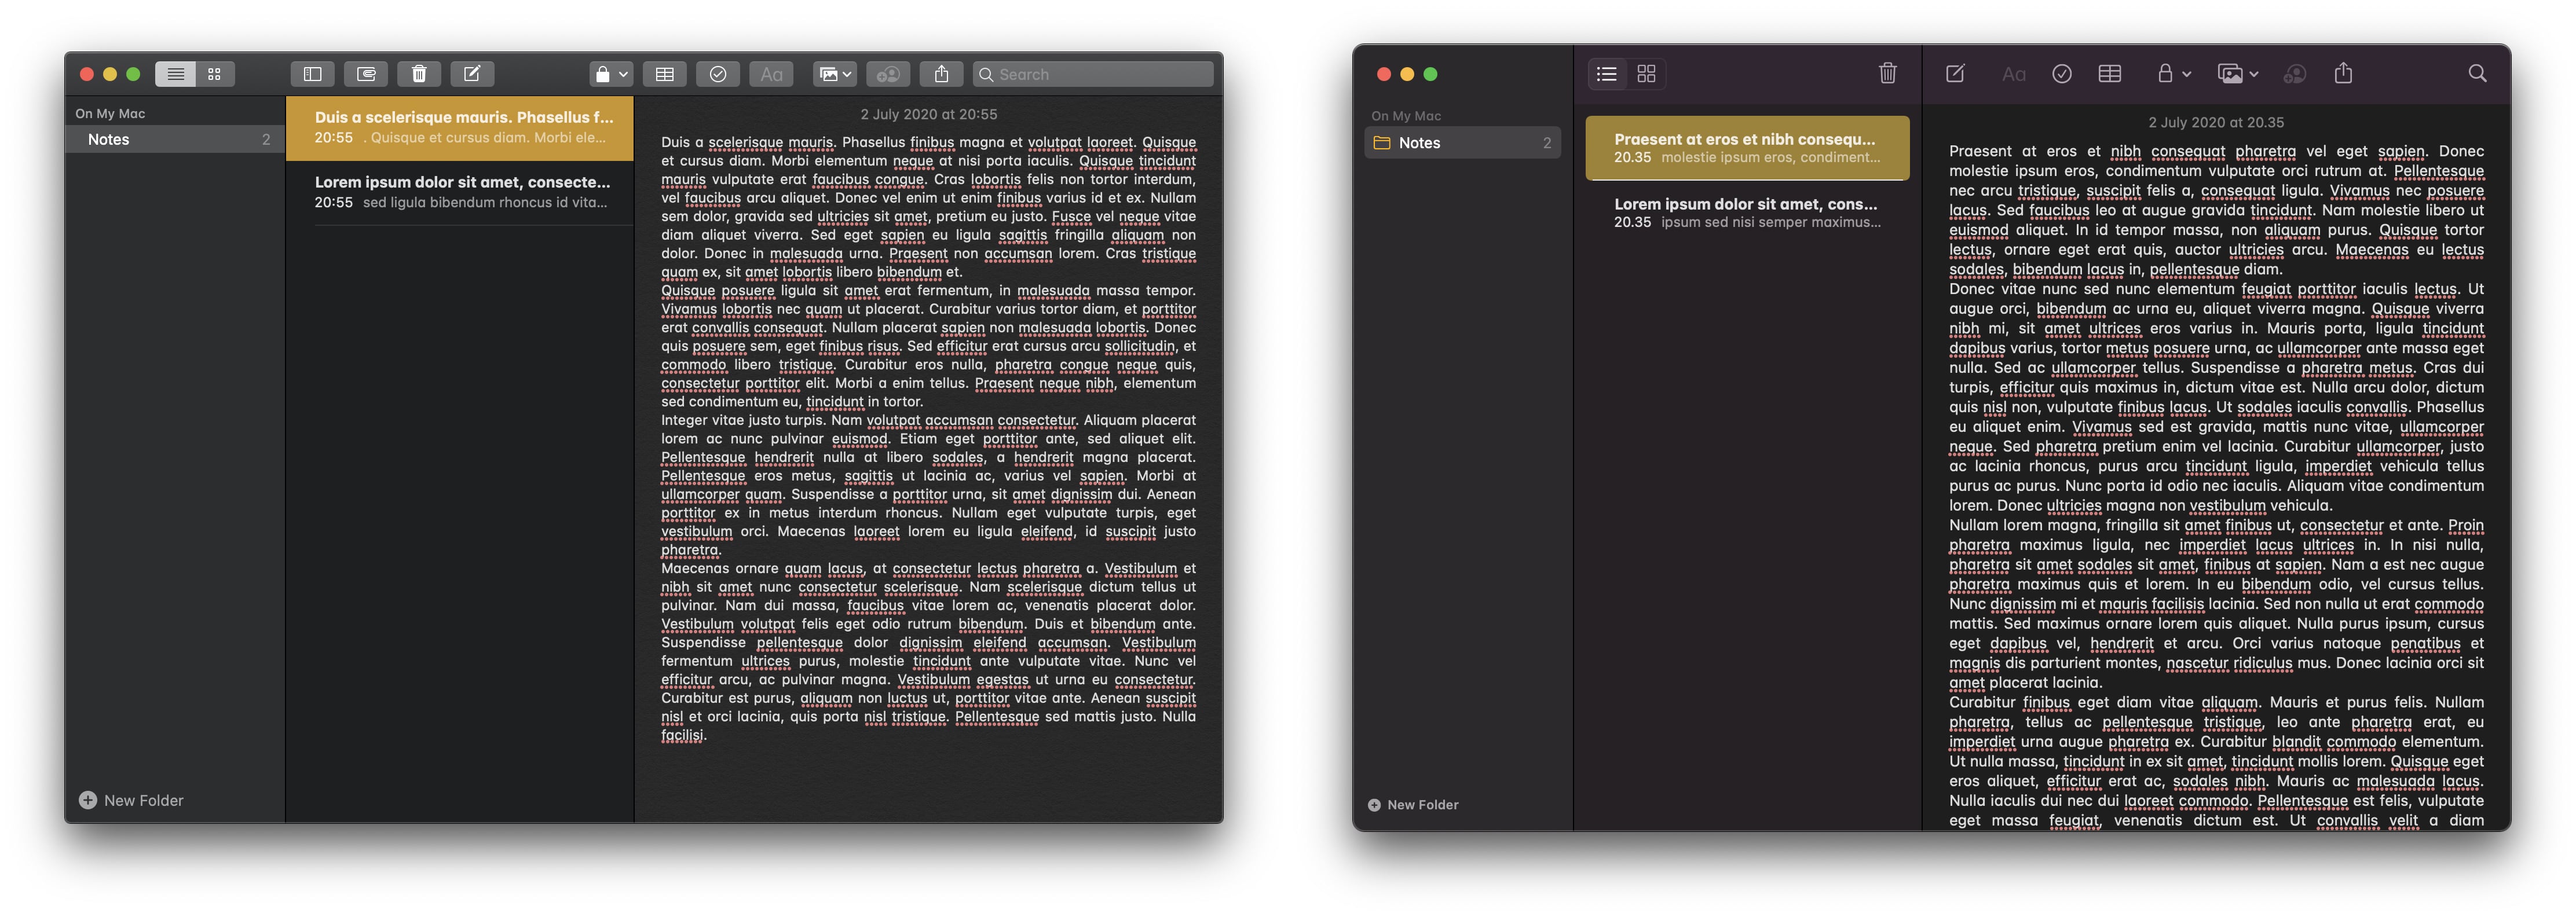
<p>Take for example the notes app. The faux-paper texture has finally been completely removed. The toolbar buttons no longer have containers and there is no background separator between the toolbar and writing area.</p>

<p><a href="/blog/assets/img/macos-flat/notes-compared.png"><img src="/blog/assets/img/macos-flat/notes-compared.png" alt="Comparison of Notes app between macOS Catalina and Big Sur" /></a></p>

<h3 id="if-anything-the-design-trend-is-convergence-with-ios">If anything the design trend is convergence with iOS</h3>
<p>This is not a new paradigm in visual design, but a shift towards unification between platforms. There is increasingly less separation between iOS and macOS. Both in hardware with Apple’s switch to an all ARM architecture and software where iPhones and iPads can now do many of the tasks once reserved for desktop computing.</p>

<p>In many ways the interface changes in macOS Big Sur reflect this transition. The iOS glyph icon set, the removal of distinct buttons and increasingly rounded corners. Apple has clearly been asking why interface elements on an iPad and a Mac should look different, and come to the conclusion there’s no longer a good reason for this.</p>

<p>On the topic of conversion, one interesting question will be how much further this transition goes. Can we expect to see touch enabled laptops? Dual booting iPads? iPhones with docking stations?</p>

<h3 id="but-what-about-fun-design---isnt-that-coming-back">But what about fun design - isn’t that coming back?</h3>

<p>As a designer I’ve often found the trend towards flat, minimalist design frustrating. I pretty much always have an urge to add little embellishments or extra layers to work. I then subsequently almost always end up removing them. Either due to what I’ve learned when testing the design with users, or just realising that these extra details often end up detracting from the bigger picture.</p>

<p>This doesn’t mean there’s no value in intricate detailing. If you are a designer and you can inject a fun details into your work in a way which delights and enriches your users lives then I implore you to do this. I just don’t think that macOS Big Sur is the signal we’ve all been waiting for to bring out those shadows, textures and bevels.</p>]]></content><author><name></name></author><category term="Apple" /><category term="macOS" /><category term="Catalina" /><category term="Big Sur" /><category term="UI" /><category term="Interaction design" /><category term="Visual design" /><summary type="html"><![CDATA[]]></summary><media:thumbnail xmlns:media="http://search.yahoo.com/mrss/" url="https://www.andrewdenty.com/blog/assets/img/why-macos-big-sur-is-flatter-than-ever.png" /><media:content medium="image" url="https://www.andrewdenty.com/blog/assets/img/why-macos-big-sur-is-flatter-than-ever.png" xmlns:media="http://search.yahoo.com/mrss/" /></entry><entry><title type="html">A visual comparison of macOS Catalina and Big Sur</title><link href="https://www.andrewdenty.com/blog/2020/07/01/a-visual-comparison-of-macos-catalina-and-big-sur.html" rel="alternate" type="text/html" title="A visual comparison of macOS Catalina and Big Sur" /><published>2020-07-01T16:01:00+00:00</published><updated>2020-07-01T16:01:00+00:00</updated><id>https://www.andrewdenty.com/blog/2020/07/01/a-visual-comparison-of-macos-catalina-and-big-sur</id><content type="html" xml:base="https://www.andrewdenty.com/blog/2020/07/01/a-visual-comparison-of-macos-catalina-and-big-sur.html"><![CDATA[<p><img src="/blog/assets/img/catalina-vs-big-sur.jpg" alt="Catalina vs Big Sur" />
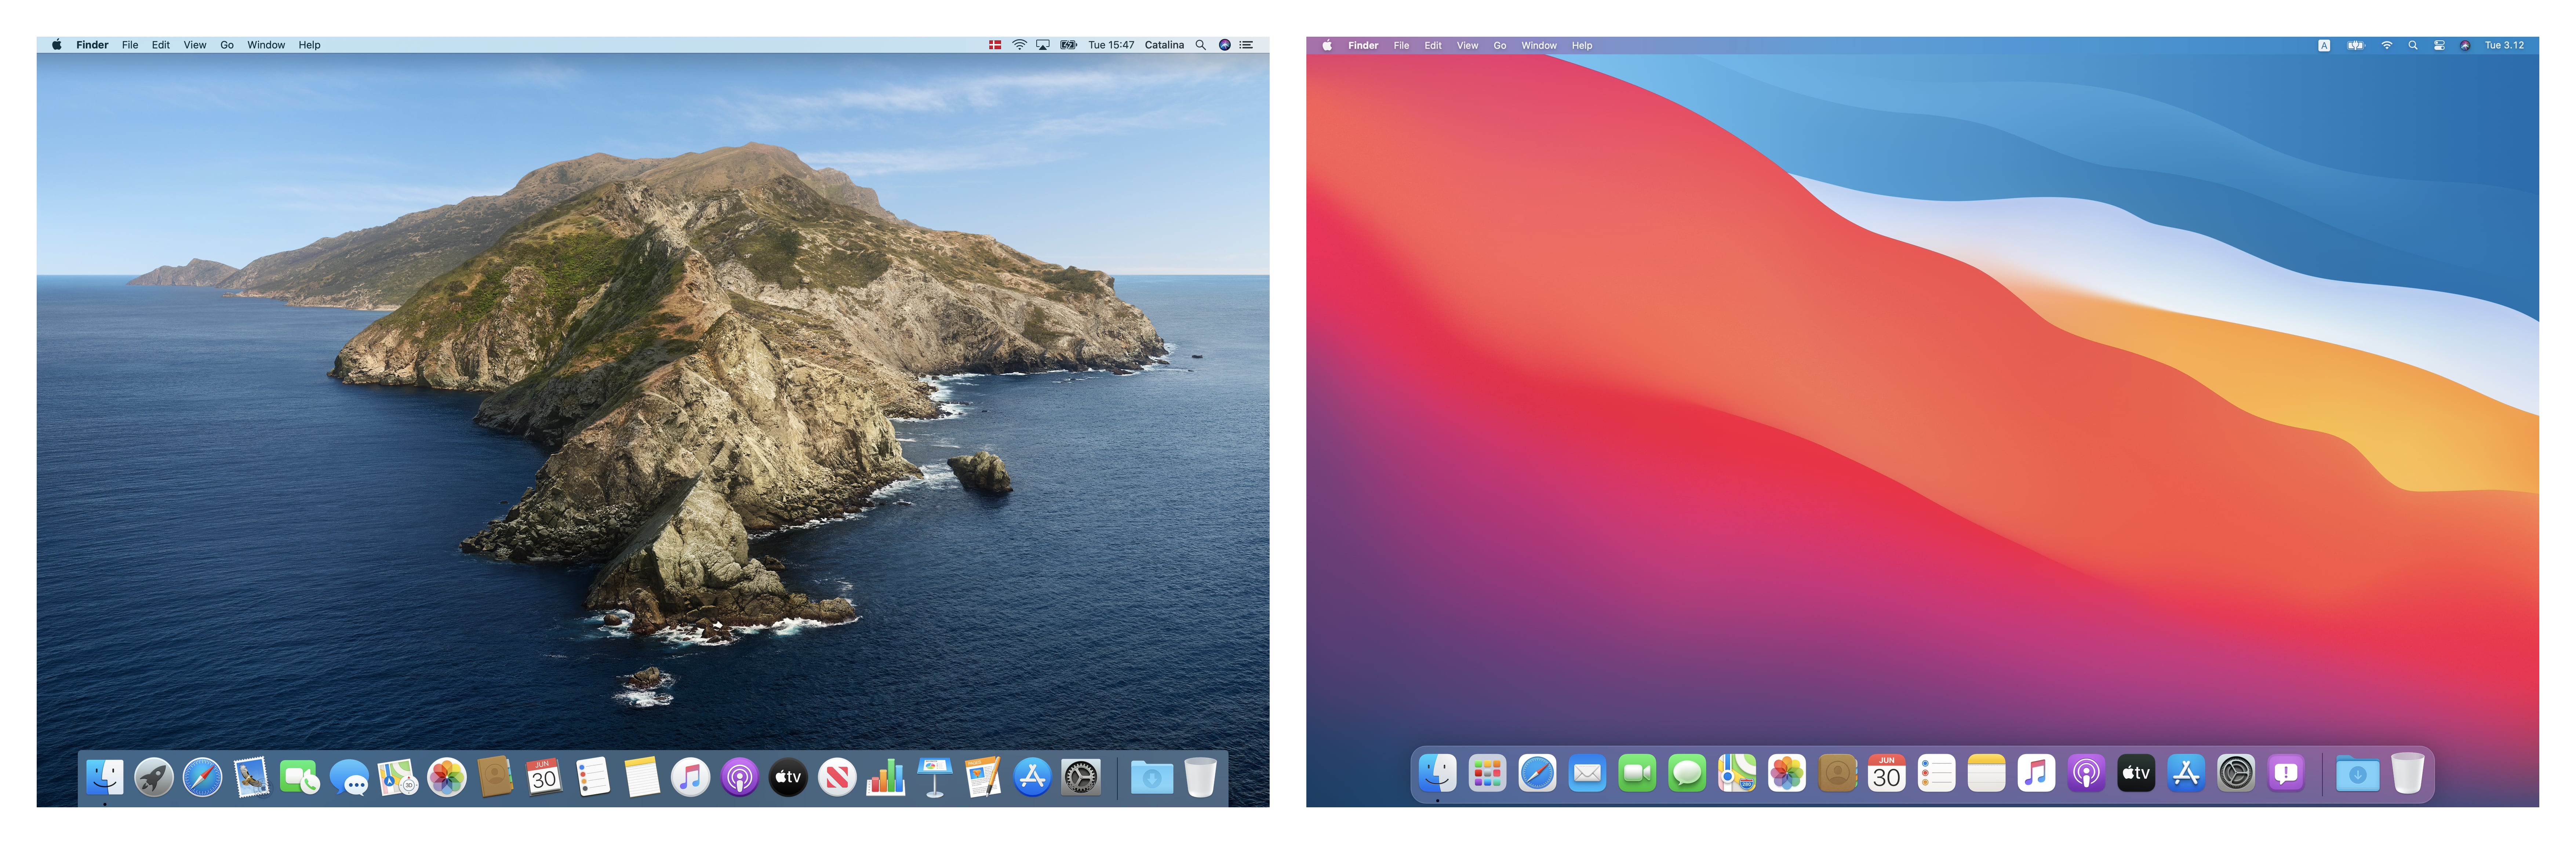
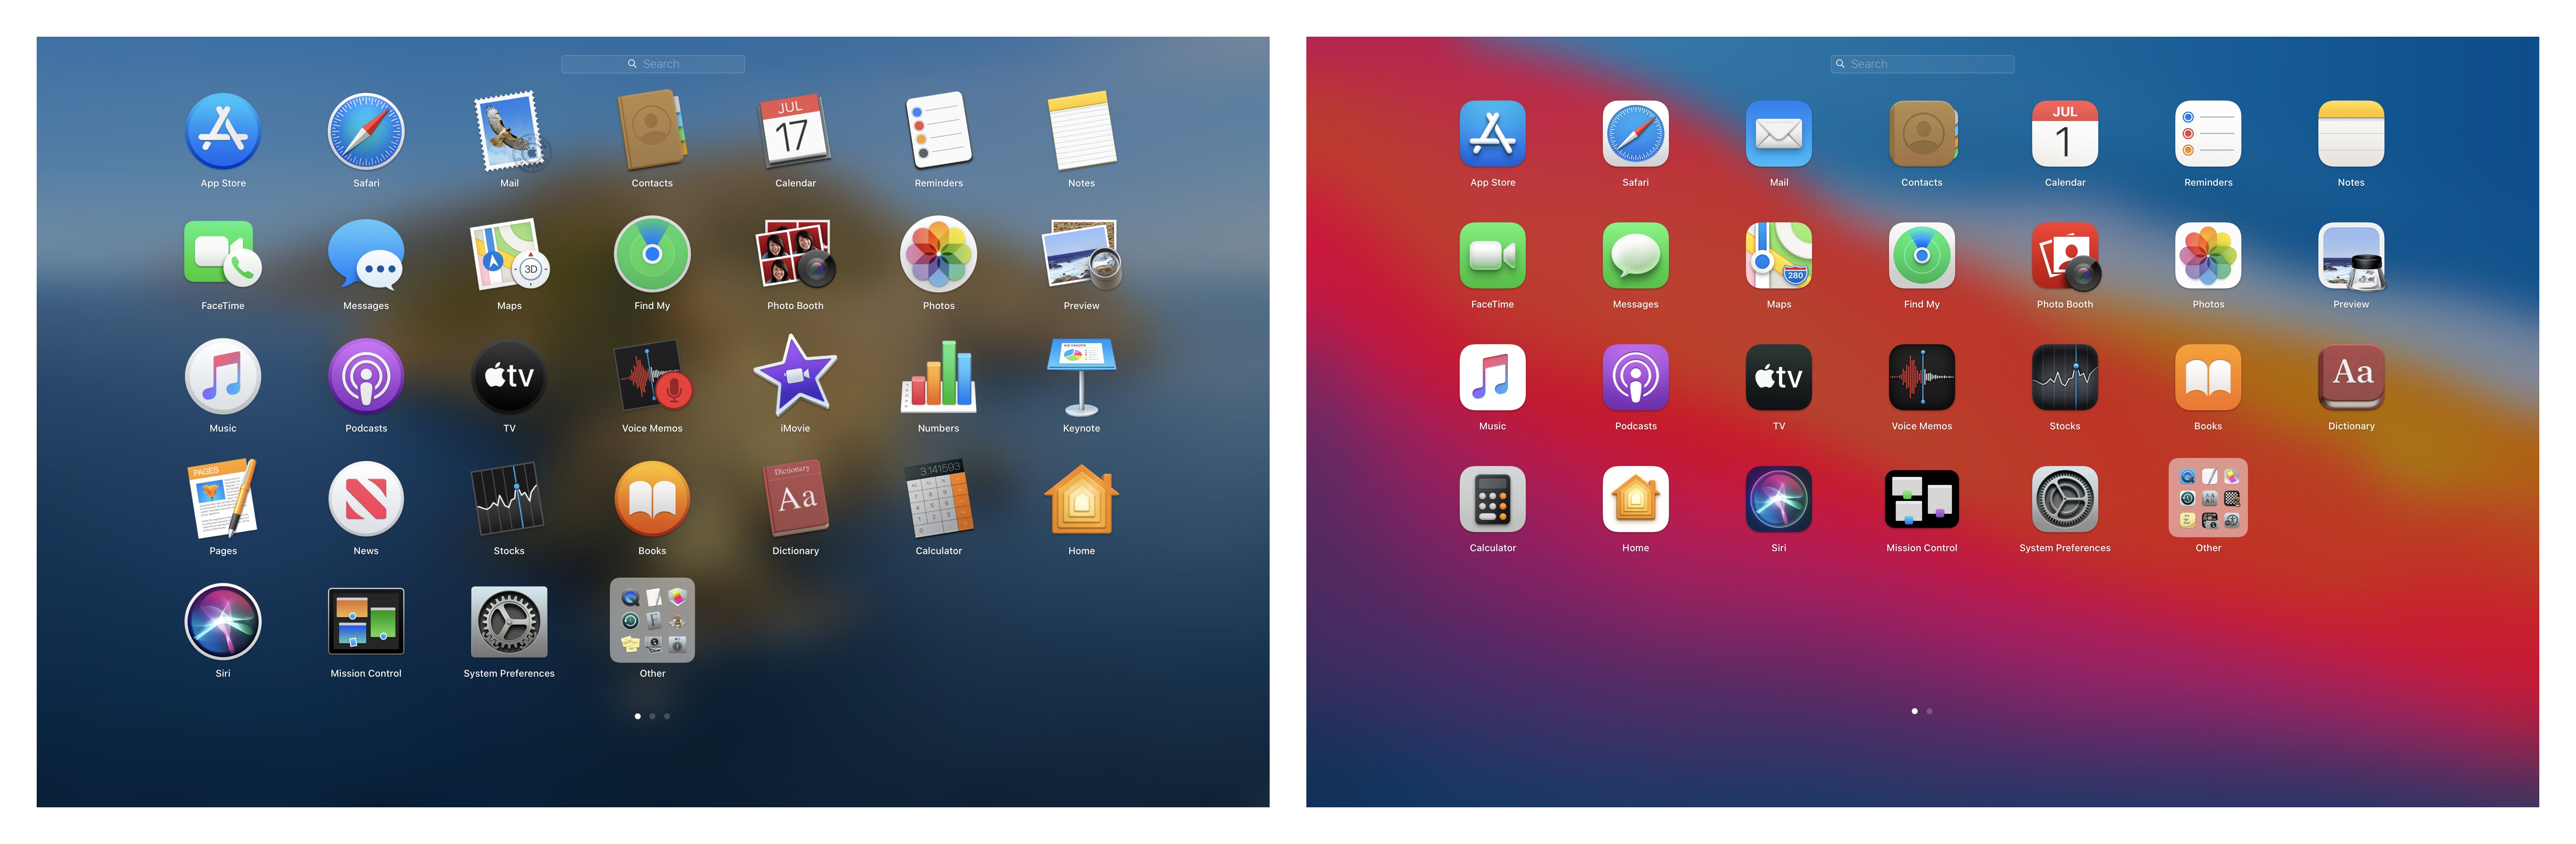
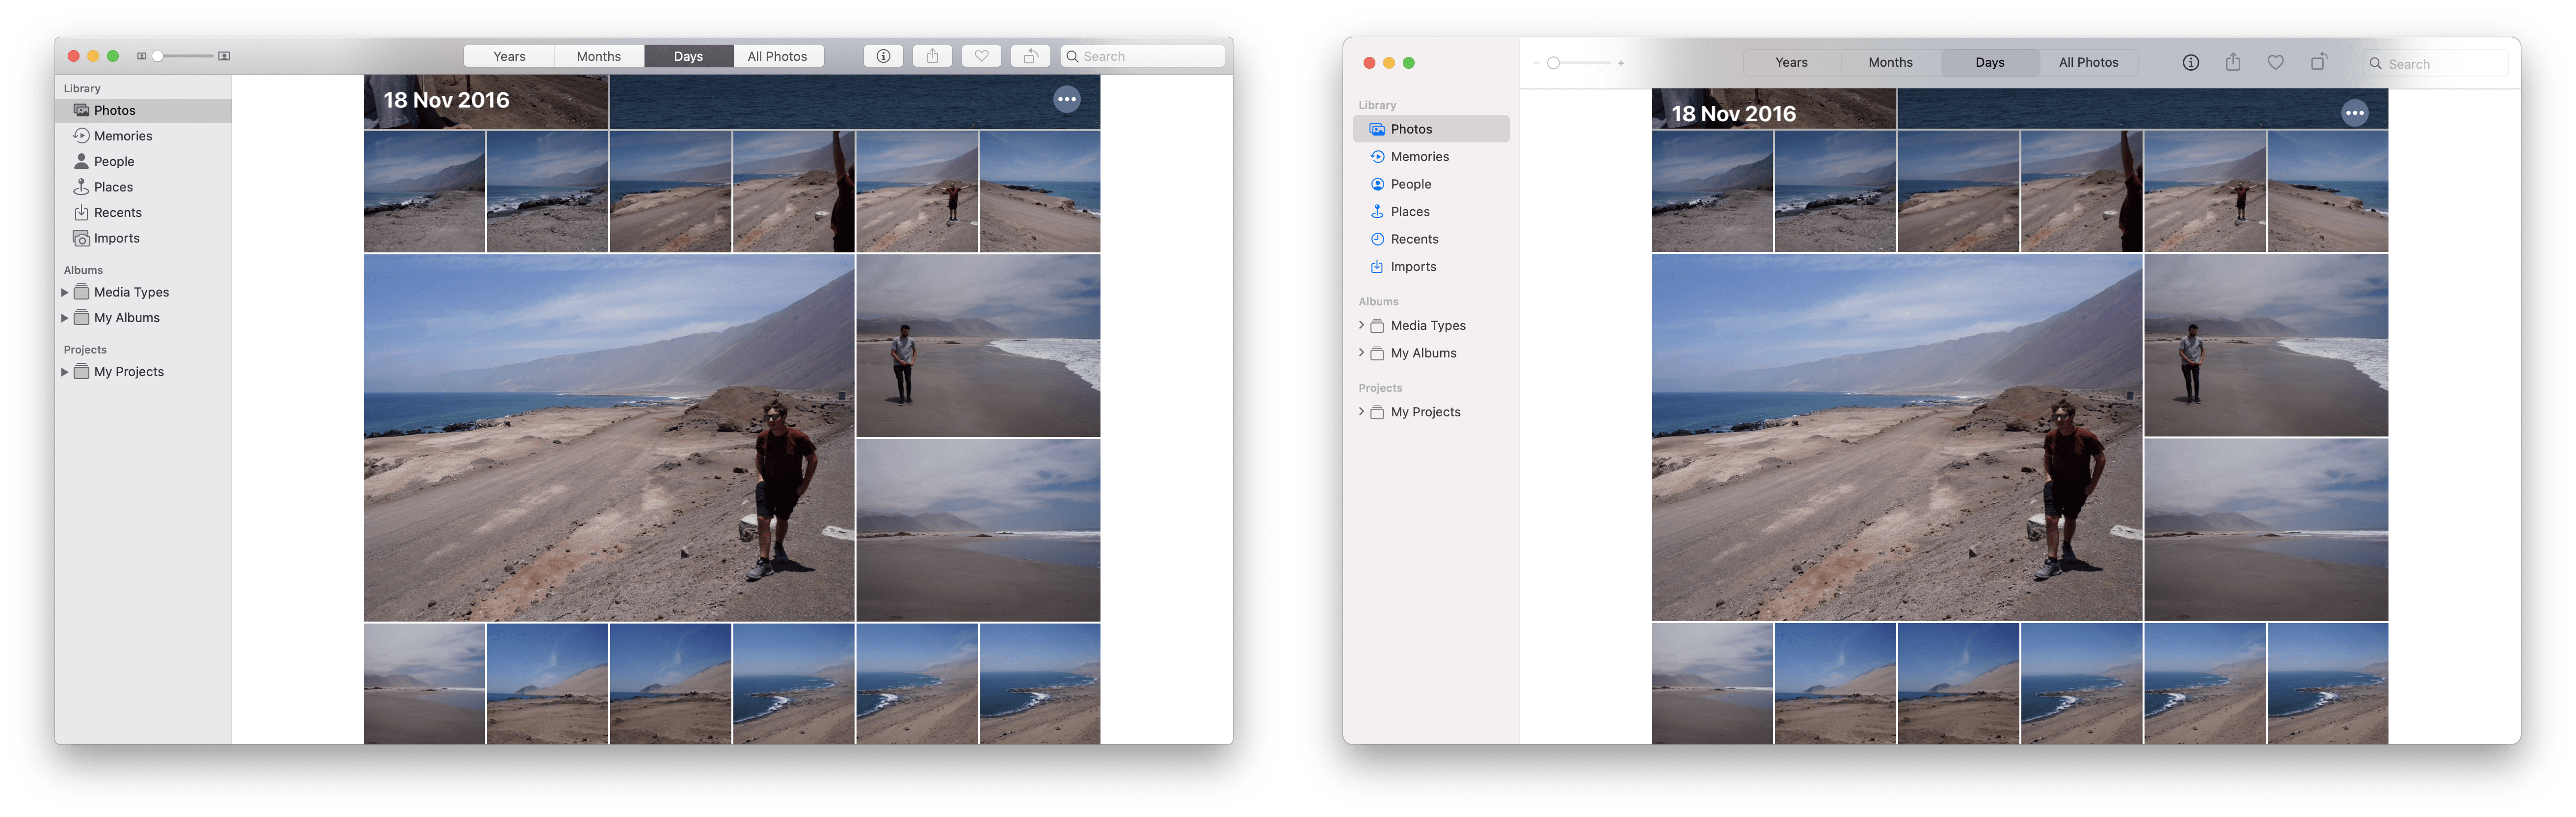
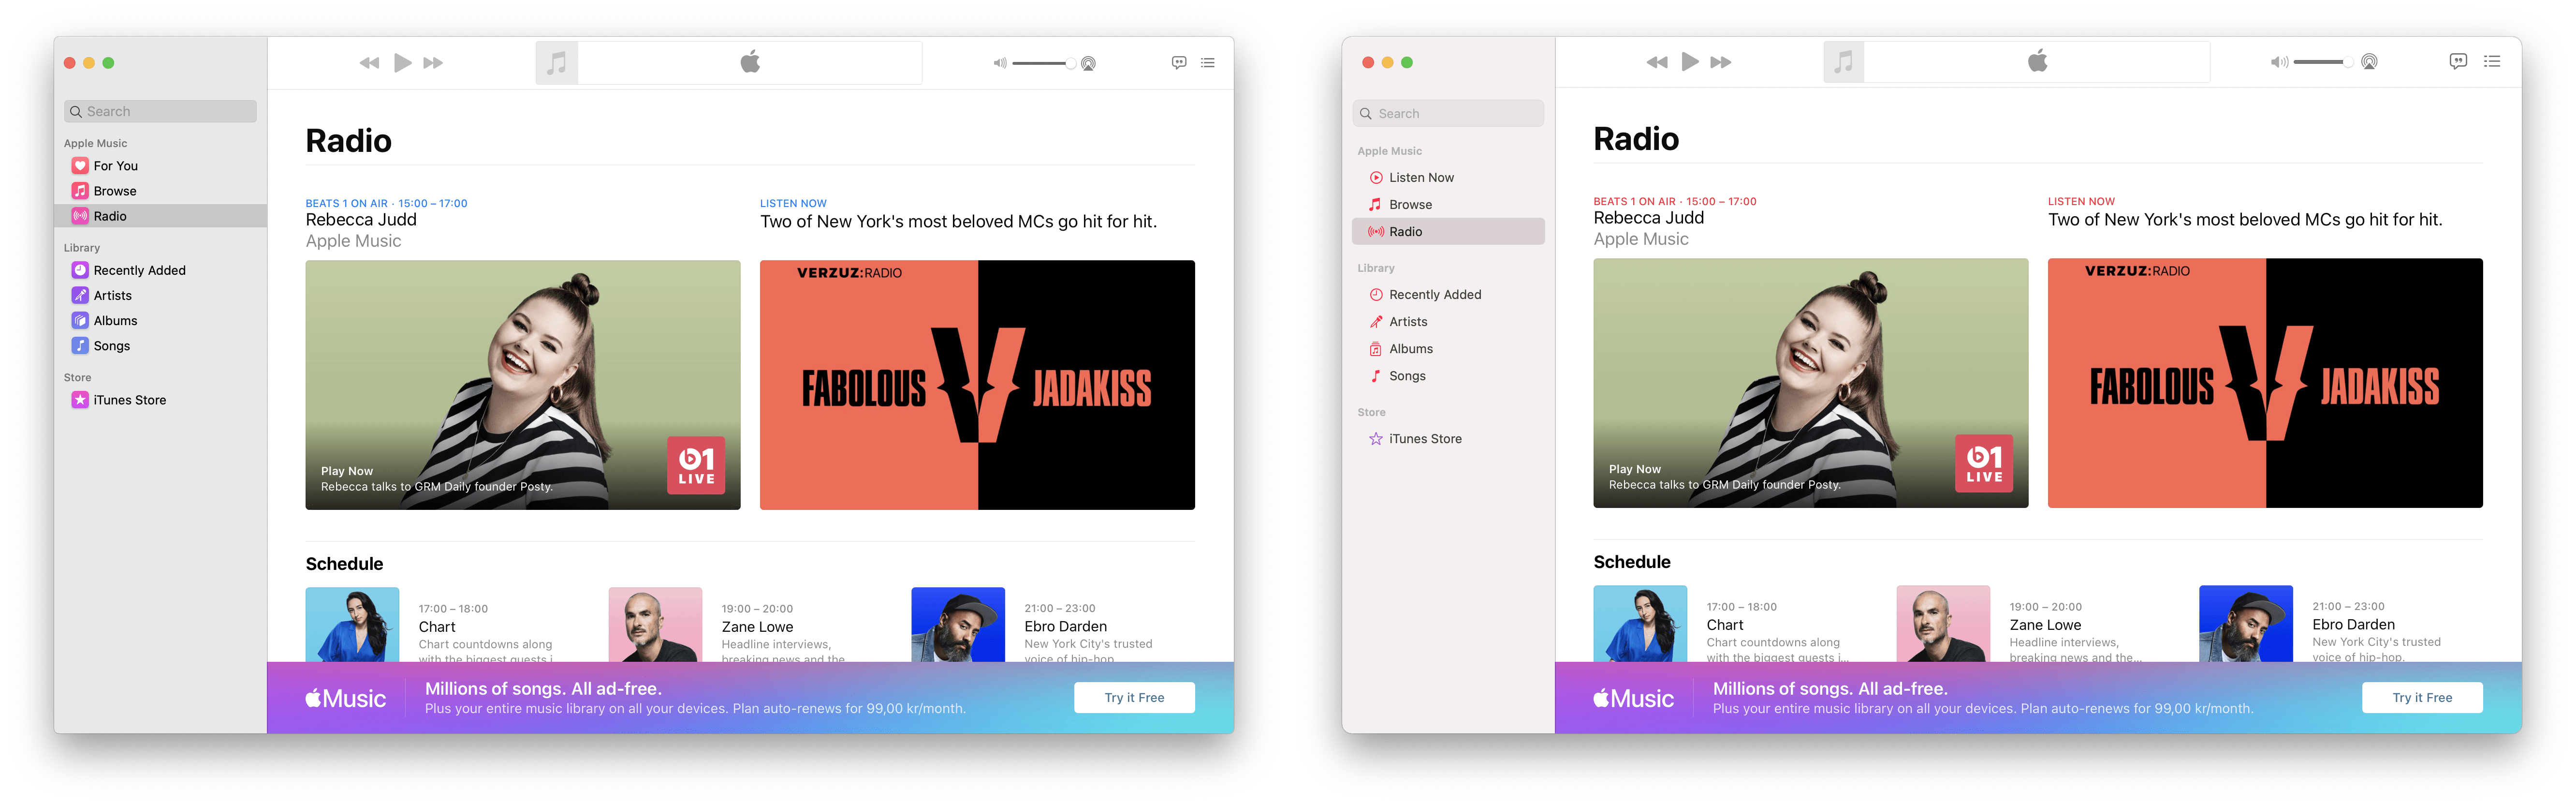
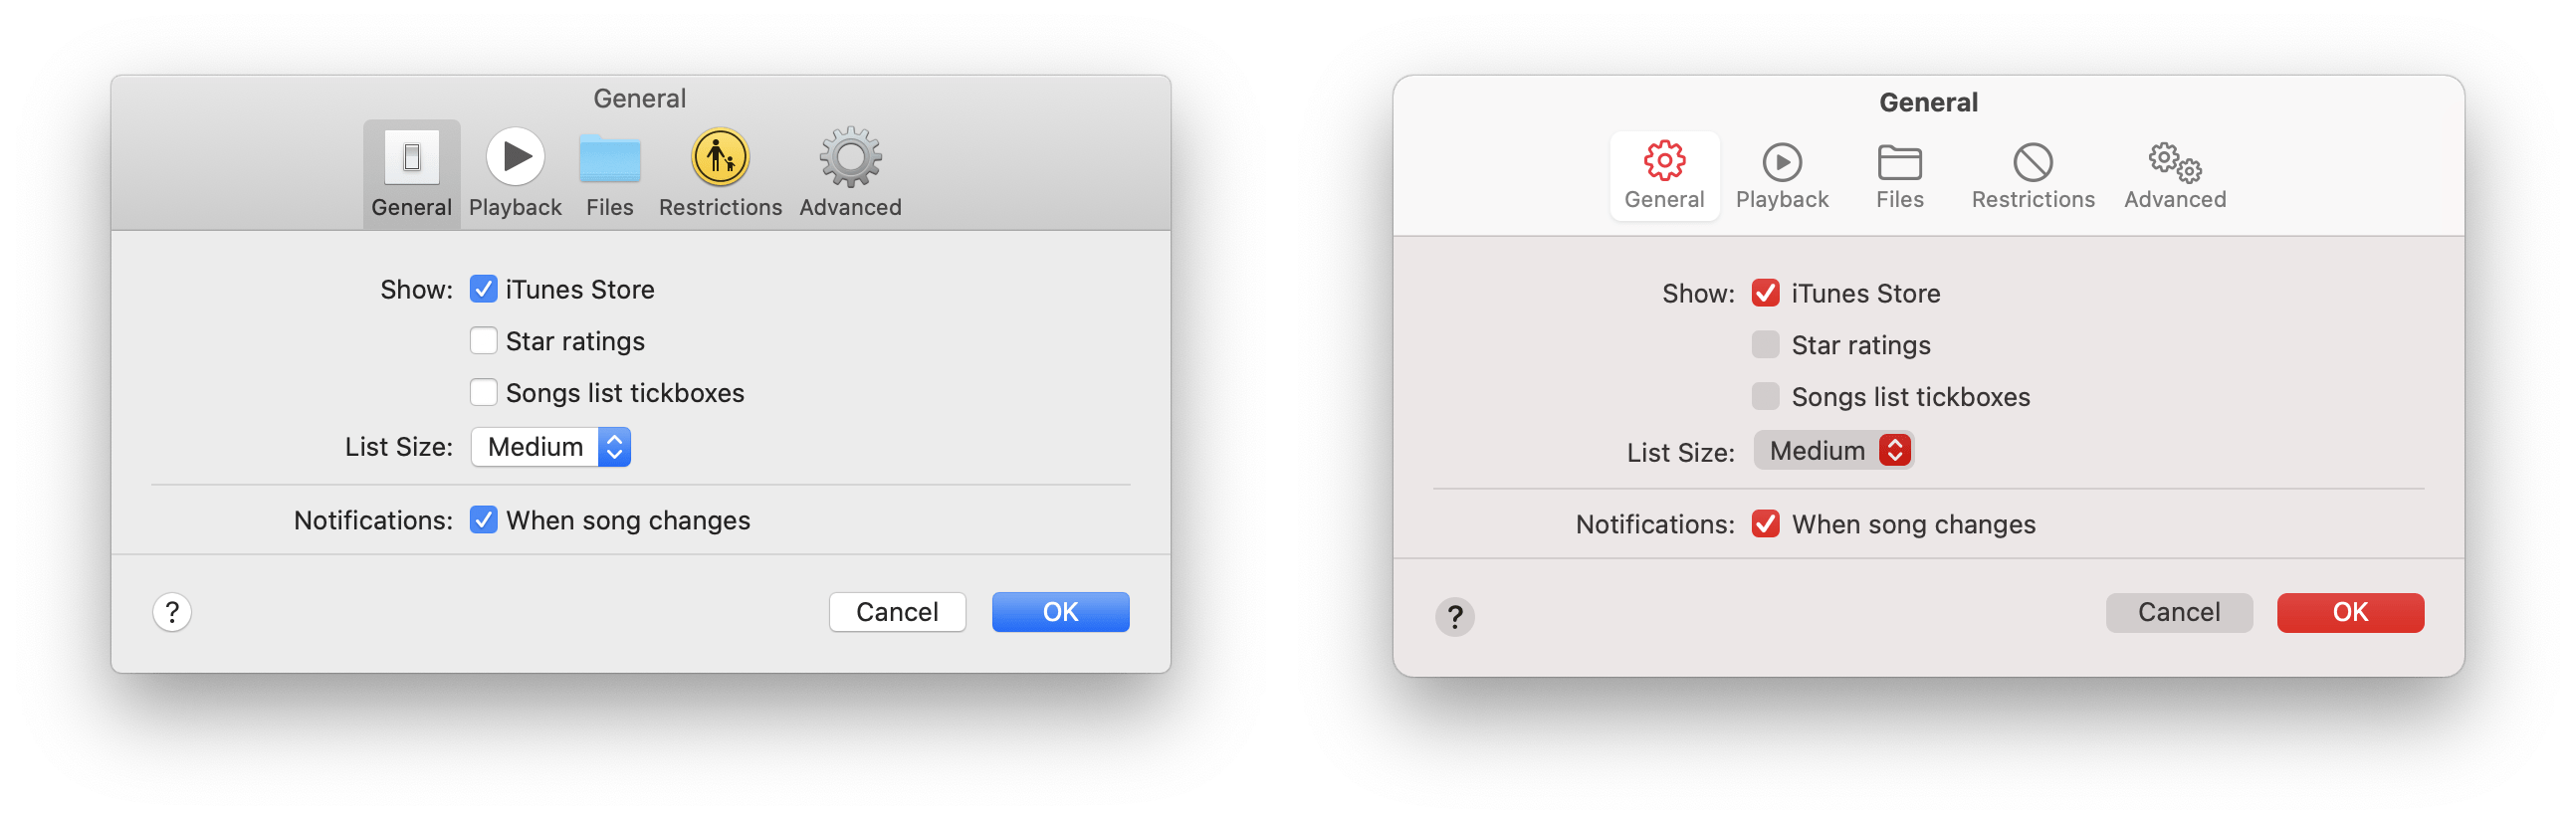
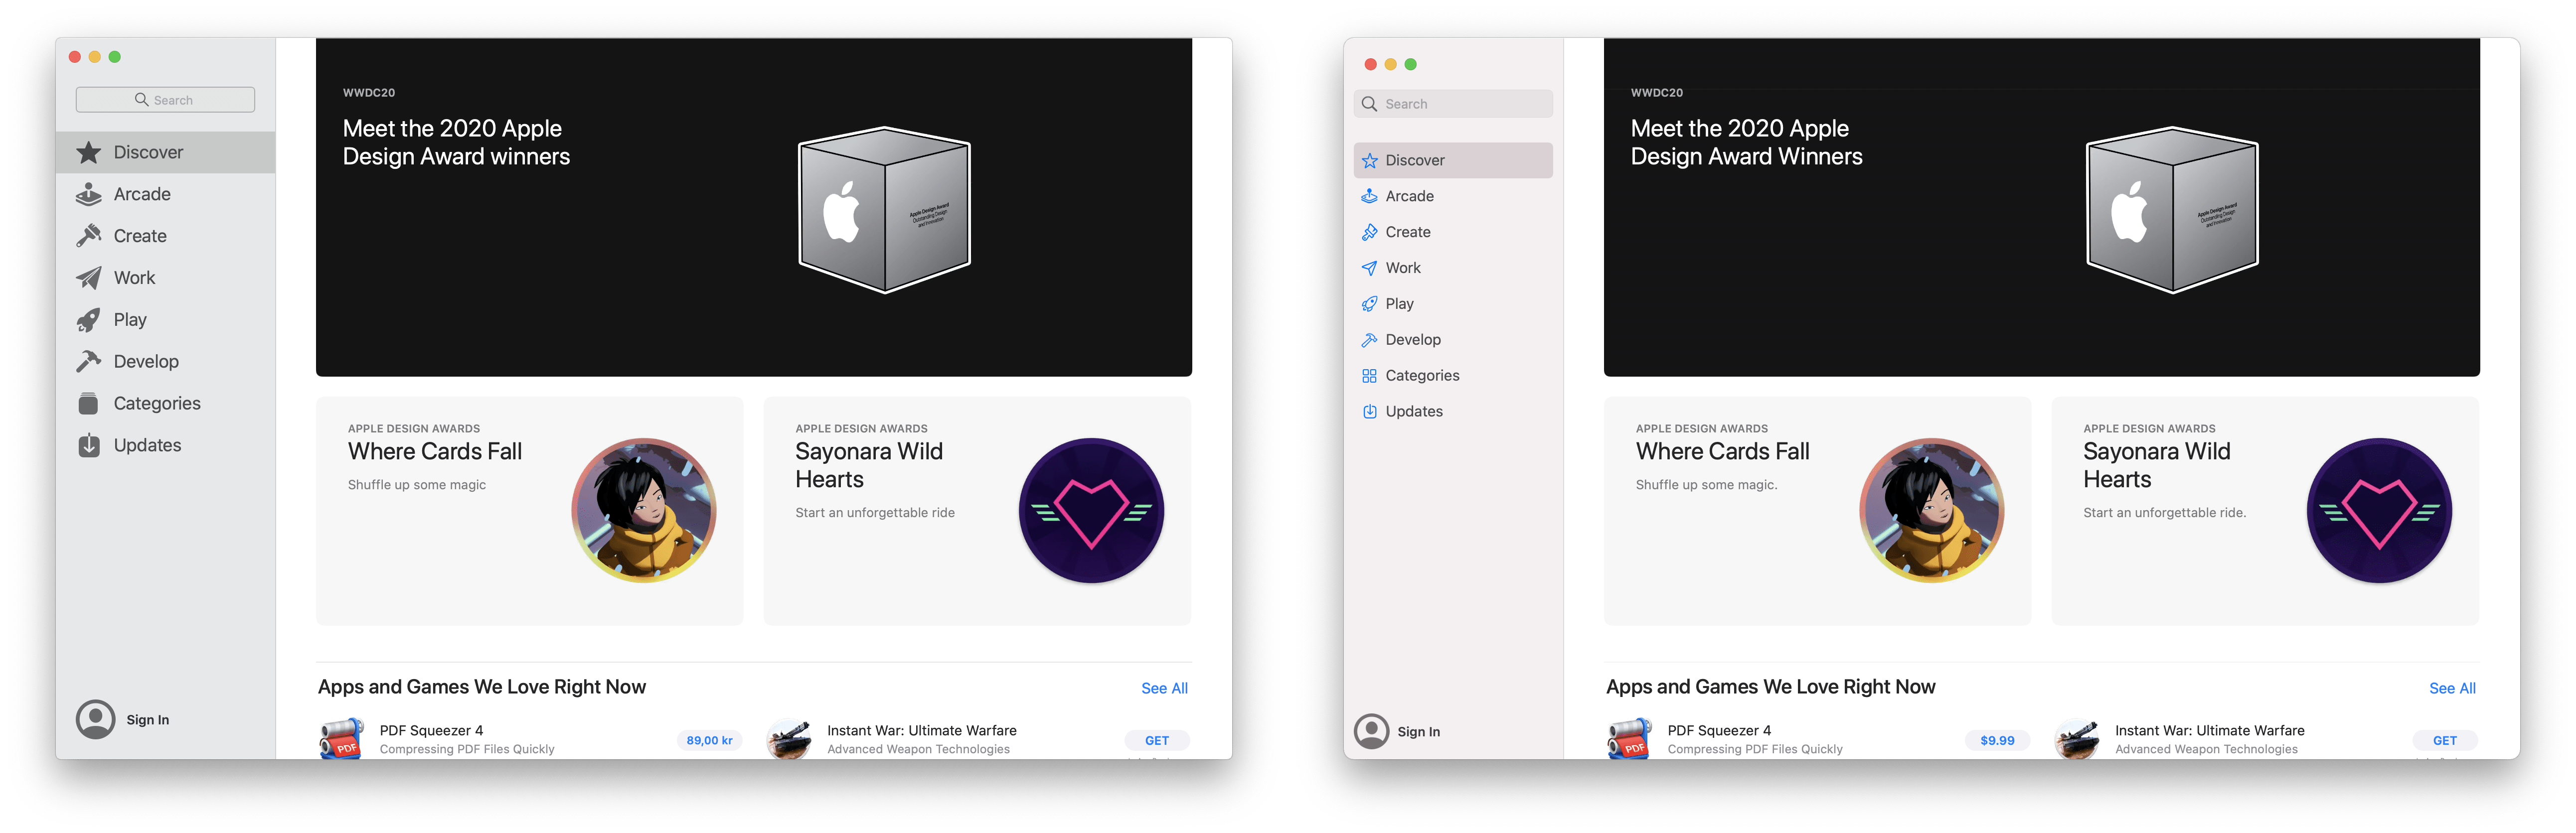
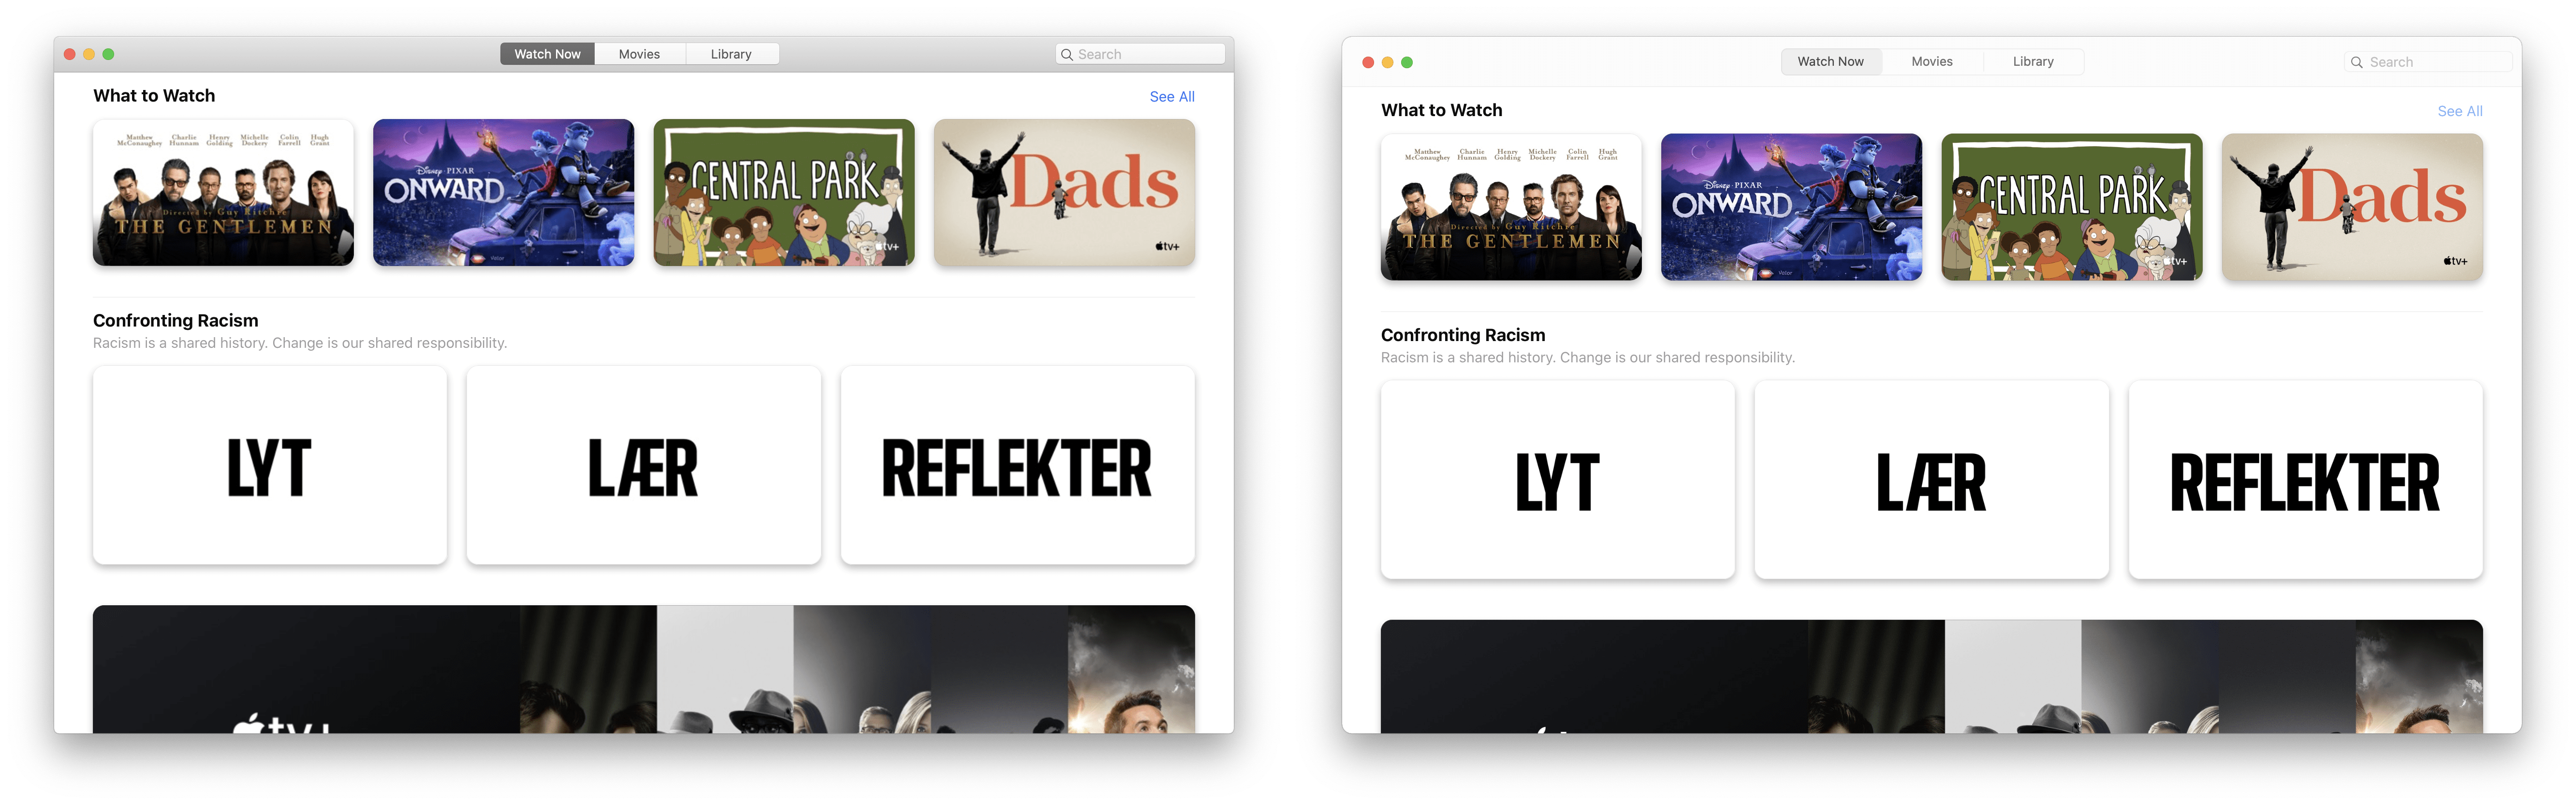
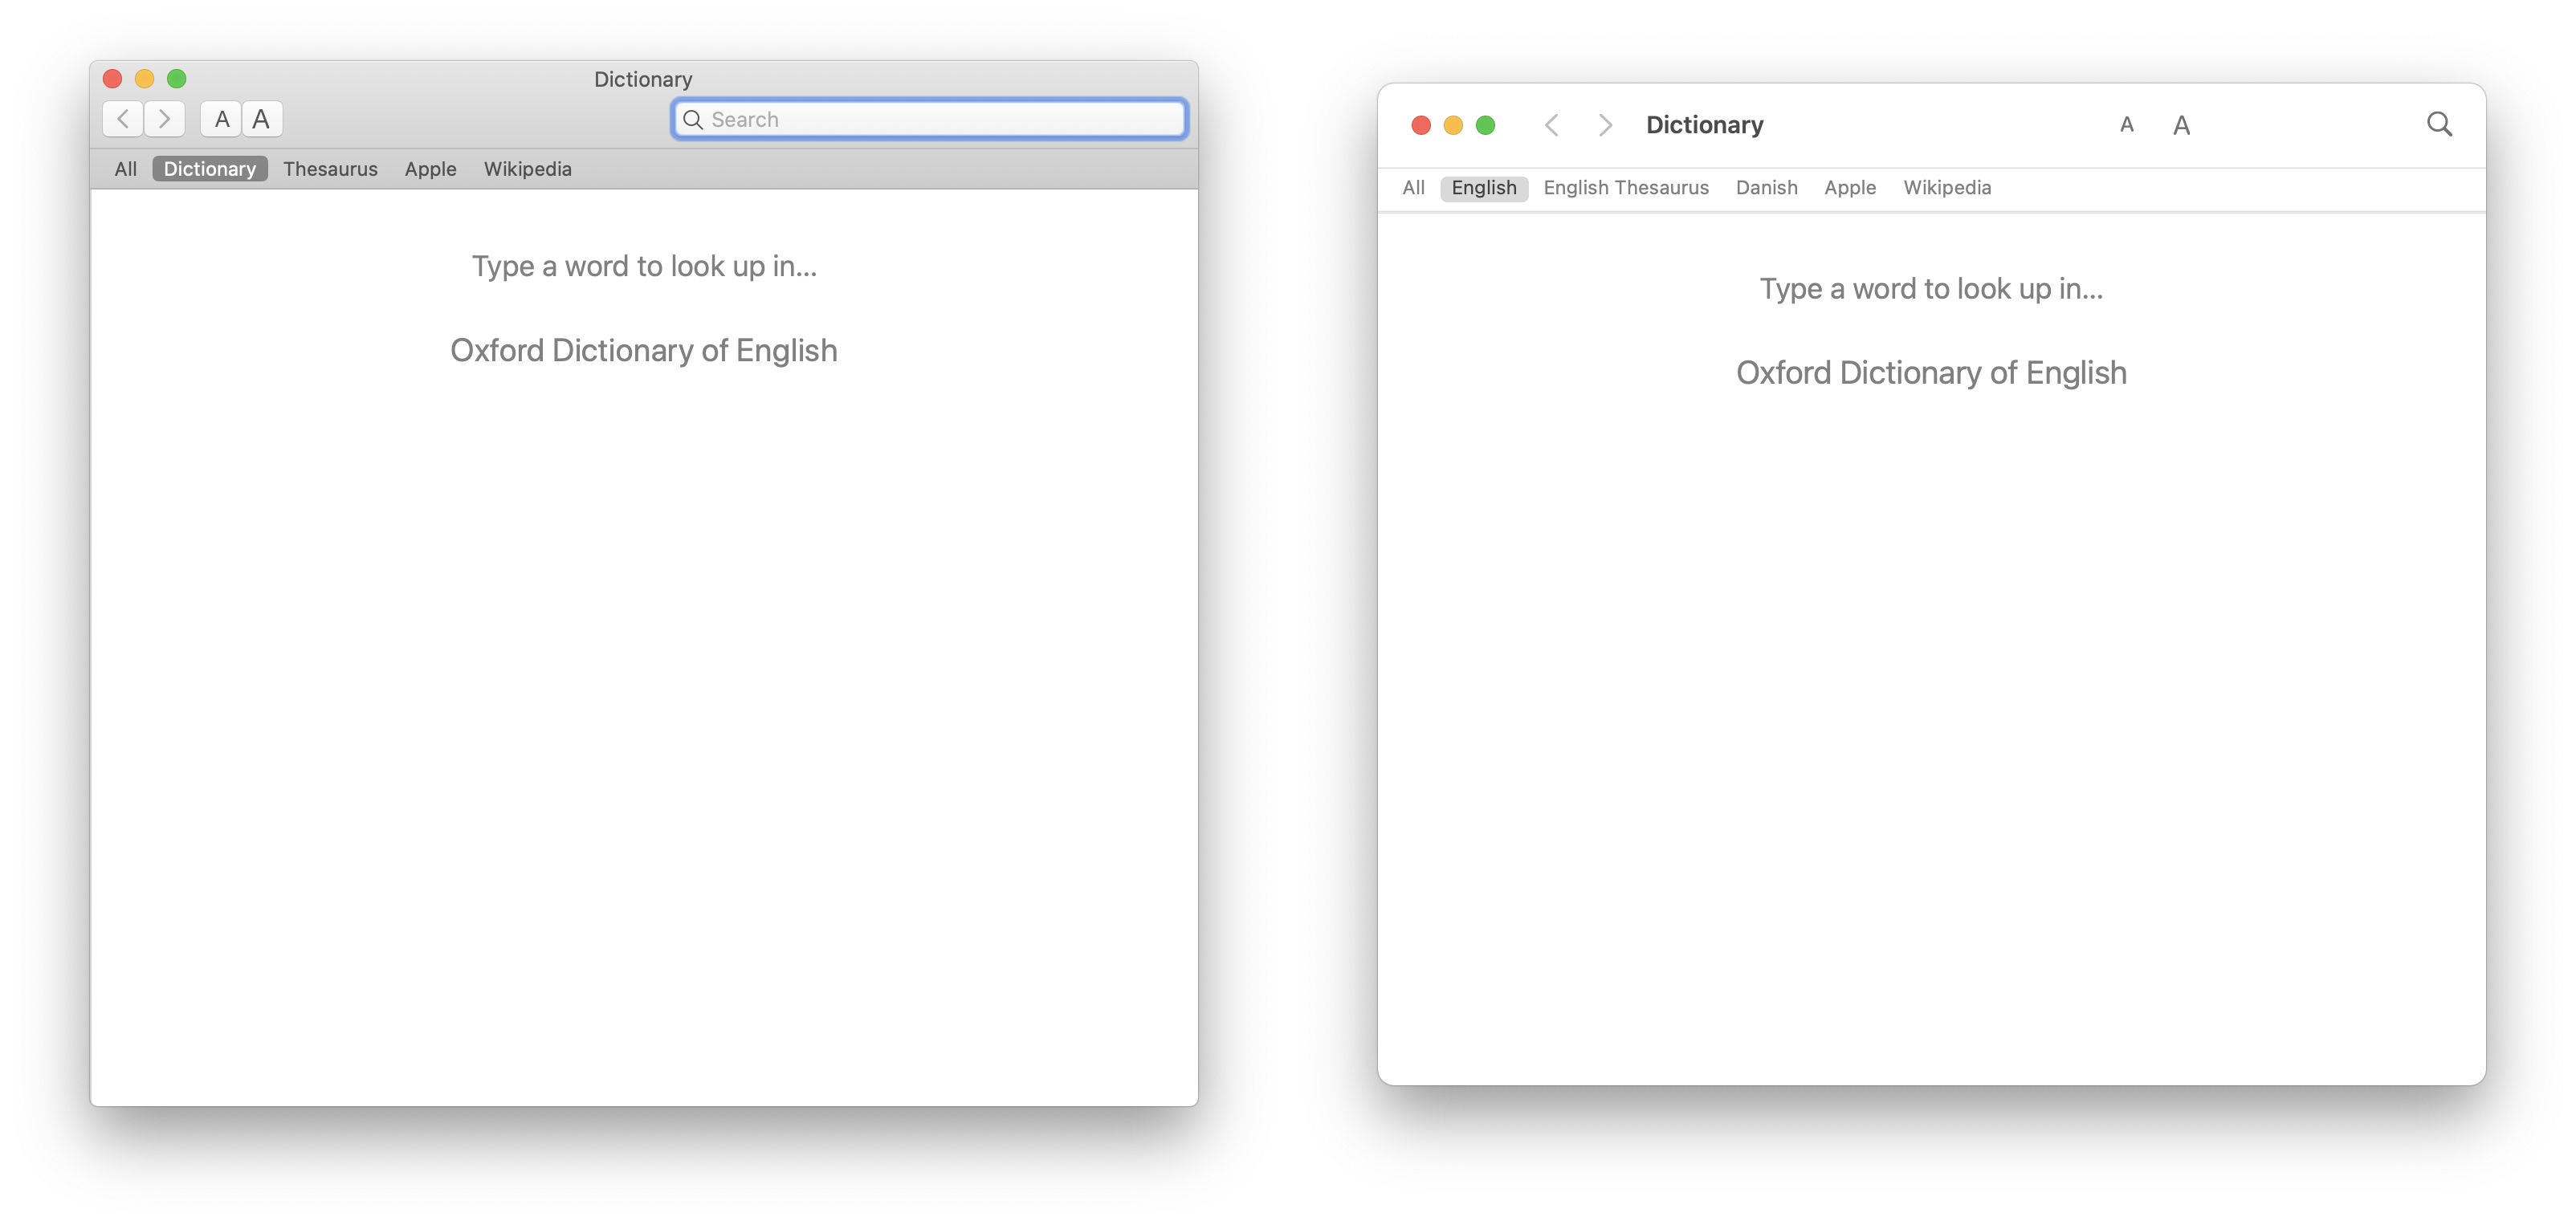
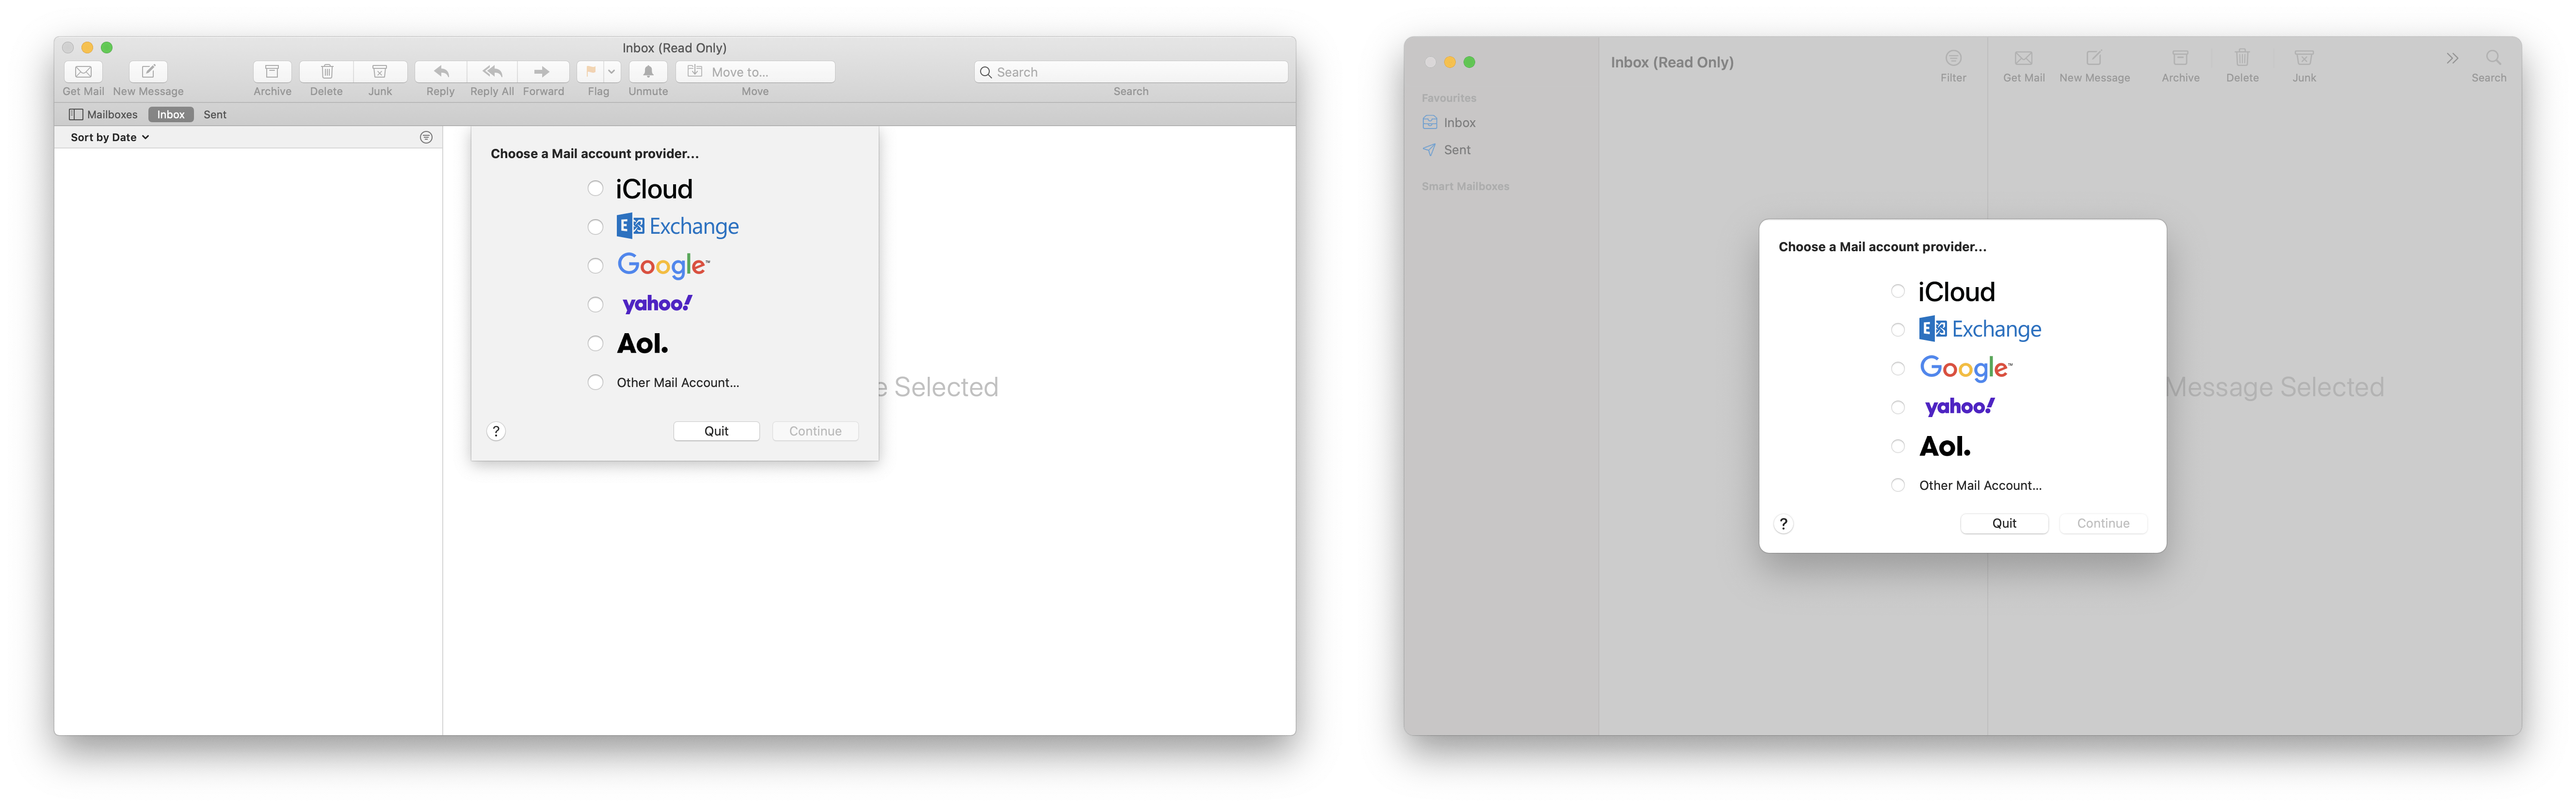
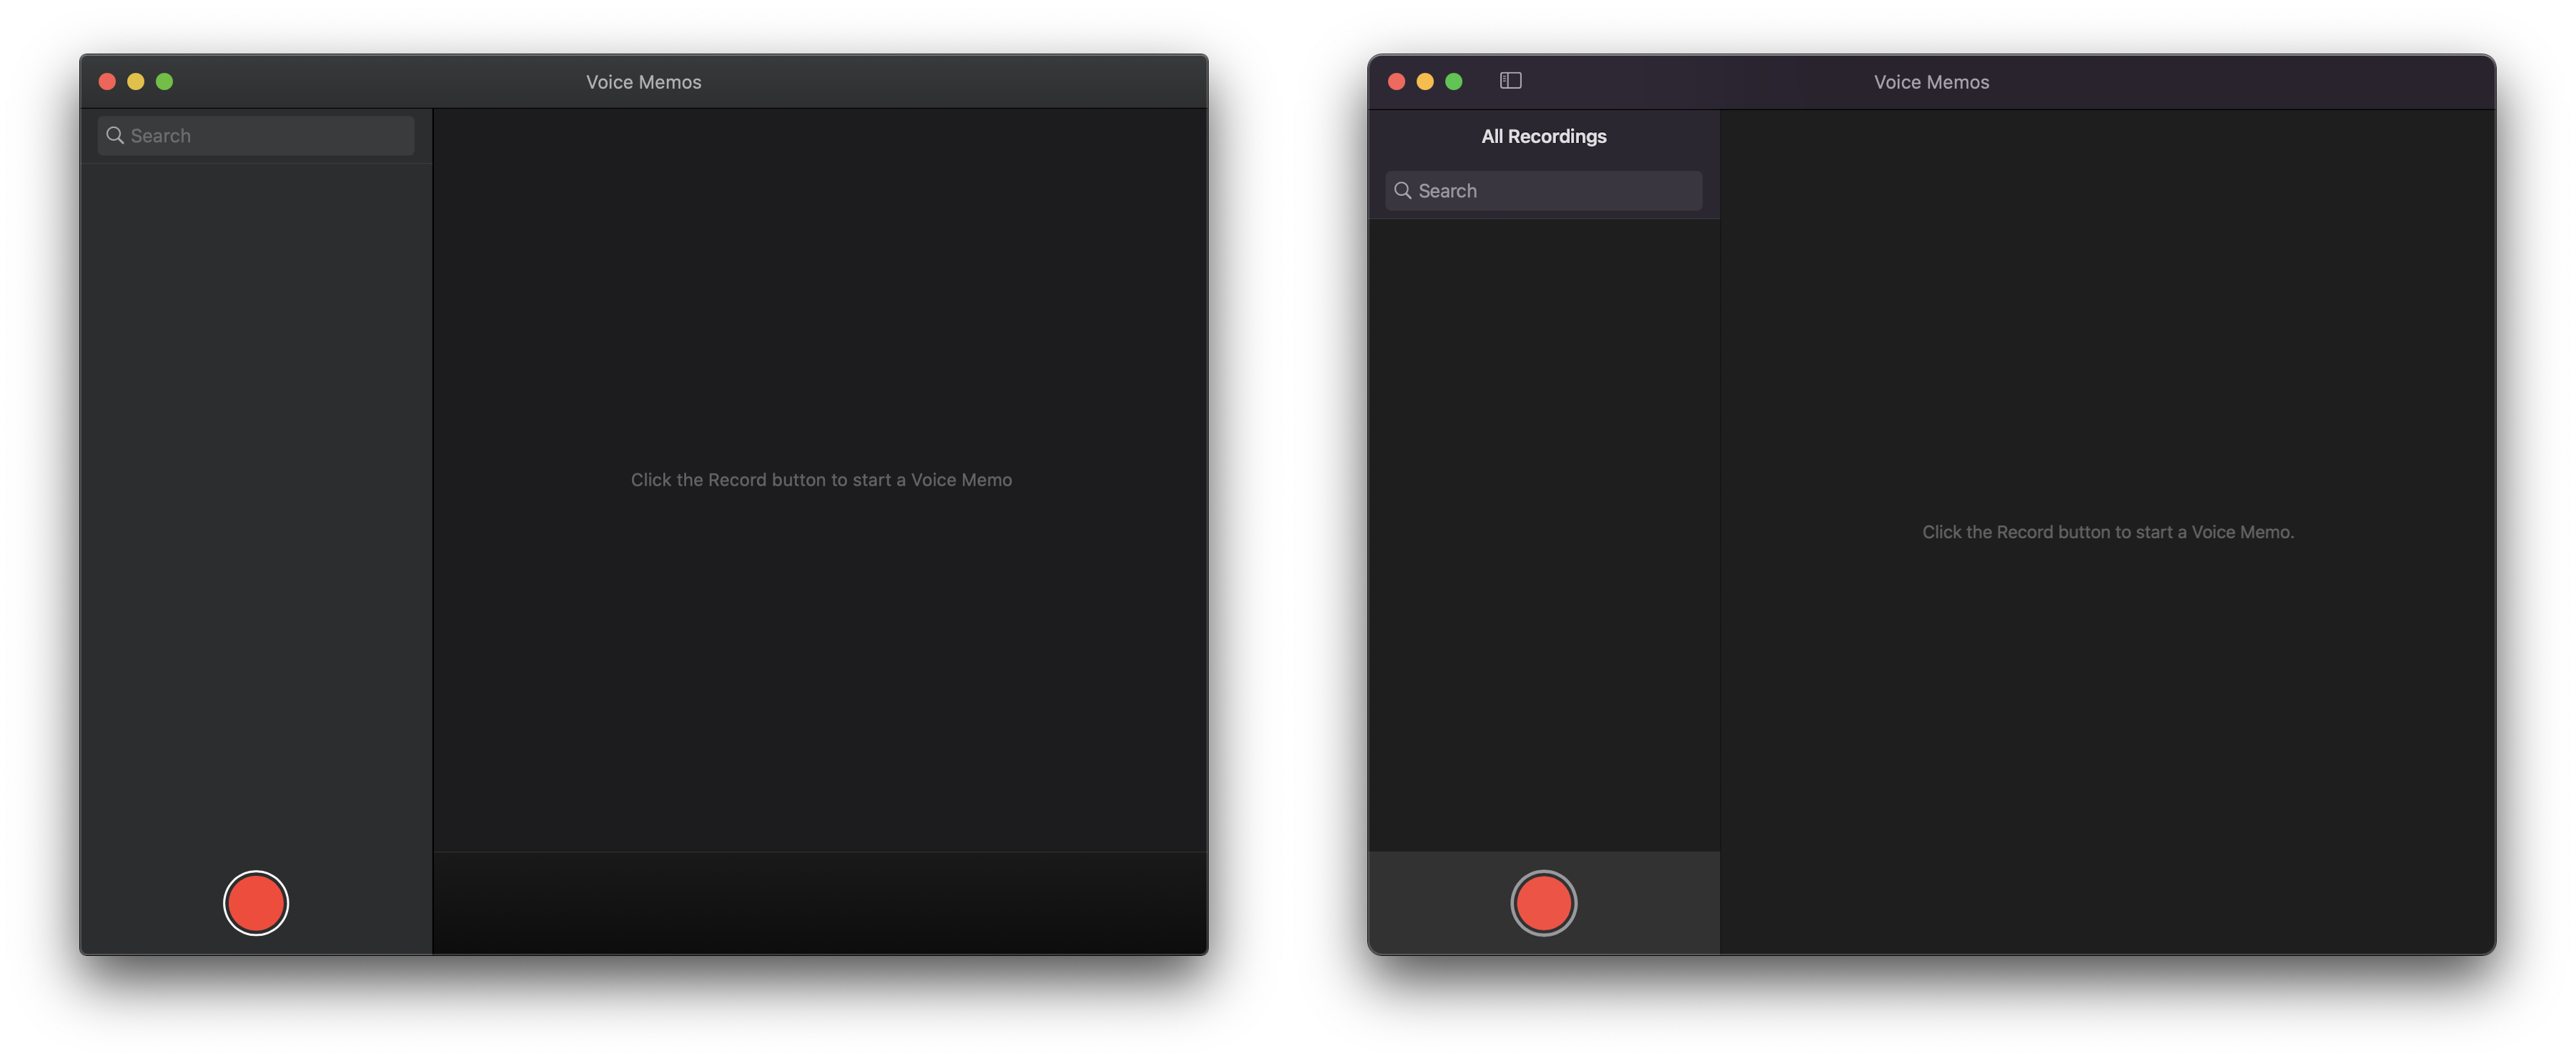
This post is an attempt to provide a visual comparison of pretty dramatic UI changes between macOS Catalina and Big Sur.</p>

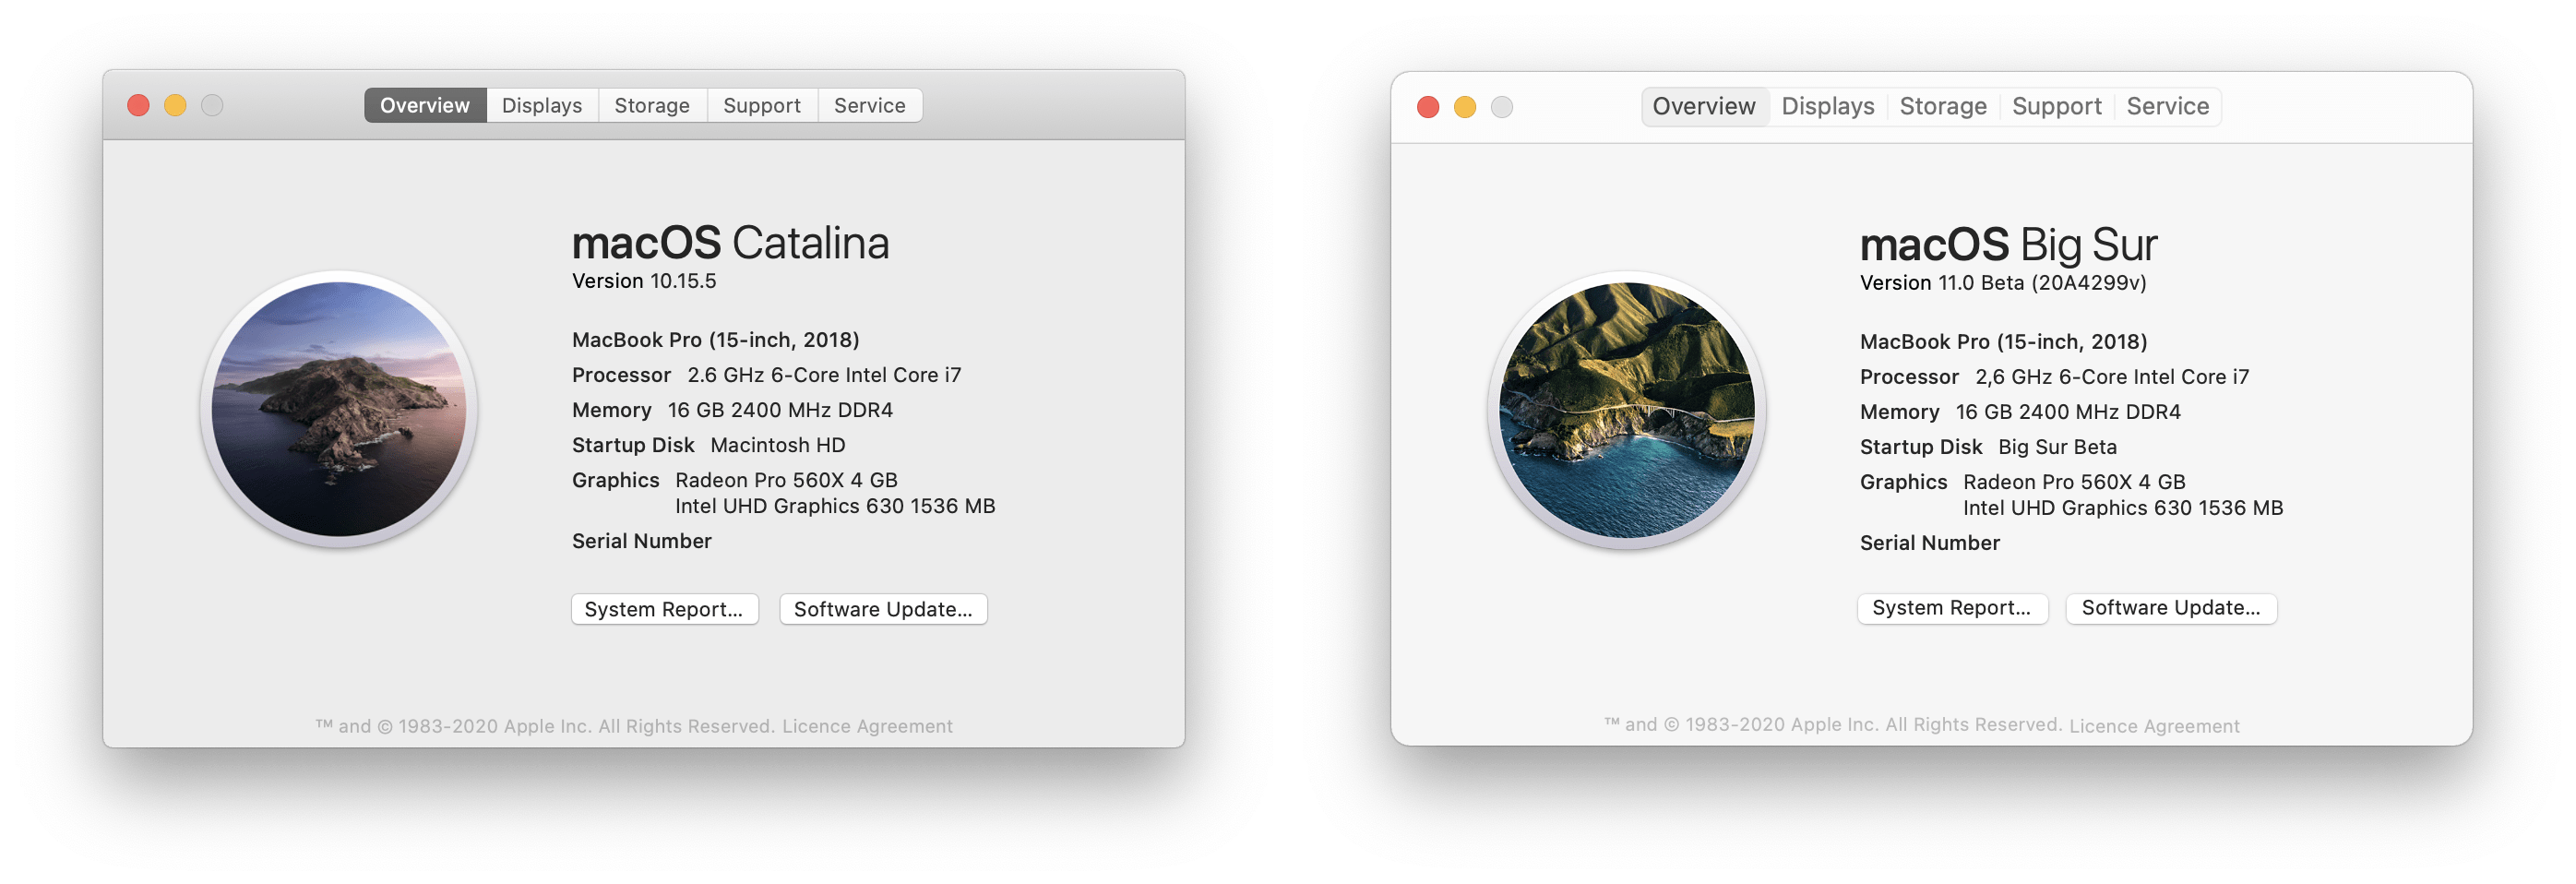
<p>Why did I end up doing this? Well, this week I installed the developer beta of macOS Big Sur as I was curious what impact the new UI would have on the <a href="https://www.andrewdenty.com/airtame-desktop-app.html">app I currently design</a>. I wanted to make sure my team was ahead of any coming changes as we were burned by changes in last year’s release of Catalina.</p>

<p>I found myself taking lots of screenshots to try and track the changes and thought this might be worth sharing. I decided to carry out a quick catalogue of the UI changes as this may be helpful to other people getting ready for macOS Big Sur.</p>

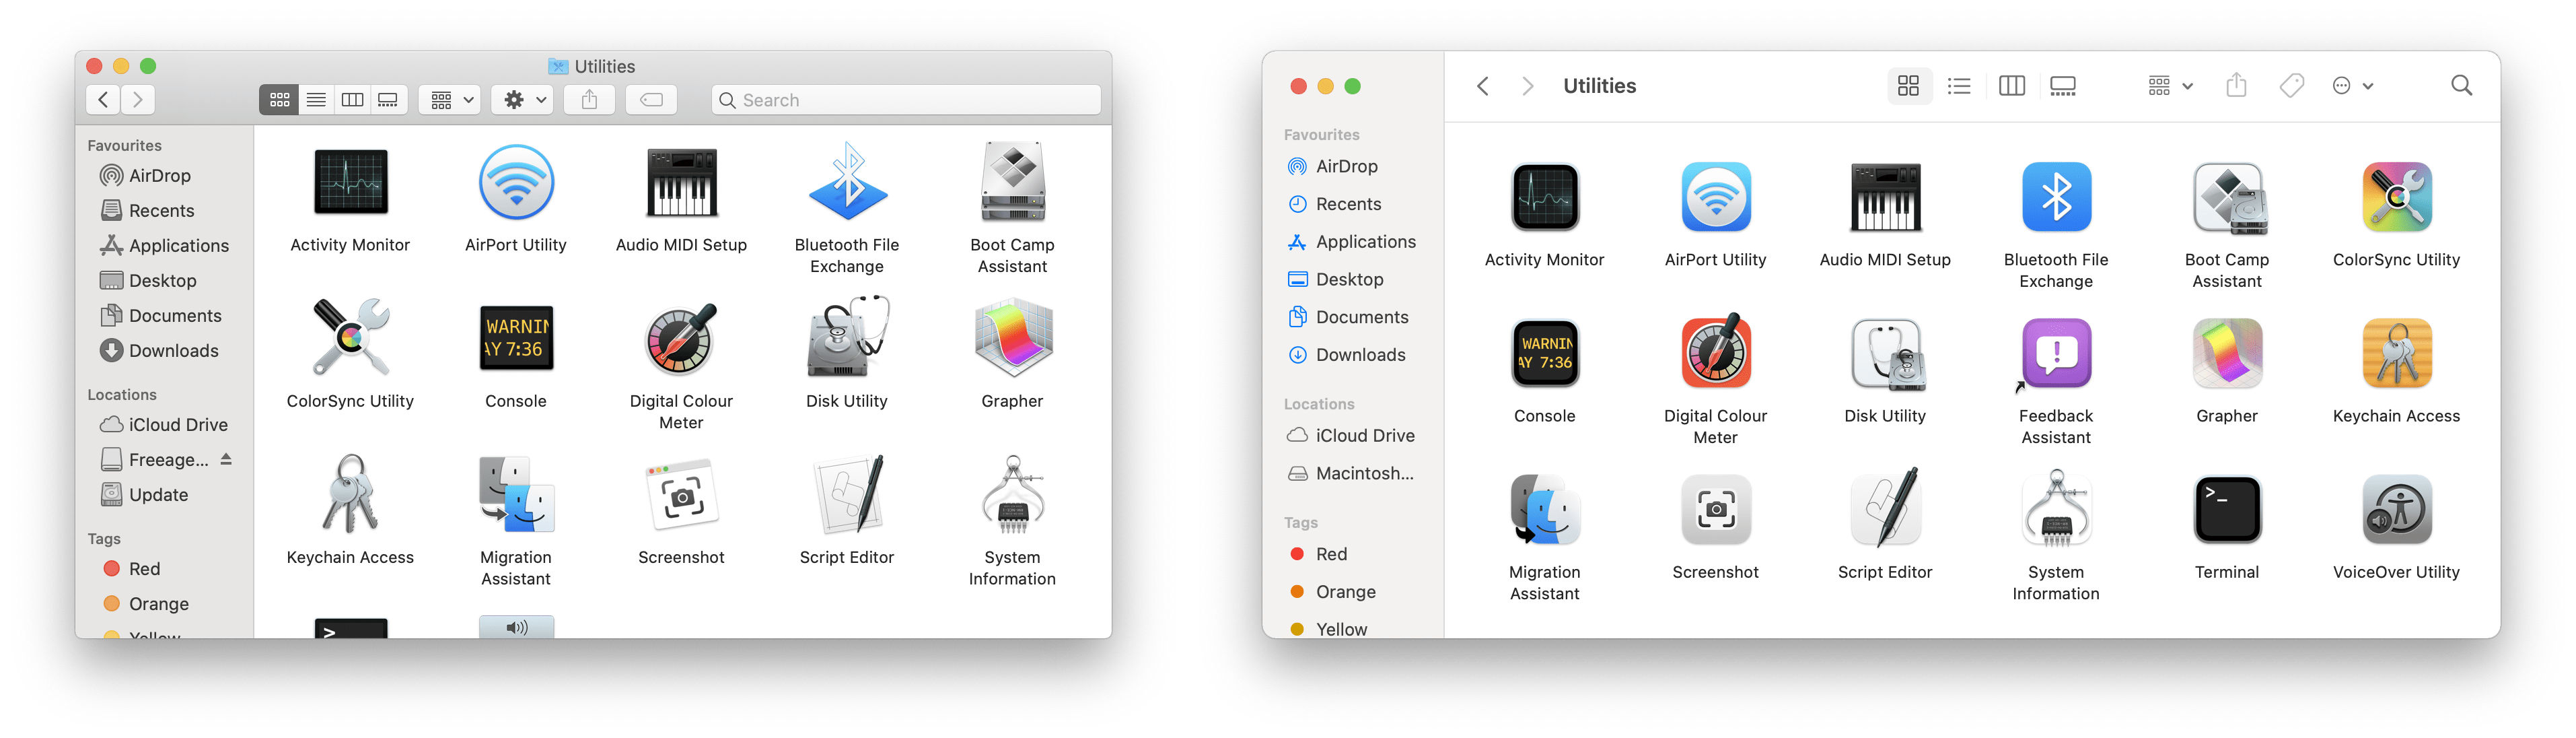
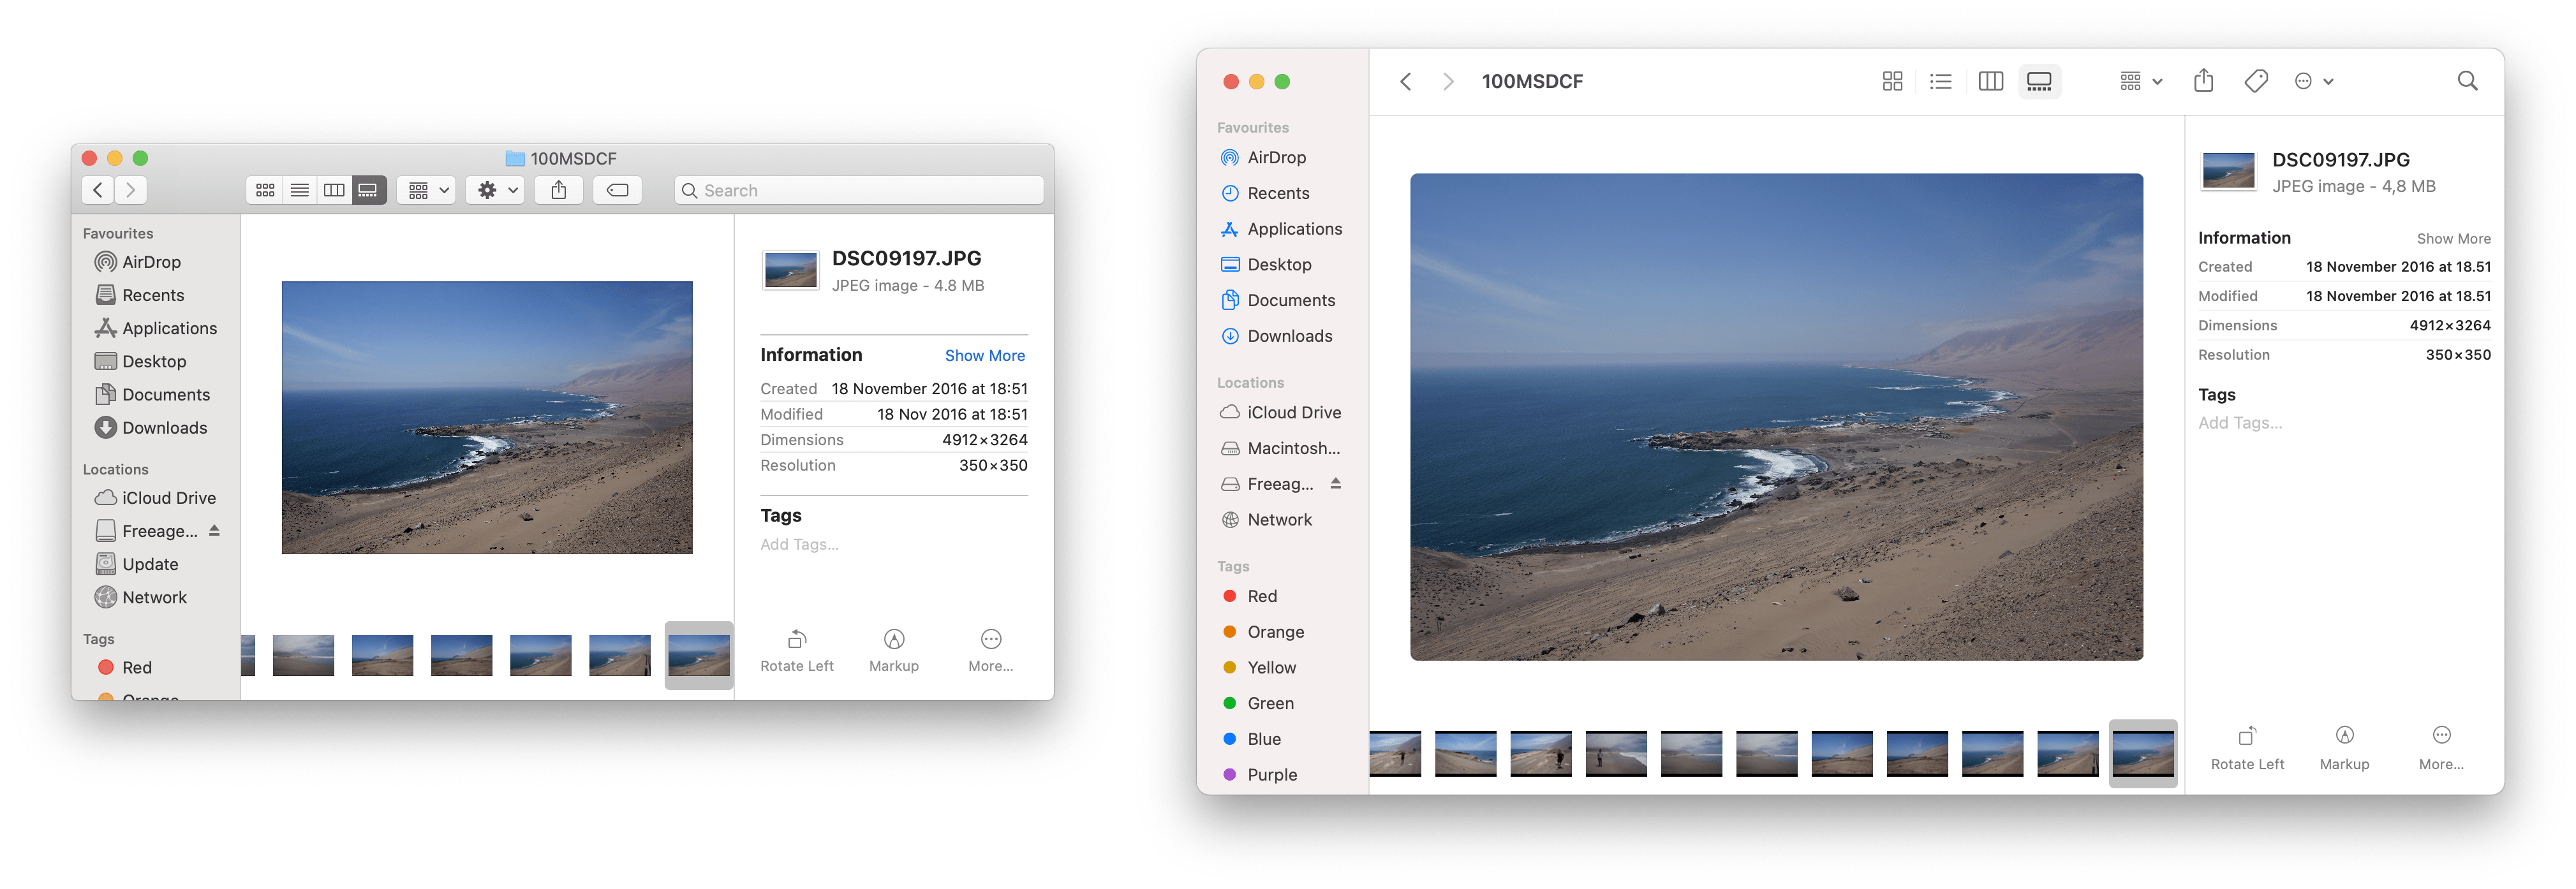
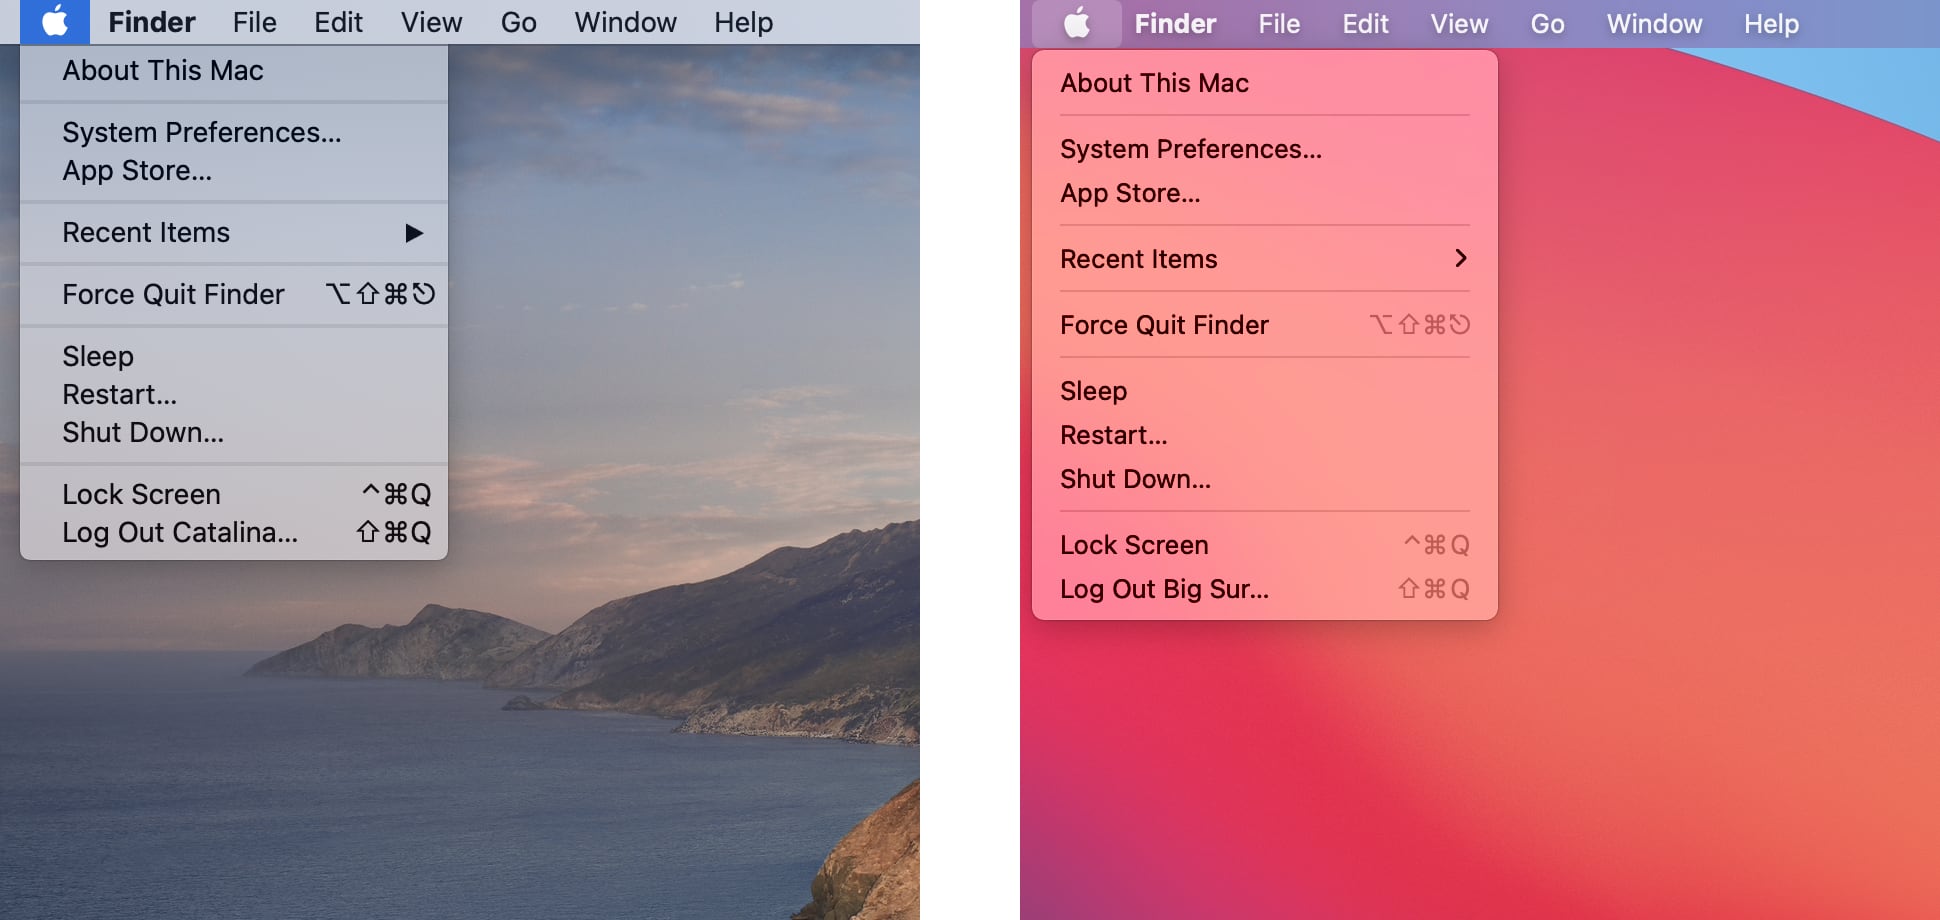
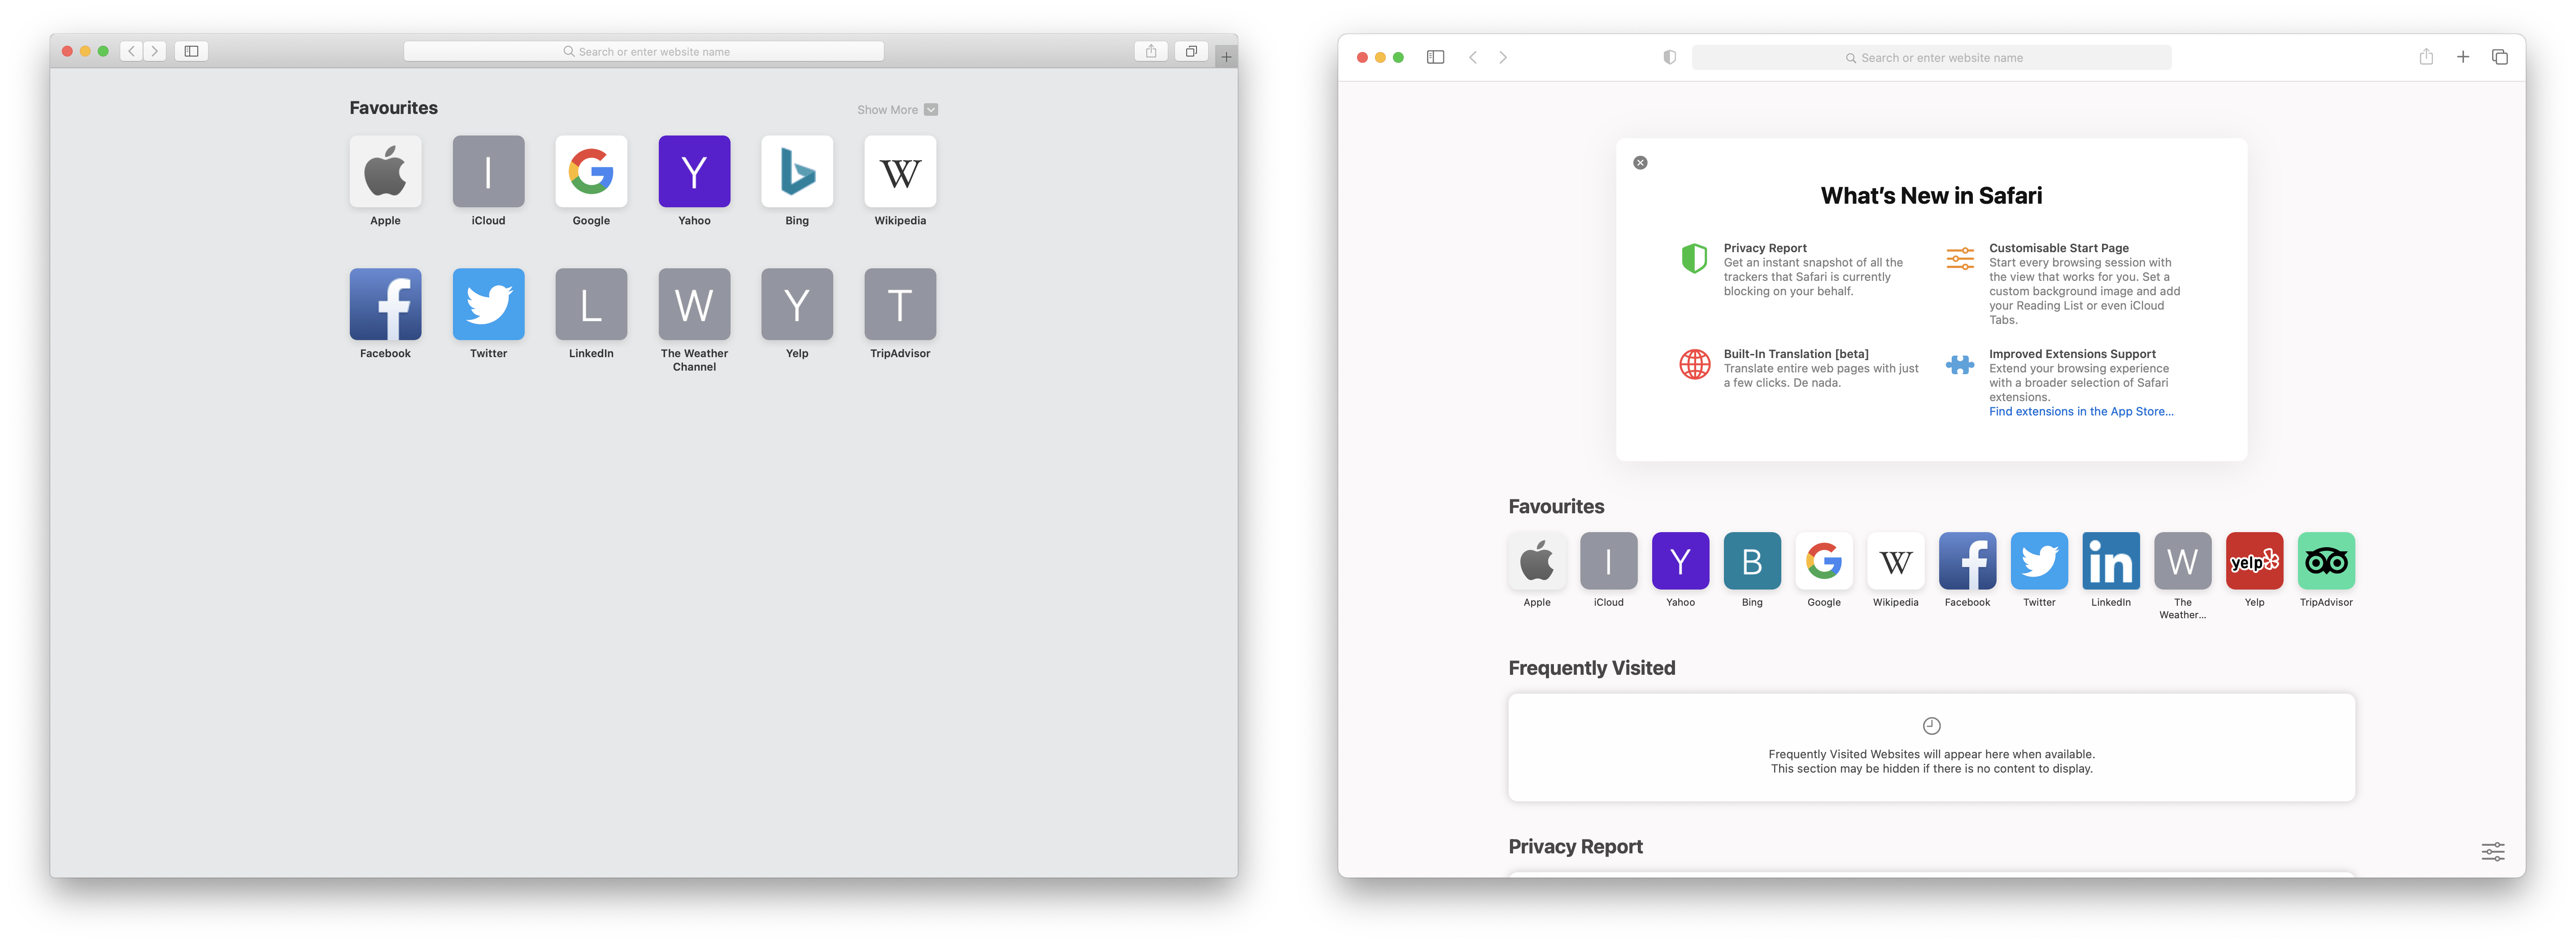
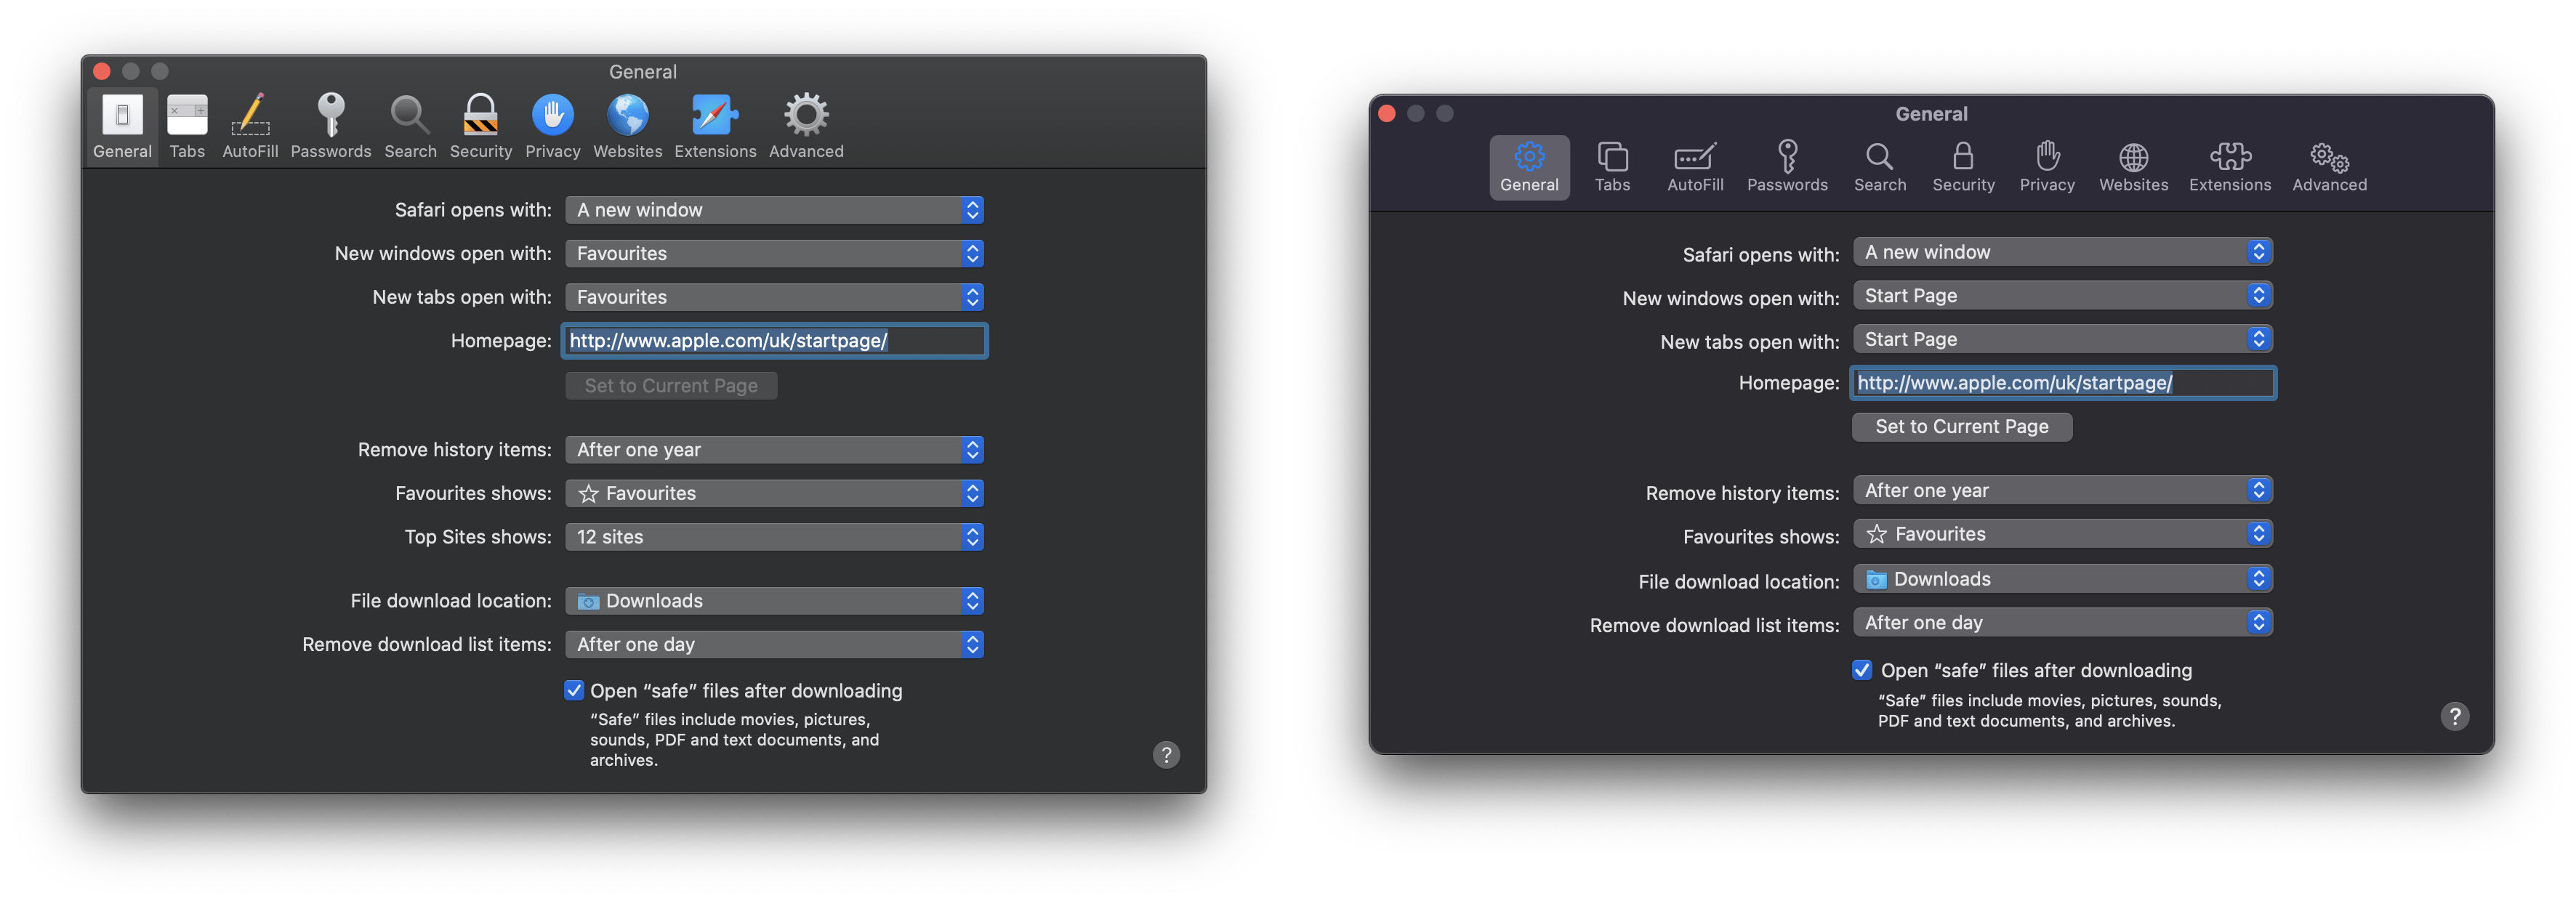
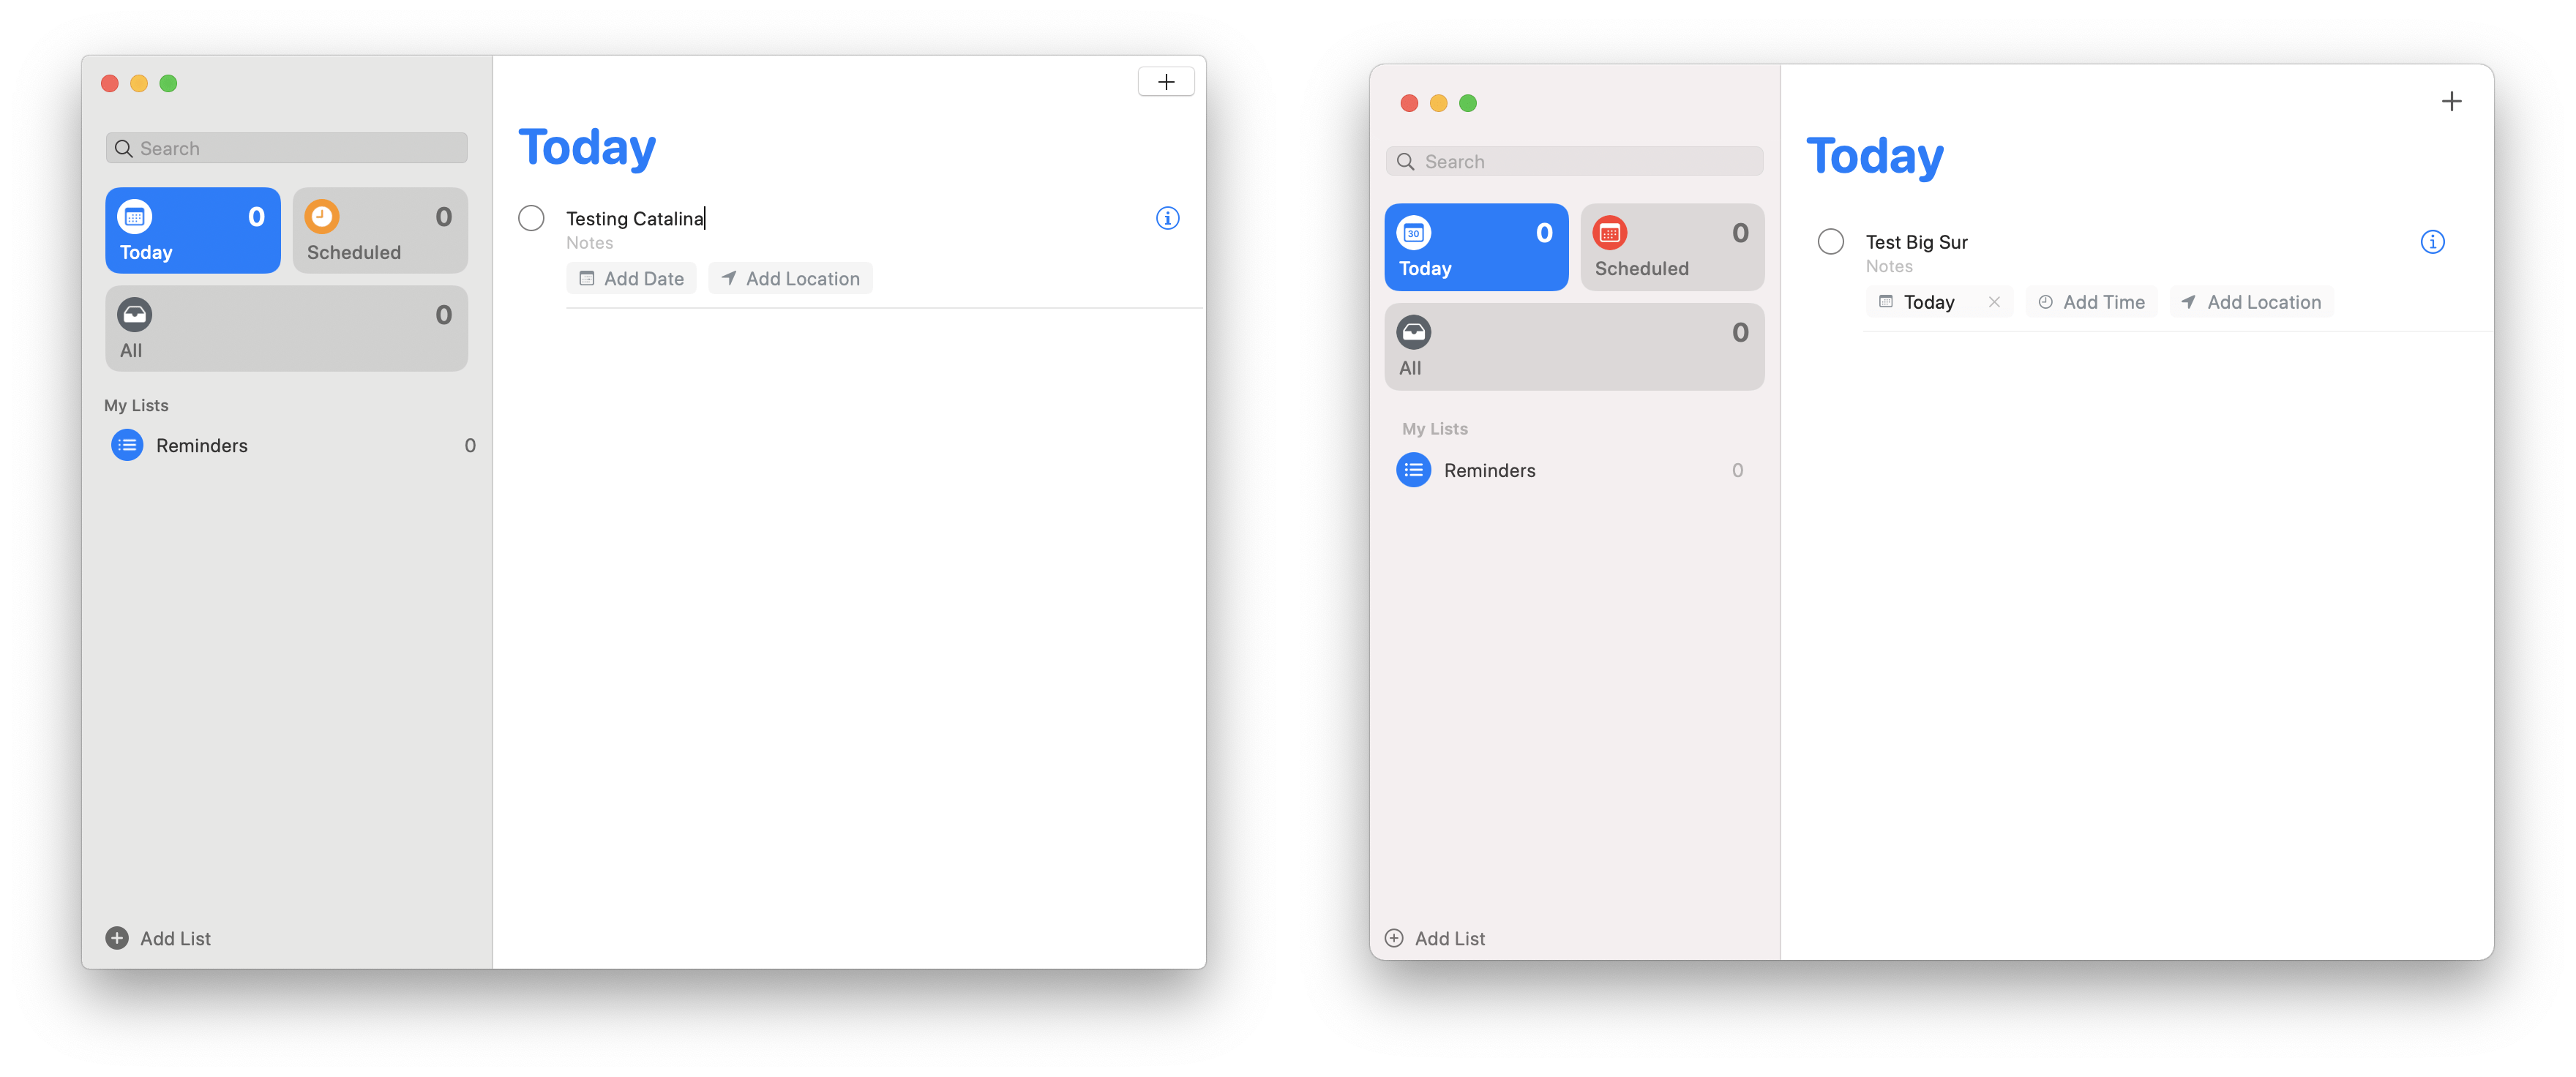
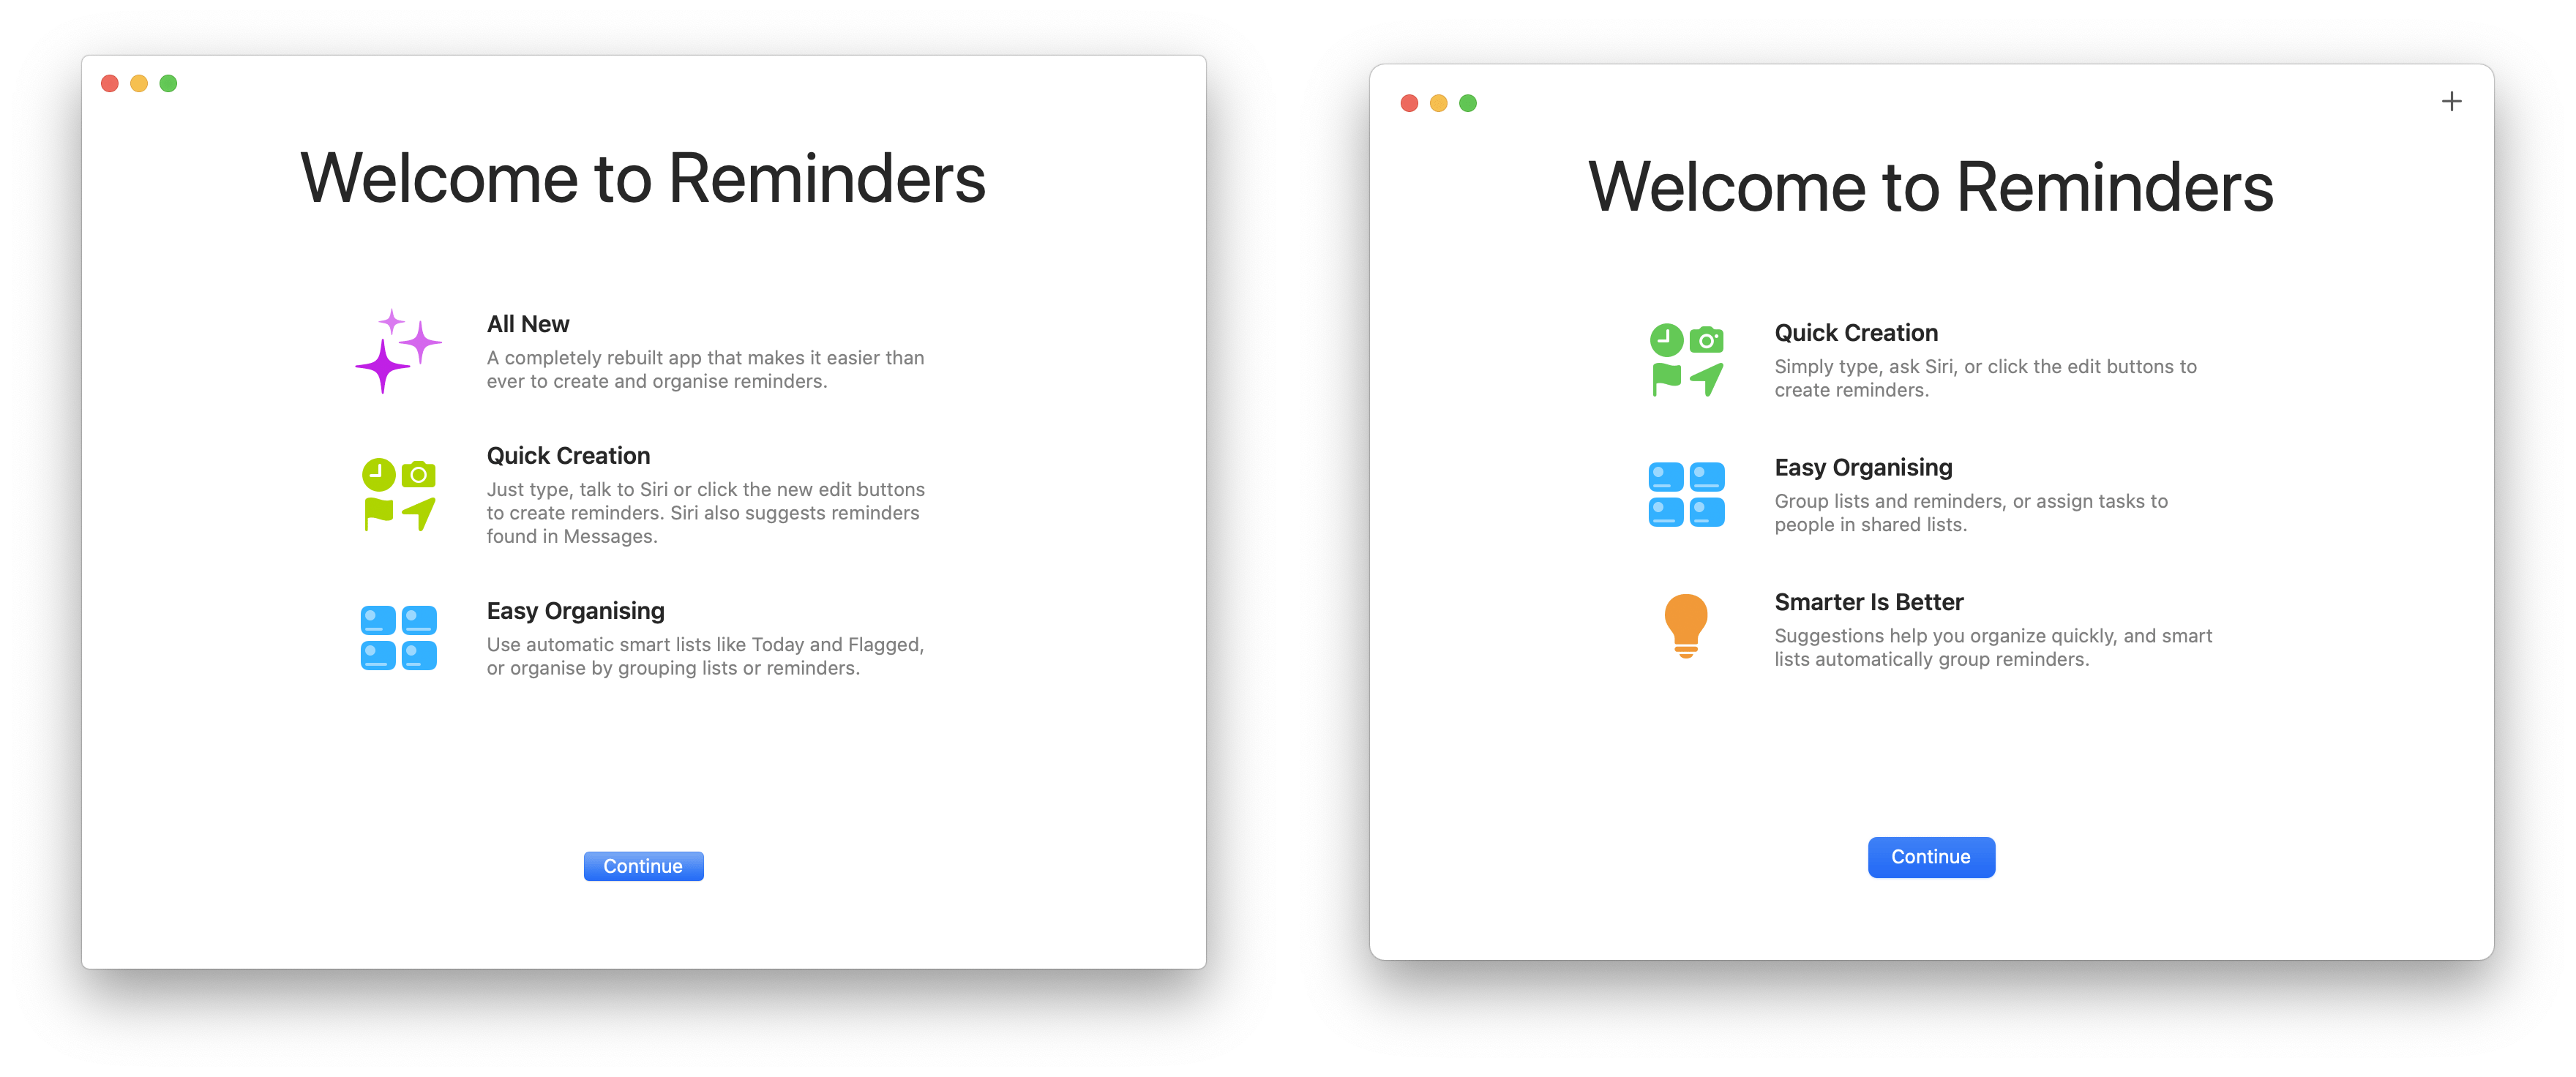
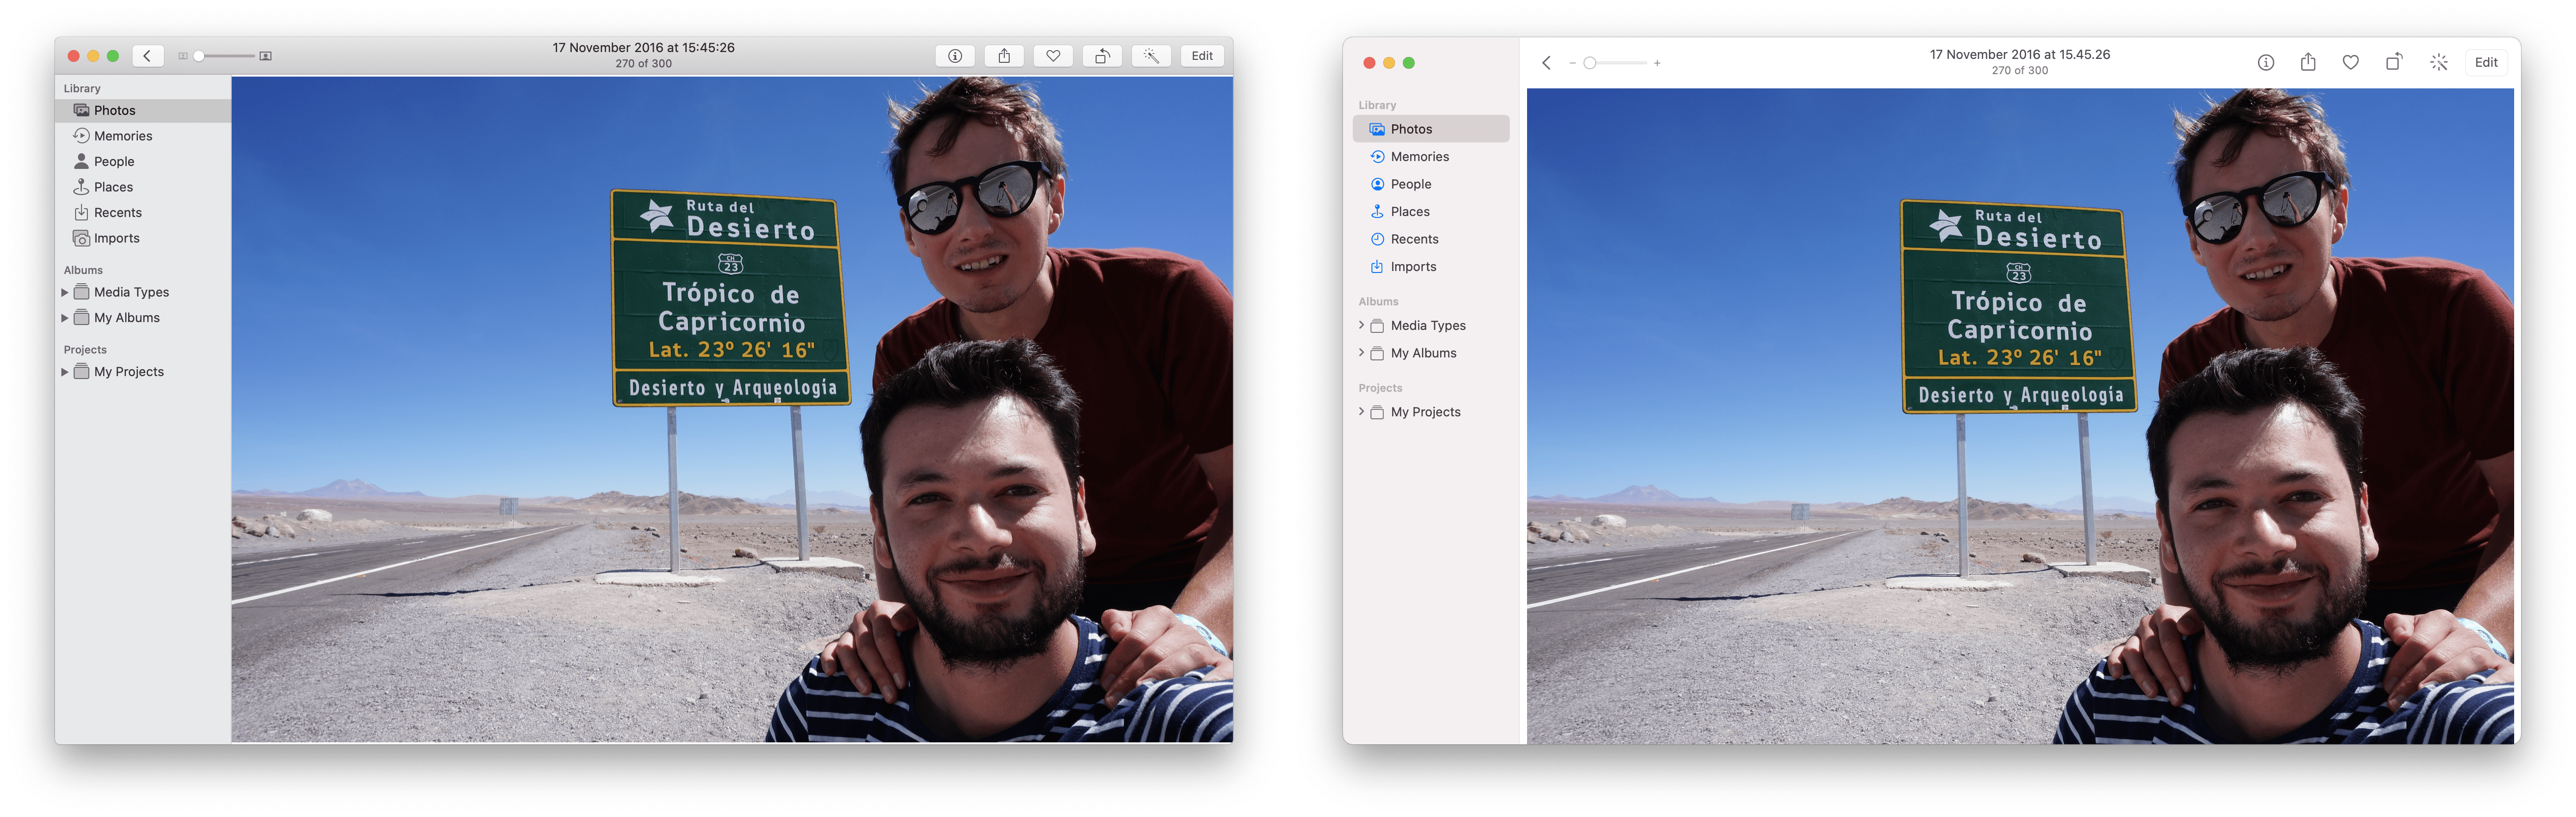
<p>All of the screenshots below are taken on a default install of macOS and the Catalina version is always on the left. I made a conscious effort not to resize any windows or change any default settings. I haven’t captured everything, but it is a good taste of the changes so far.</p>

<h2 id="first-impressions">First impressions</h2>
<style>
    .image-gallery {overflow: auto; margin-left: -1%!important;}
    .image-gallery li {float: left; display: block; margin: 0 0 0 0; width: 100%;}
    .image-gallery li a {text-align: center; text-decoration: none!important; color: #777;}
    .image-gallery li a span {display: block; text-overflow: ellipsis; overflow: hidden; white-space: nowrap; padding: 3px 0;}
    .image-gallery li a img {width: 100%; display: block;}
</style>

<ul class="image-gallery"><li><a href="/blog/assets/img/macos-new-ui/general/about-macos-macos-catalina-big-sur-comparison.png" title="about-macos-macos-catalina-big-sur-comparison"><img src="/blog/assets/img/macos-new-ui/general/about-macos-macos-catalina-big-sur-comparison.png" alt="about-macos-macos-catalina-big-sur-comparison" title="about-macos-macos-catalina-big-sur-comparison" /></a></li><li><a href="/blog/assets/img/macos-new-ui/general/desktop-macos-catalina-big-sur-comparison.jpg" title="desktop-macos-catalina-big-sur-comparison"><img src="/blog/assets/img/macos-new-ui/general/desktop-macos-catalina-big-sur-comparison.jpg" alt="desktop-macos-catalina-big-sur-comparison" title="desktop-macos-catalina-big-sur-comparison" /></a></li><li><a href="/blog/assets/img/macos-new-ui/general/launchpad-macos-catalina-big-sur-comparison.jpg" title="launchpad-macos-catalina-big-sur-comparison"><img src="/blog/assets/img/macos-new-ui/general/launchpad-macos-catalina-big-sur-comparison.jpg" alt="launchpad-macos-catalina-big-sur-comparison" title="launchpad-macos-catalina-big-sur-comparison" /></a></li></ul>

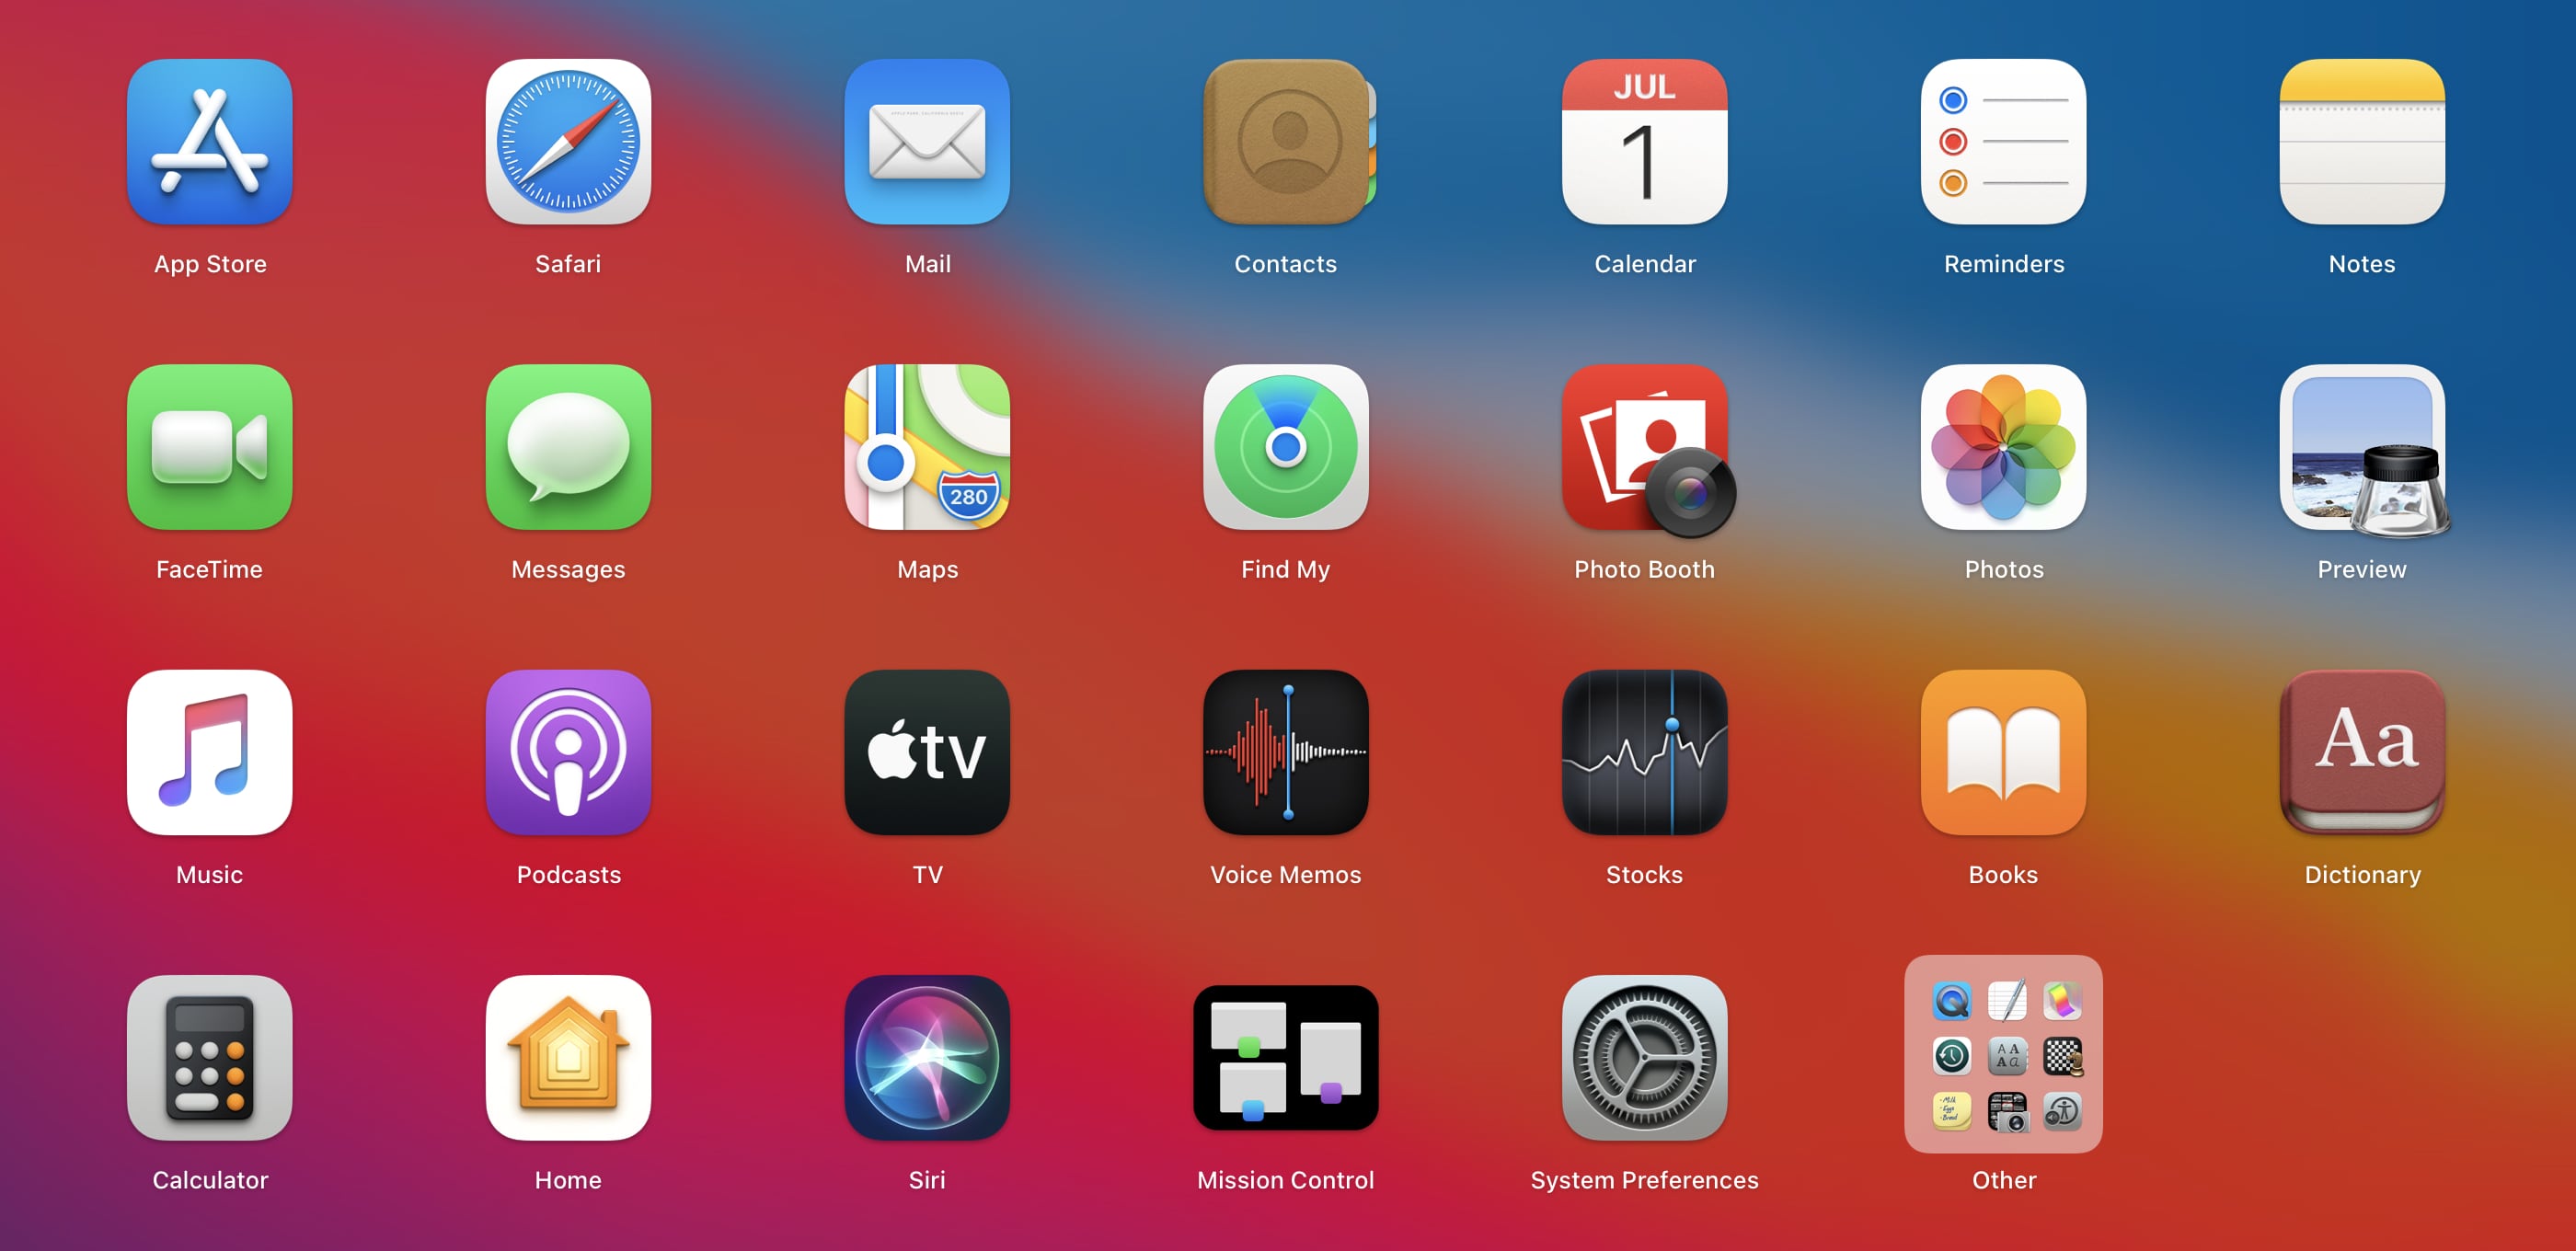
<p>At first glance macOS is a lot more colourful with, and the biggest obvious change is the bright, slightly more cartoonish iOS shaped icons. Everything is more rounded and it feels like everything has gotten a little bigger. Could this be the first hint that macOS is preparing for touch support in the future? One interesting tidbit, is that even though the icons are based around the capsule shape, many of them (like Contacts, or Preview) have elements which protrude from them giving an extra feeling of depth.</p>

<h2 id="finder-and-preview">Finder and Preview</h2>
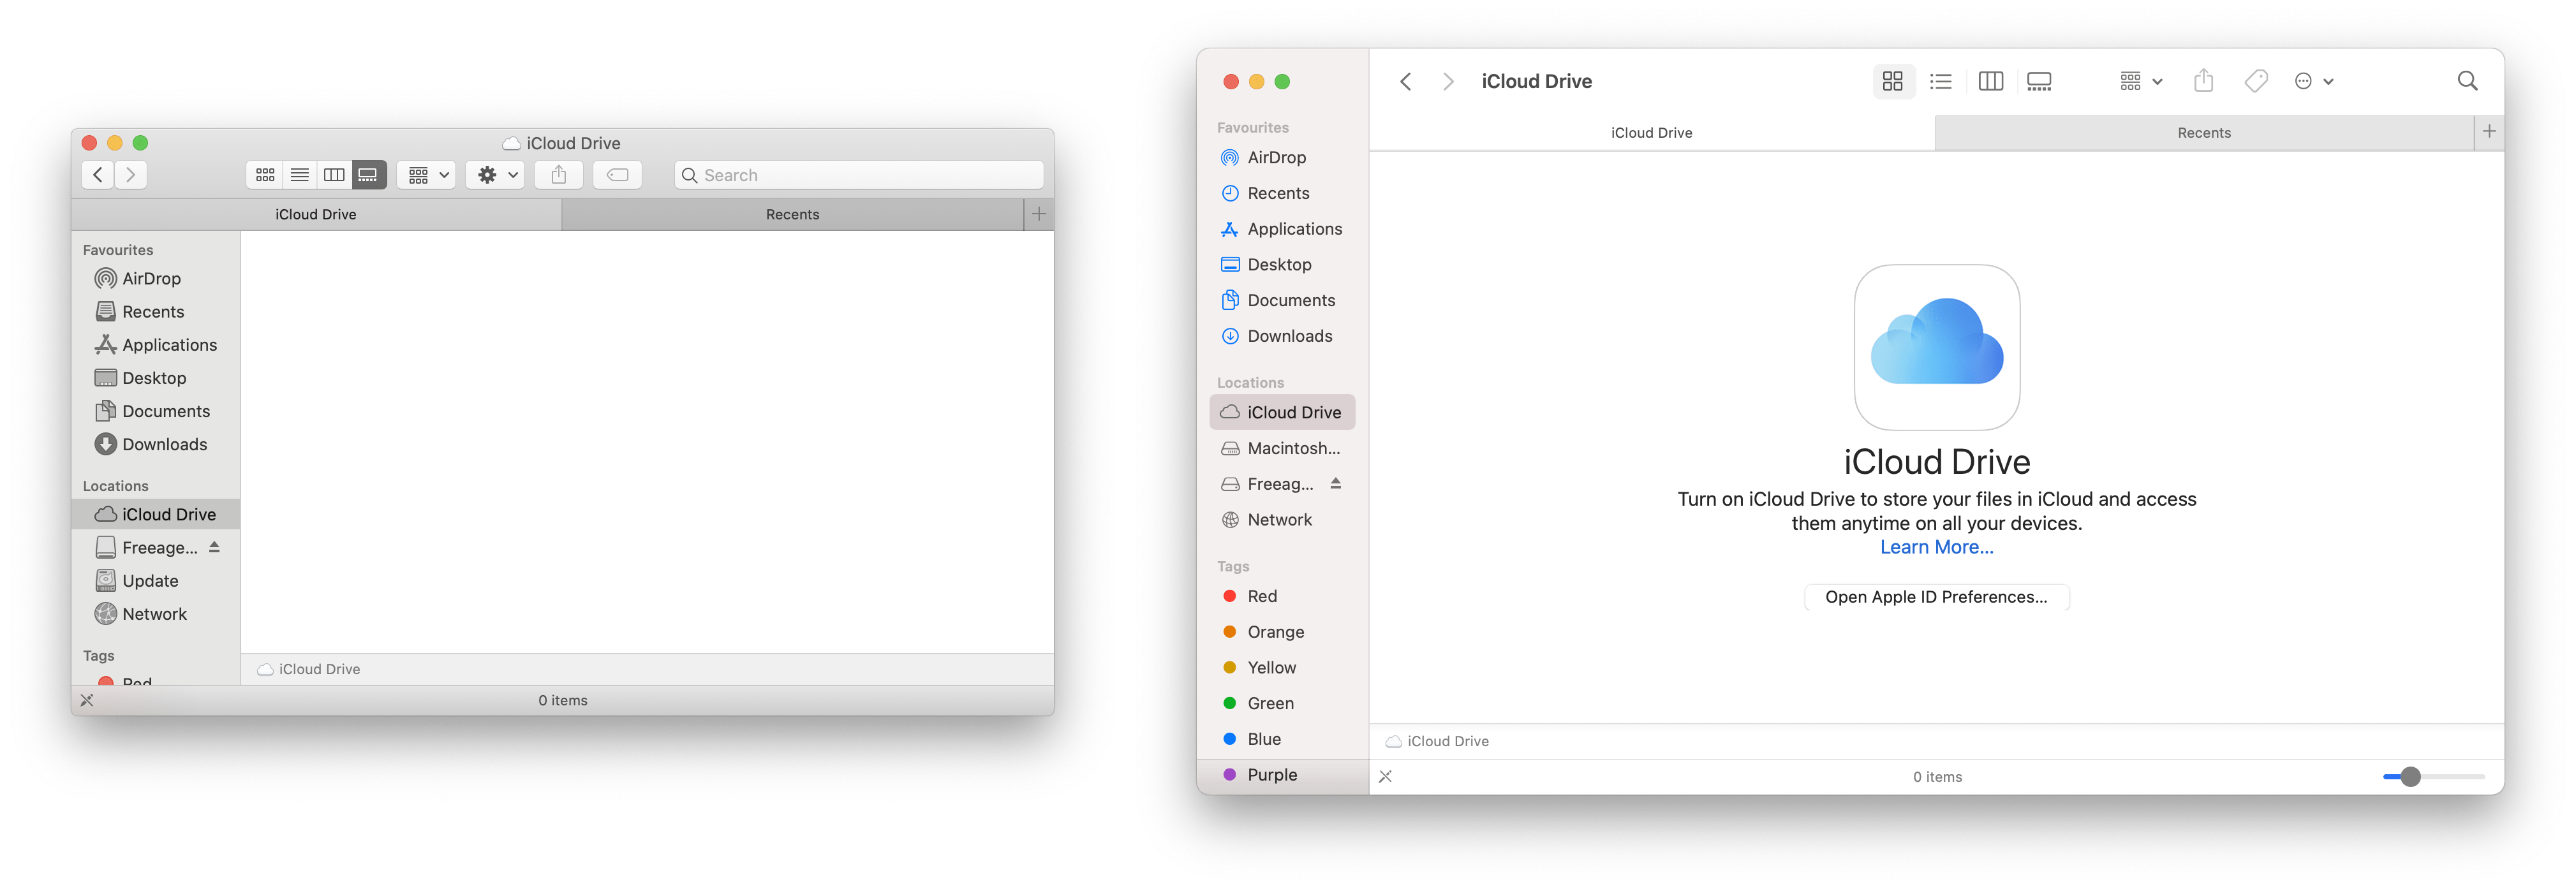
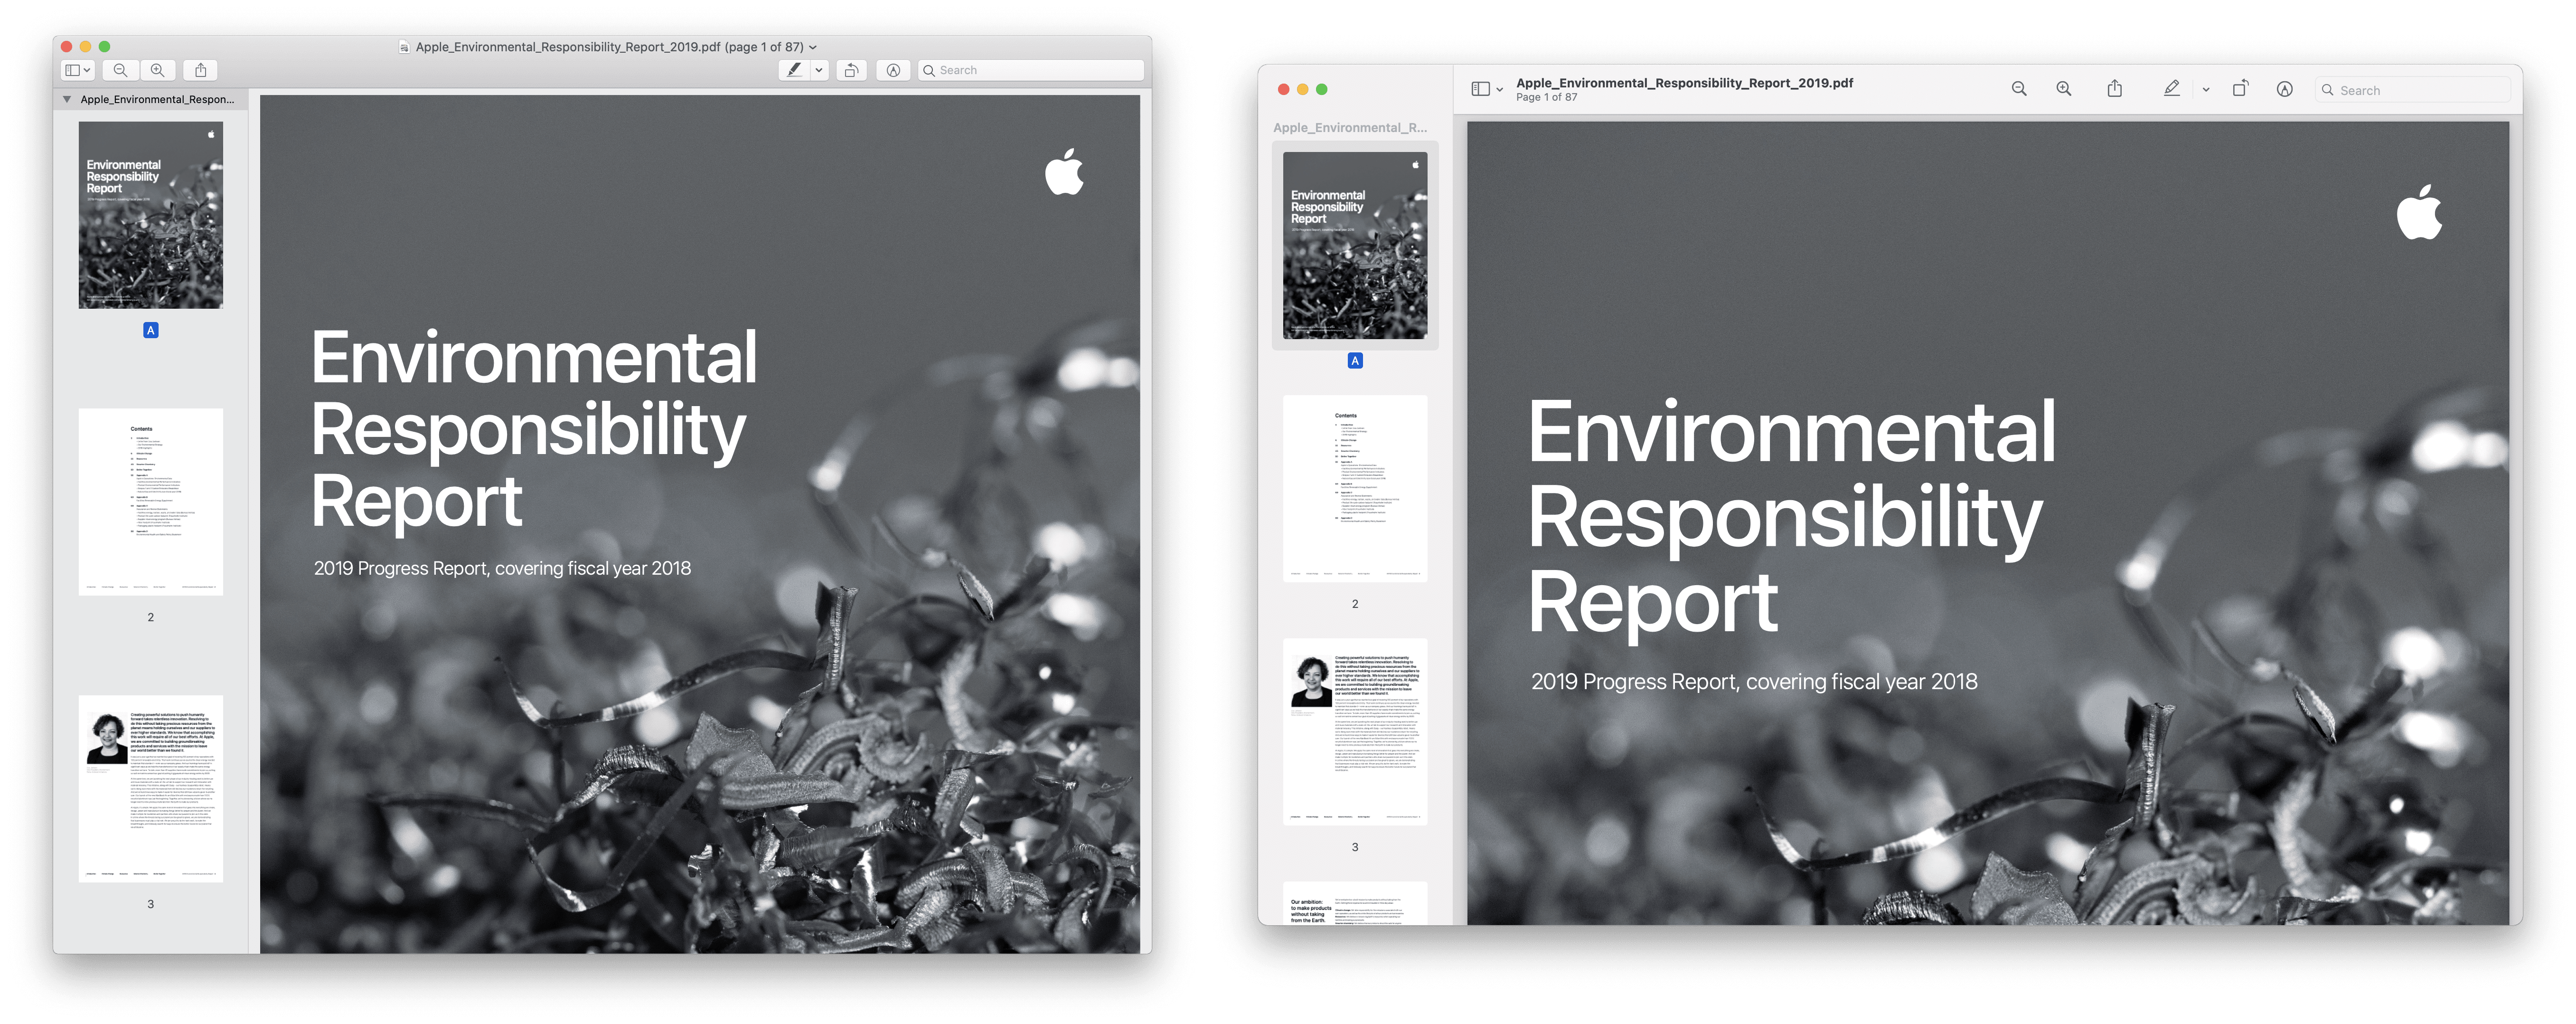
<p>Finder sees some significant changes. Of all the places I think Apple needs to get the new UI spot on, is Finder. Overall the default size of Finder seems to be bigger in macOS Big Sur.</p>
<style>
    .image-gallery {overflow: auto; margin-left: -1%!important;}
    .image-gallery li {float: left; display: block; margin: 0 0 0 0; width: 100%;}
    .image-gallery li a {text-align: center; text-decoration: none!important; color: #777;}
    .image-gallery li a span {display: block; text-overflow: ellipsis; overflow: hidden; white-space: nowrap; padding: 3px 0;}
    .image-gallery li a img {width: 100%; display: block;}
</style>

<ul class="image-gallery"><li><a href="/blog/assets/img/macos-new-ui/finder/1-finder-utilities-macos-catalina-big-sur-comparison.png" title="1-finder-utilities-macos-catalina-big-sur-comparison"><img src="/blog/assets/img/macos-new-ui/finder/1-finder-utilities-macos-catalina-big-sur-comparison.png" alt="1-finder-utilities-macos-catalina-big-sur-comparison" title="1-finder-utilities-macos-catalina-big-sur-comparison" /></a></li><li><a href="/blog/assets/img/macos-new-ui/finder/2-finder-gallery-view-macos-catalina-big-sur-comparison.png" title="2-finder-gallery-view-macos-catalina-big-sur-comparison"><img src="/blog/assets/img/macos-new-ui/finder/2-finder-gallery-view-macos-catalina-big-sur-comparison.png" alt="2-finder-gallery-view-macos-catalina-big-sur-comparison" title="2-finder-gallery-view-macos-catalina-big-sur-comparison" /></a></li><li><a href="/blog/assets/img/macos-new-ui/finder/3-finder-advanced-options-macos-catalina-big-sur-comparison.png" title="3-finder-advanced-options-macos-catalina-big-sur-comparison"><img src="/blog/assets/img/macos-new-ui/finder/3-finder-advanced-options-macos-catalina-big-sur-comparison.png" alt="3-finder-advanced-options-macos-catalina-big-sur-comparison" title="3-finder-advanced-options-macos-catalina-big-sur-comparison" /></a></li><li><a href="/blog/assets/img/macos-new-ui/finder/4-finder-search-macos-catalina-big-sur-comparison.png" title="4-finder-search-macos-catalina-big-sur-comparison"><img src="/blog/assets/img/macos-new-ui/finder/4-finder-search-macos-catalina-big-sur-comparison.png" alt="4-finder-search-macos-catalina-big-sur-comparison" title="4-finder-search-macos-catalina-big-sur-comparison" /></a></li><li><a href="/blog/assets/img/macos-new-ui/finder/5-preview-macos-catalina-big-sur-comparison.png" title="5-preview-macos-catalina-big-sur-comparison"><img src="/blog/assets/img/macos-new-ui/finder/5-preview-macos-catalina-big-sur-comparison.png" alt="5-preview-macos-catalina-big-sur-comparison" title="5-preview-macos-catalina-big-sur-comparison" /></a></li></ul>

<p>One thing that struck me at this point is that Finder looks a mess with many of the more advanced features enabled. The bottom screenshot shows Finder with a Path Bar, Status Bar and multiple tabs. To me, it seems like the design team have not yet been able to find a way to elegantly integrate these elements into the iOS inspired UI.</p>

<p>One final thing to note is that in Finder the search bar at the top right has been replaced with a search icon that expands when clicked. This change seems a little inconsistent as it’s not made it to Preview. I can guarantee this will result in fewer people discovering Finder’s Spotlight search goodness.</p>

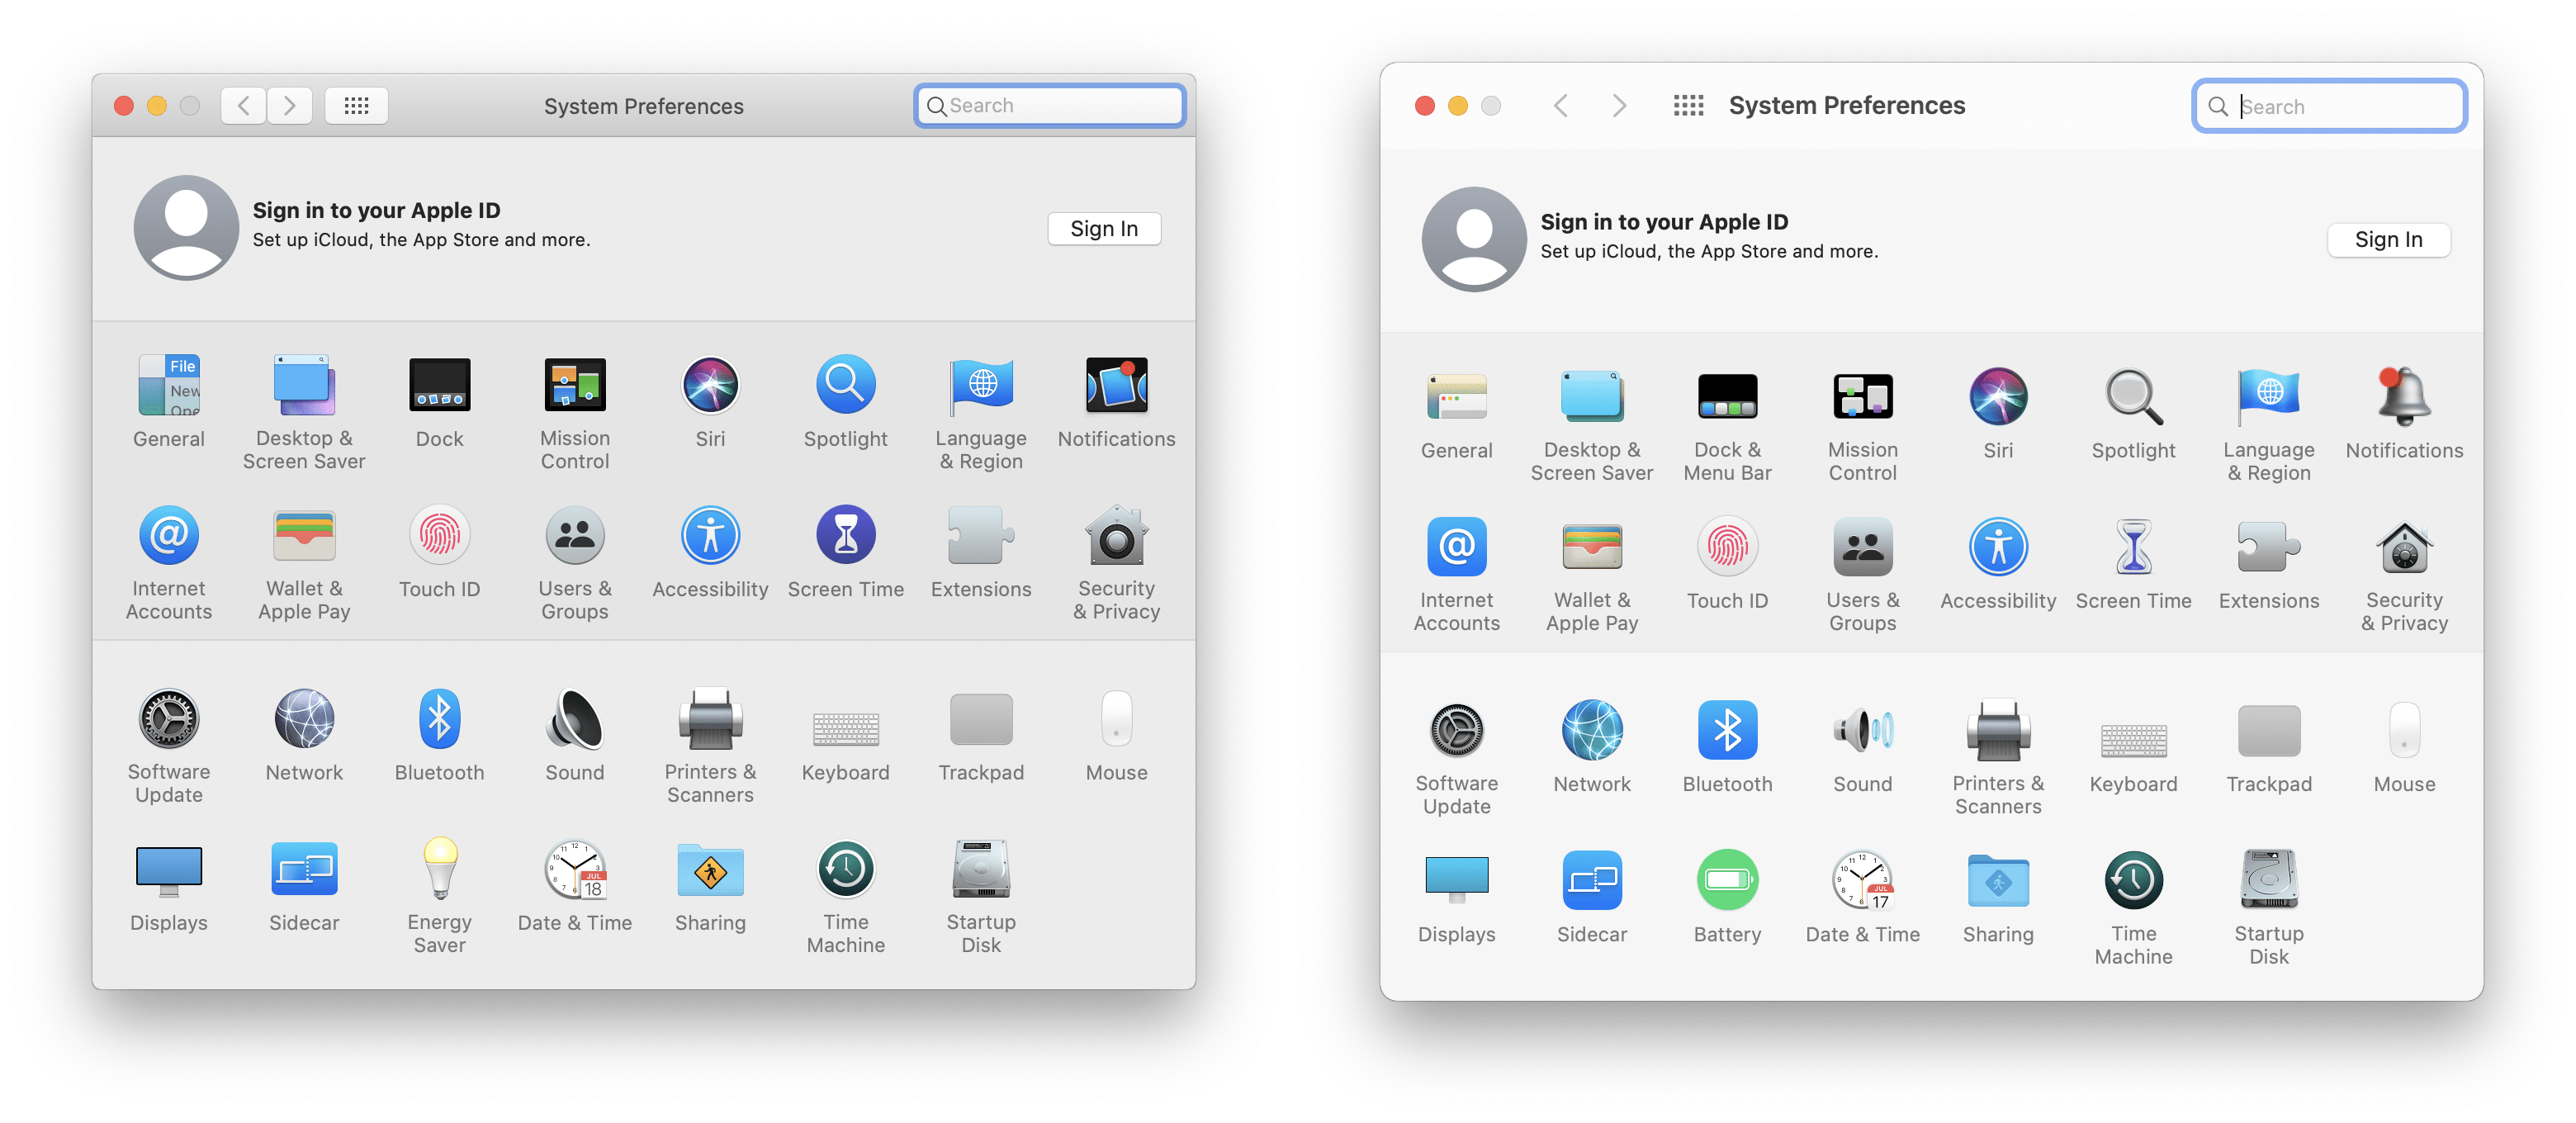
<h2 id="preferences">Preferences</h2>
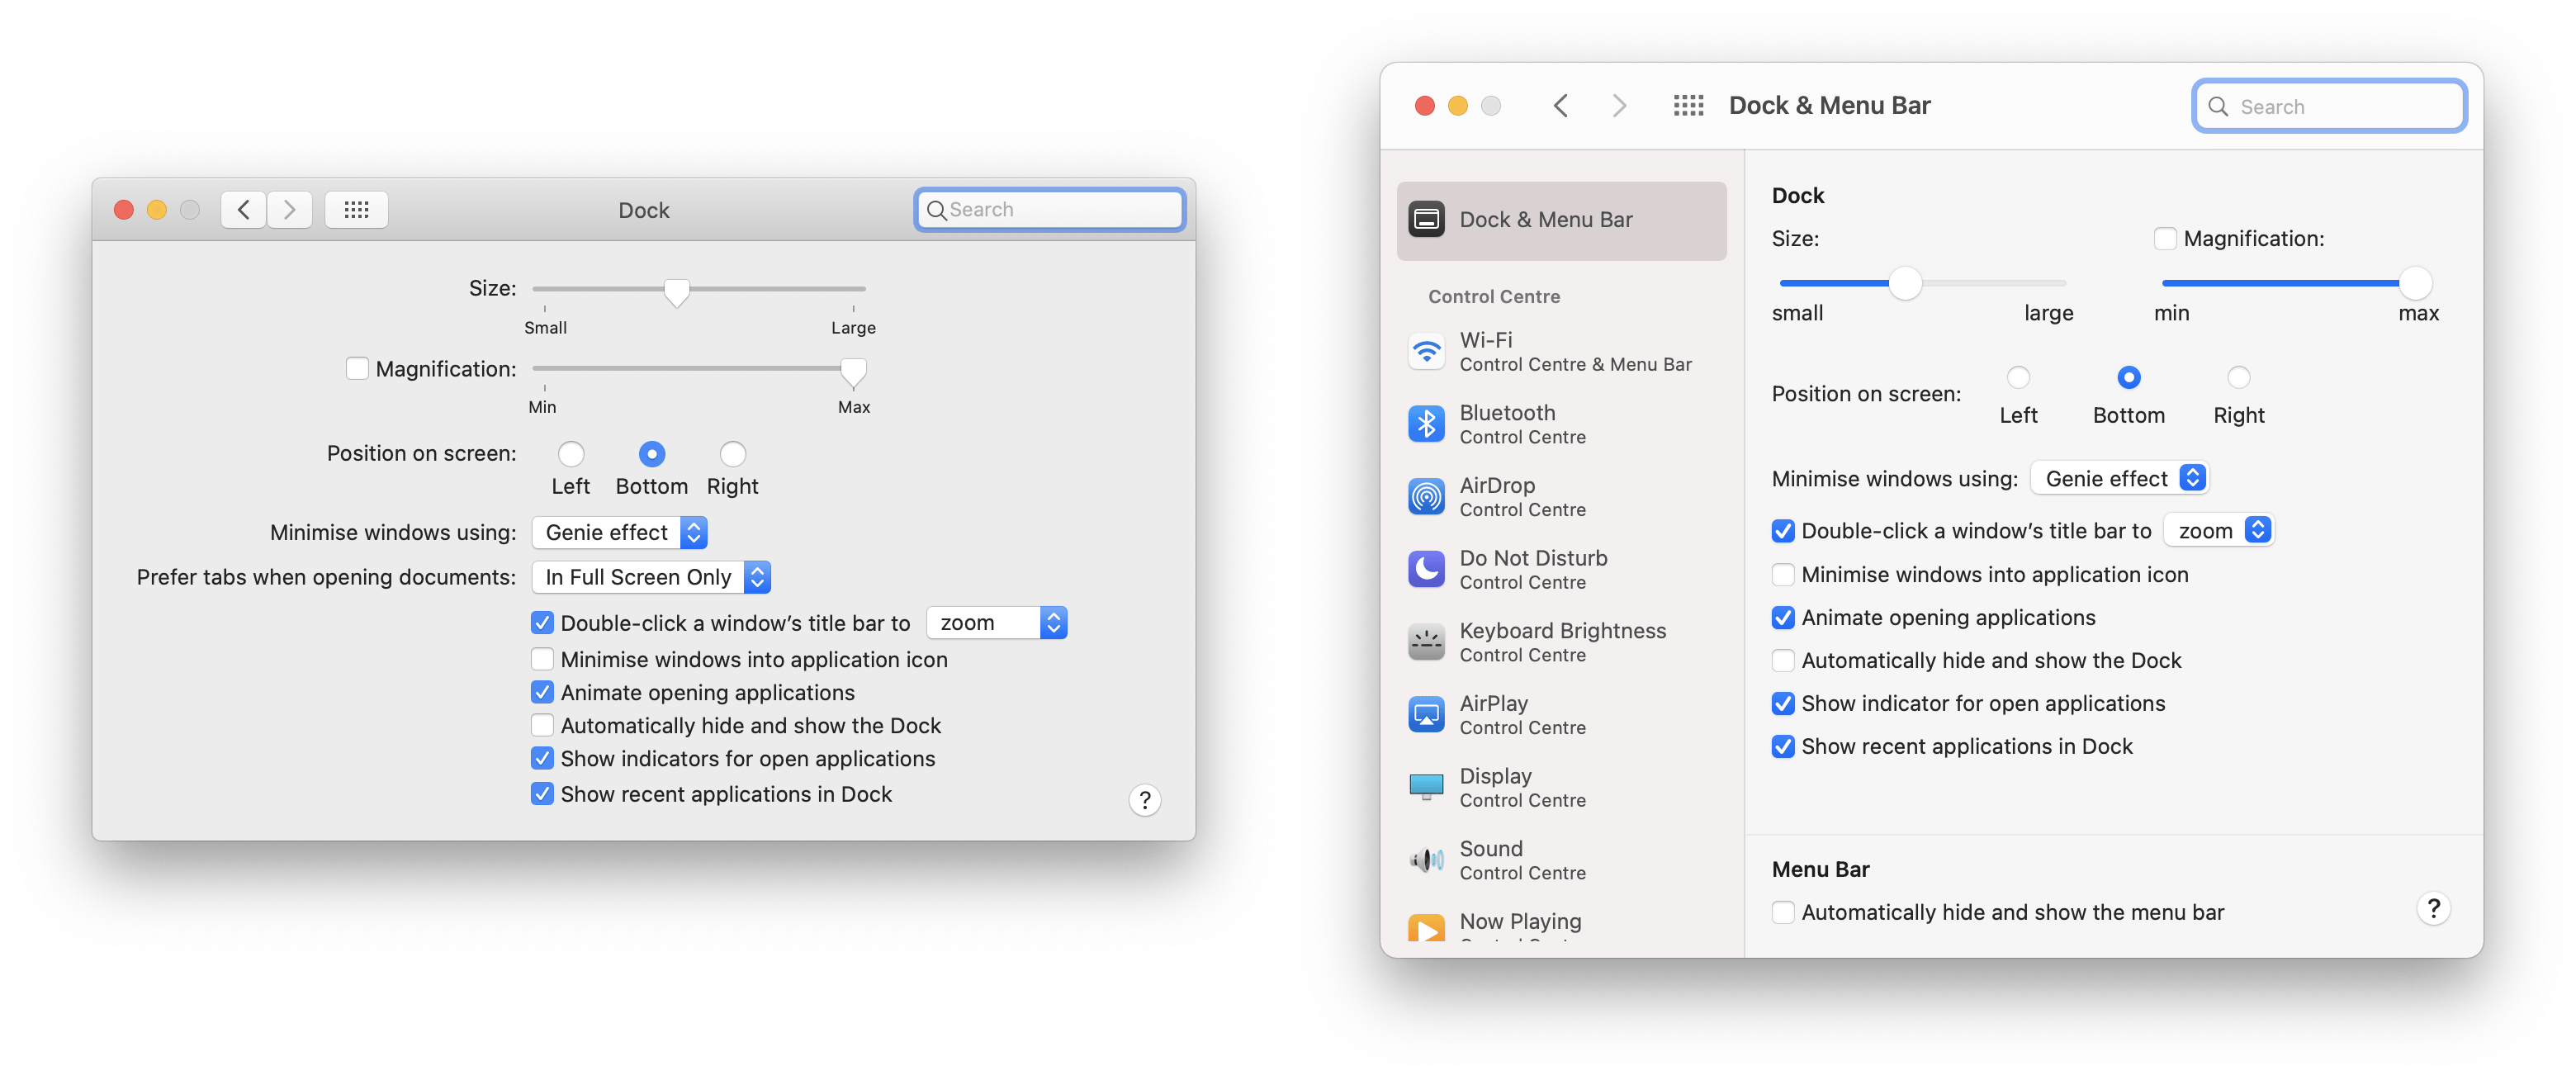
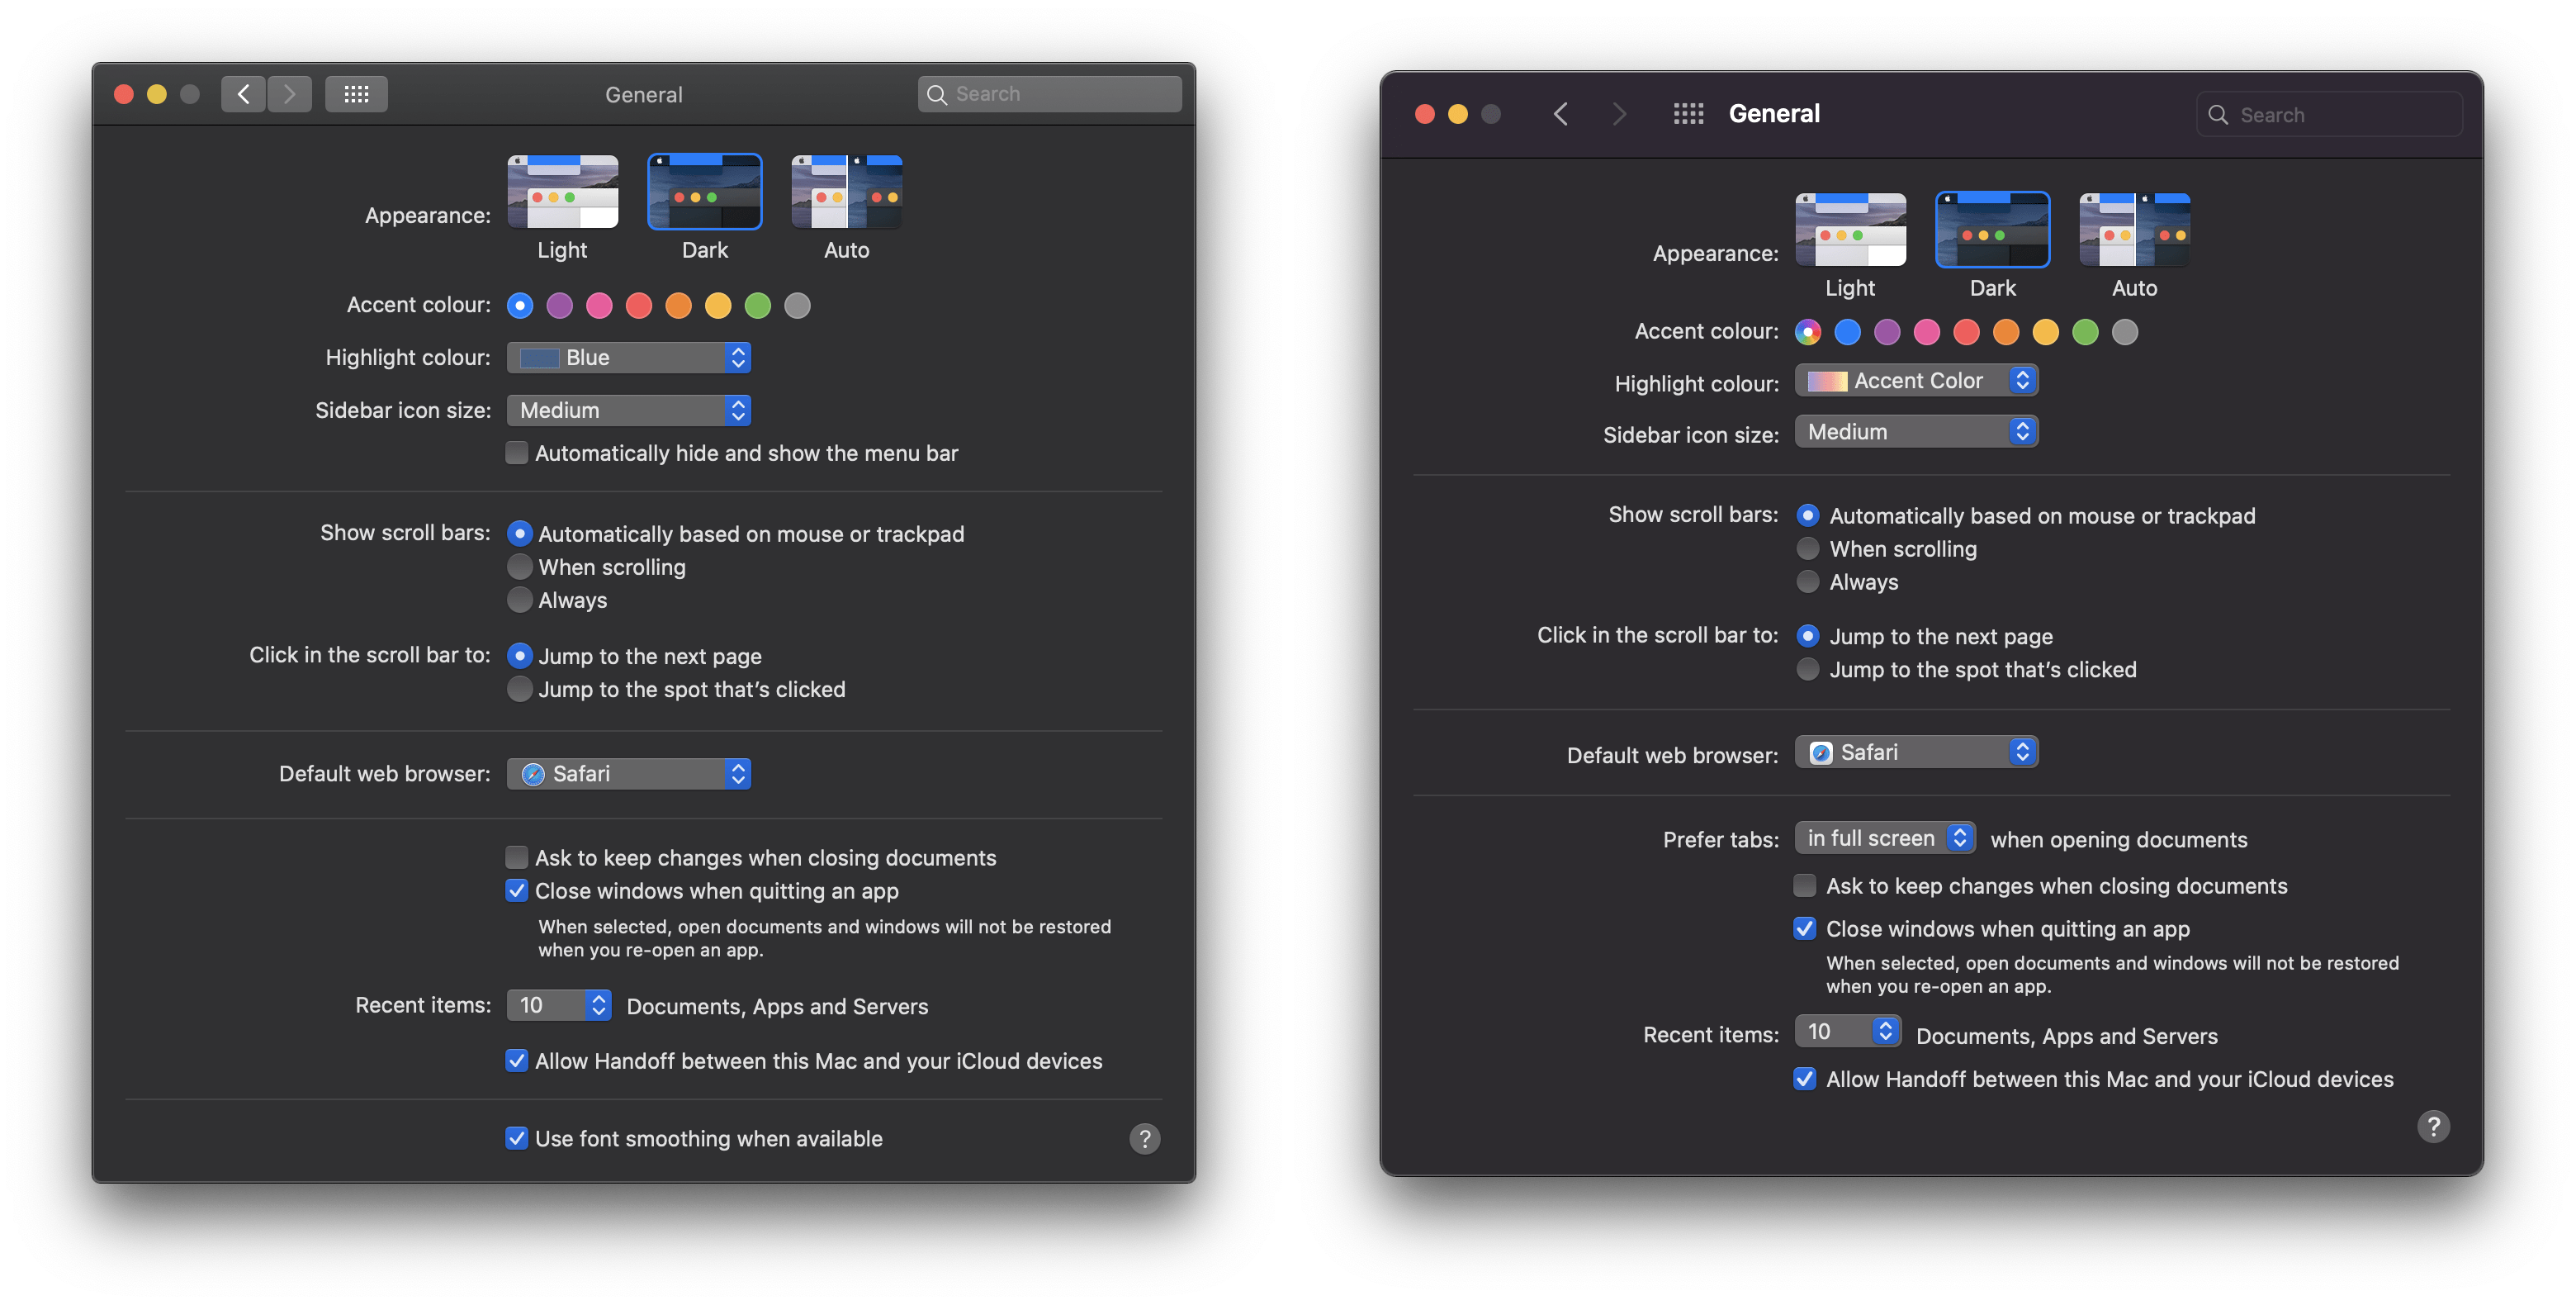
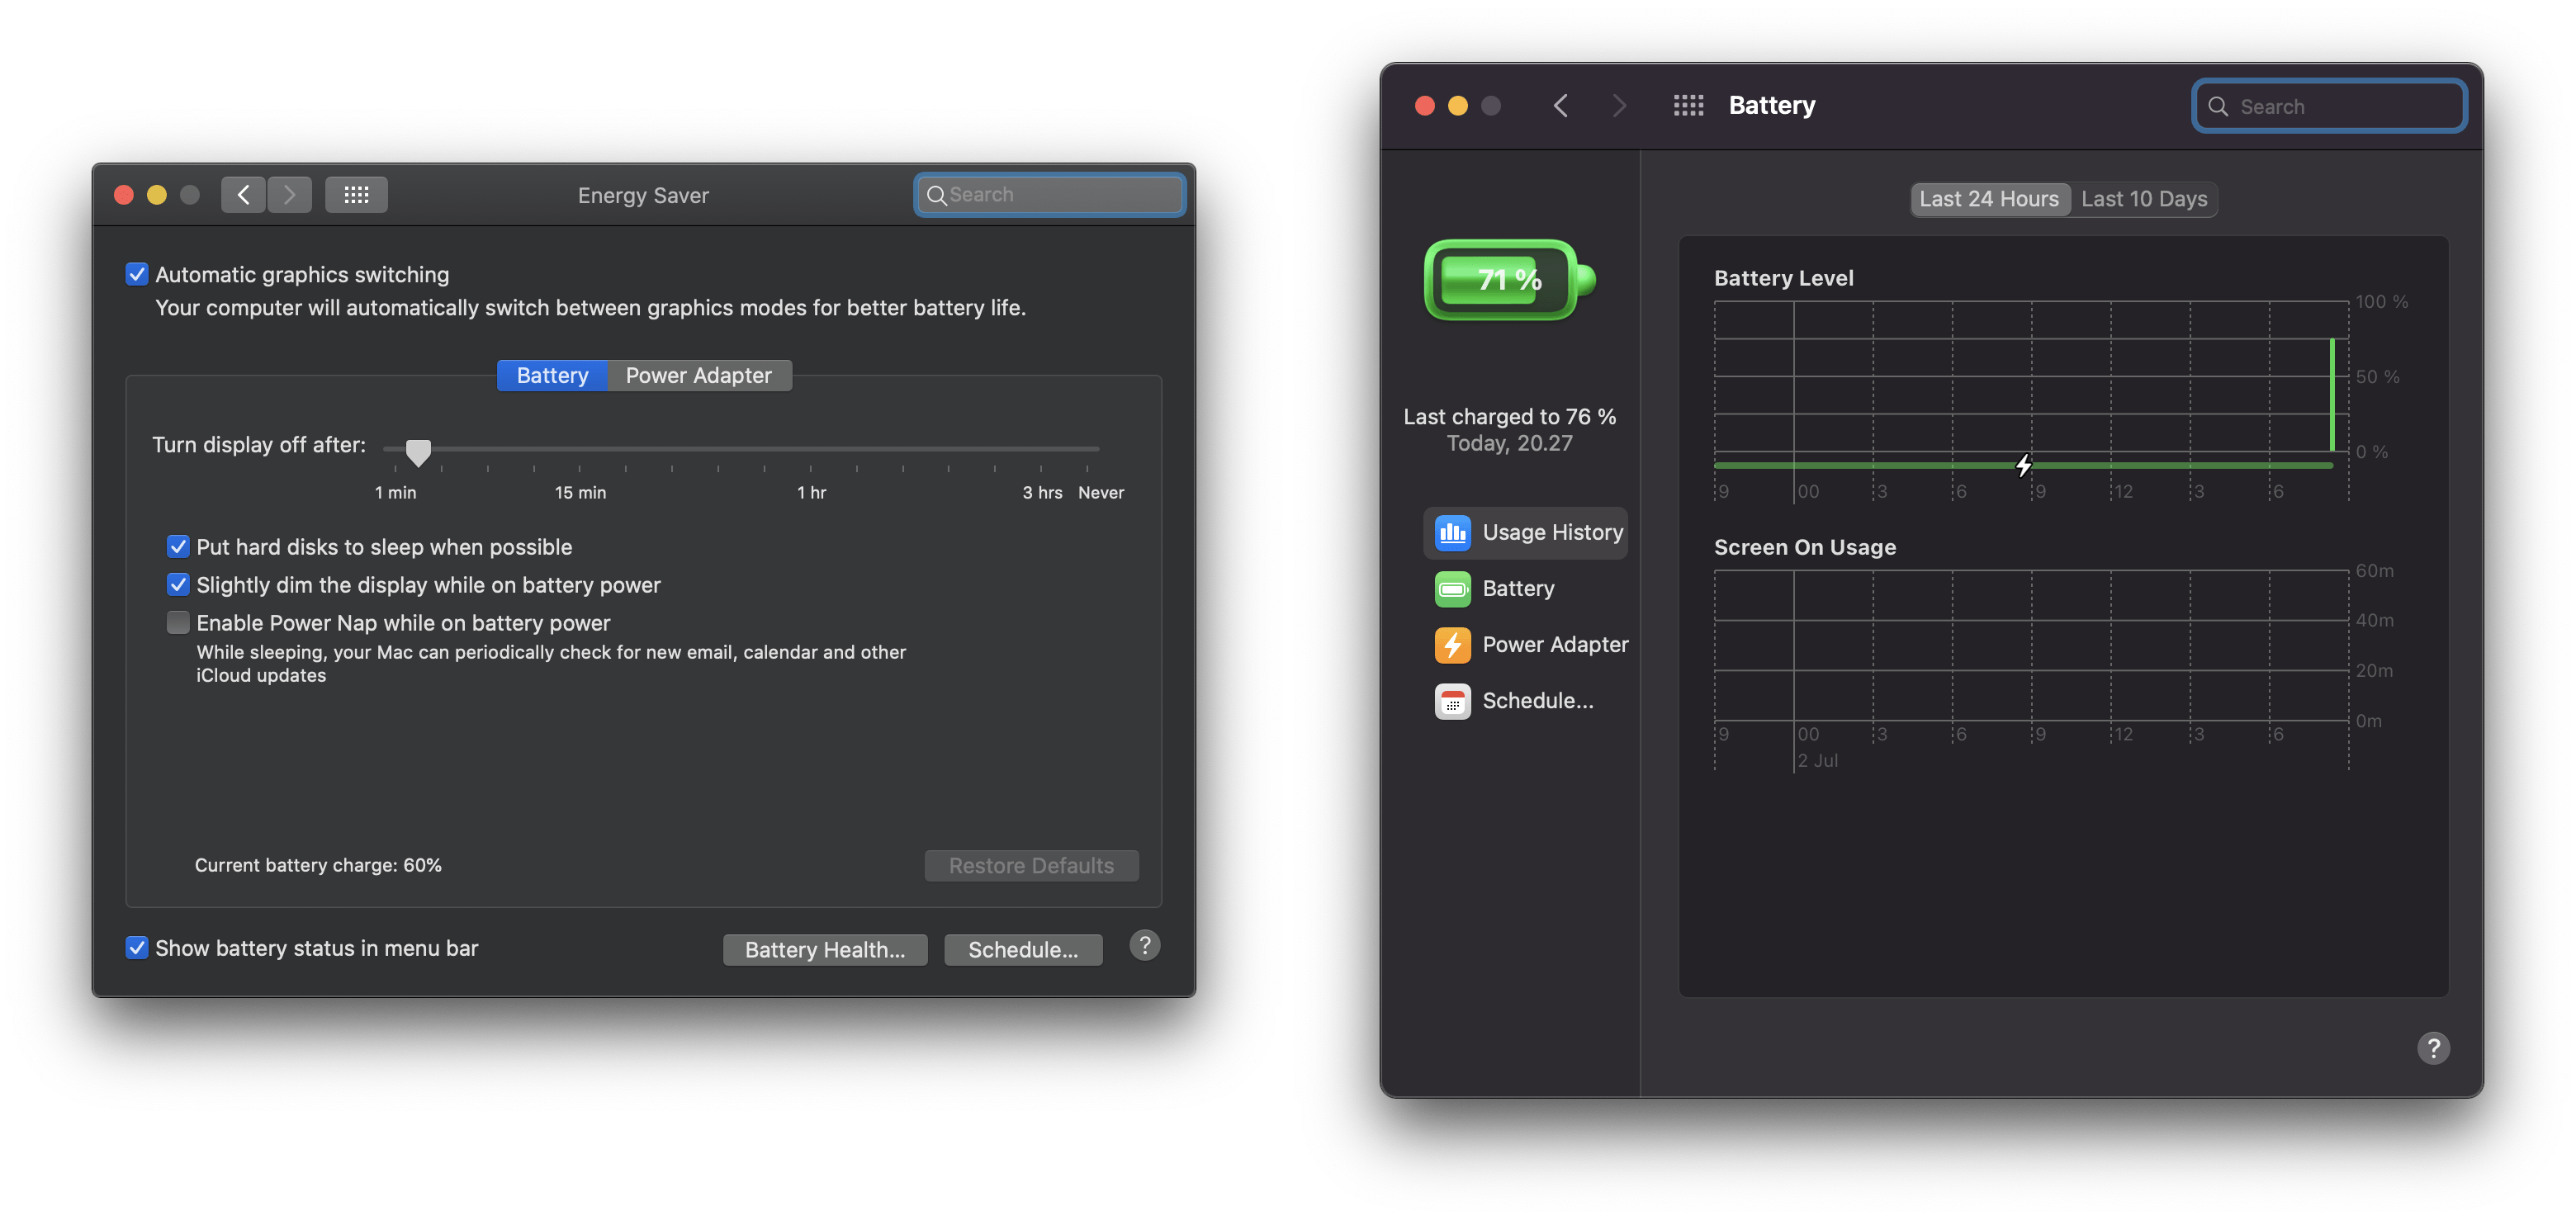
<p>Preferences sees quite a lot of change in some areas.
The Dock preferences pane has become “Dock and Menu Bar” and now integrates controls for the new macOS control center. It uses a nicely integrated sidebar to manage different categories.</p>

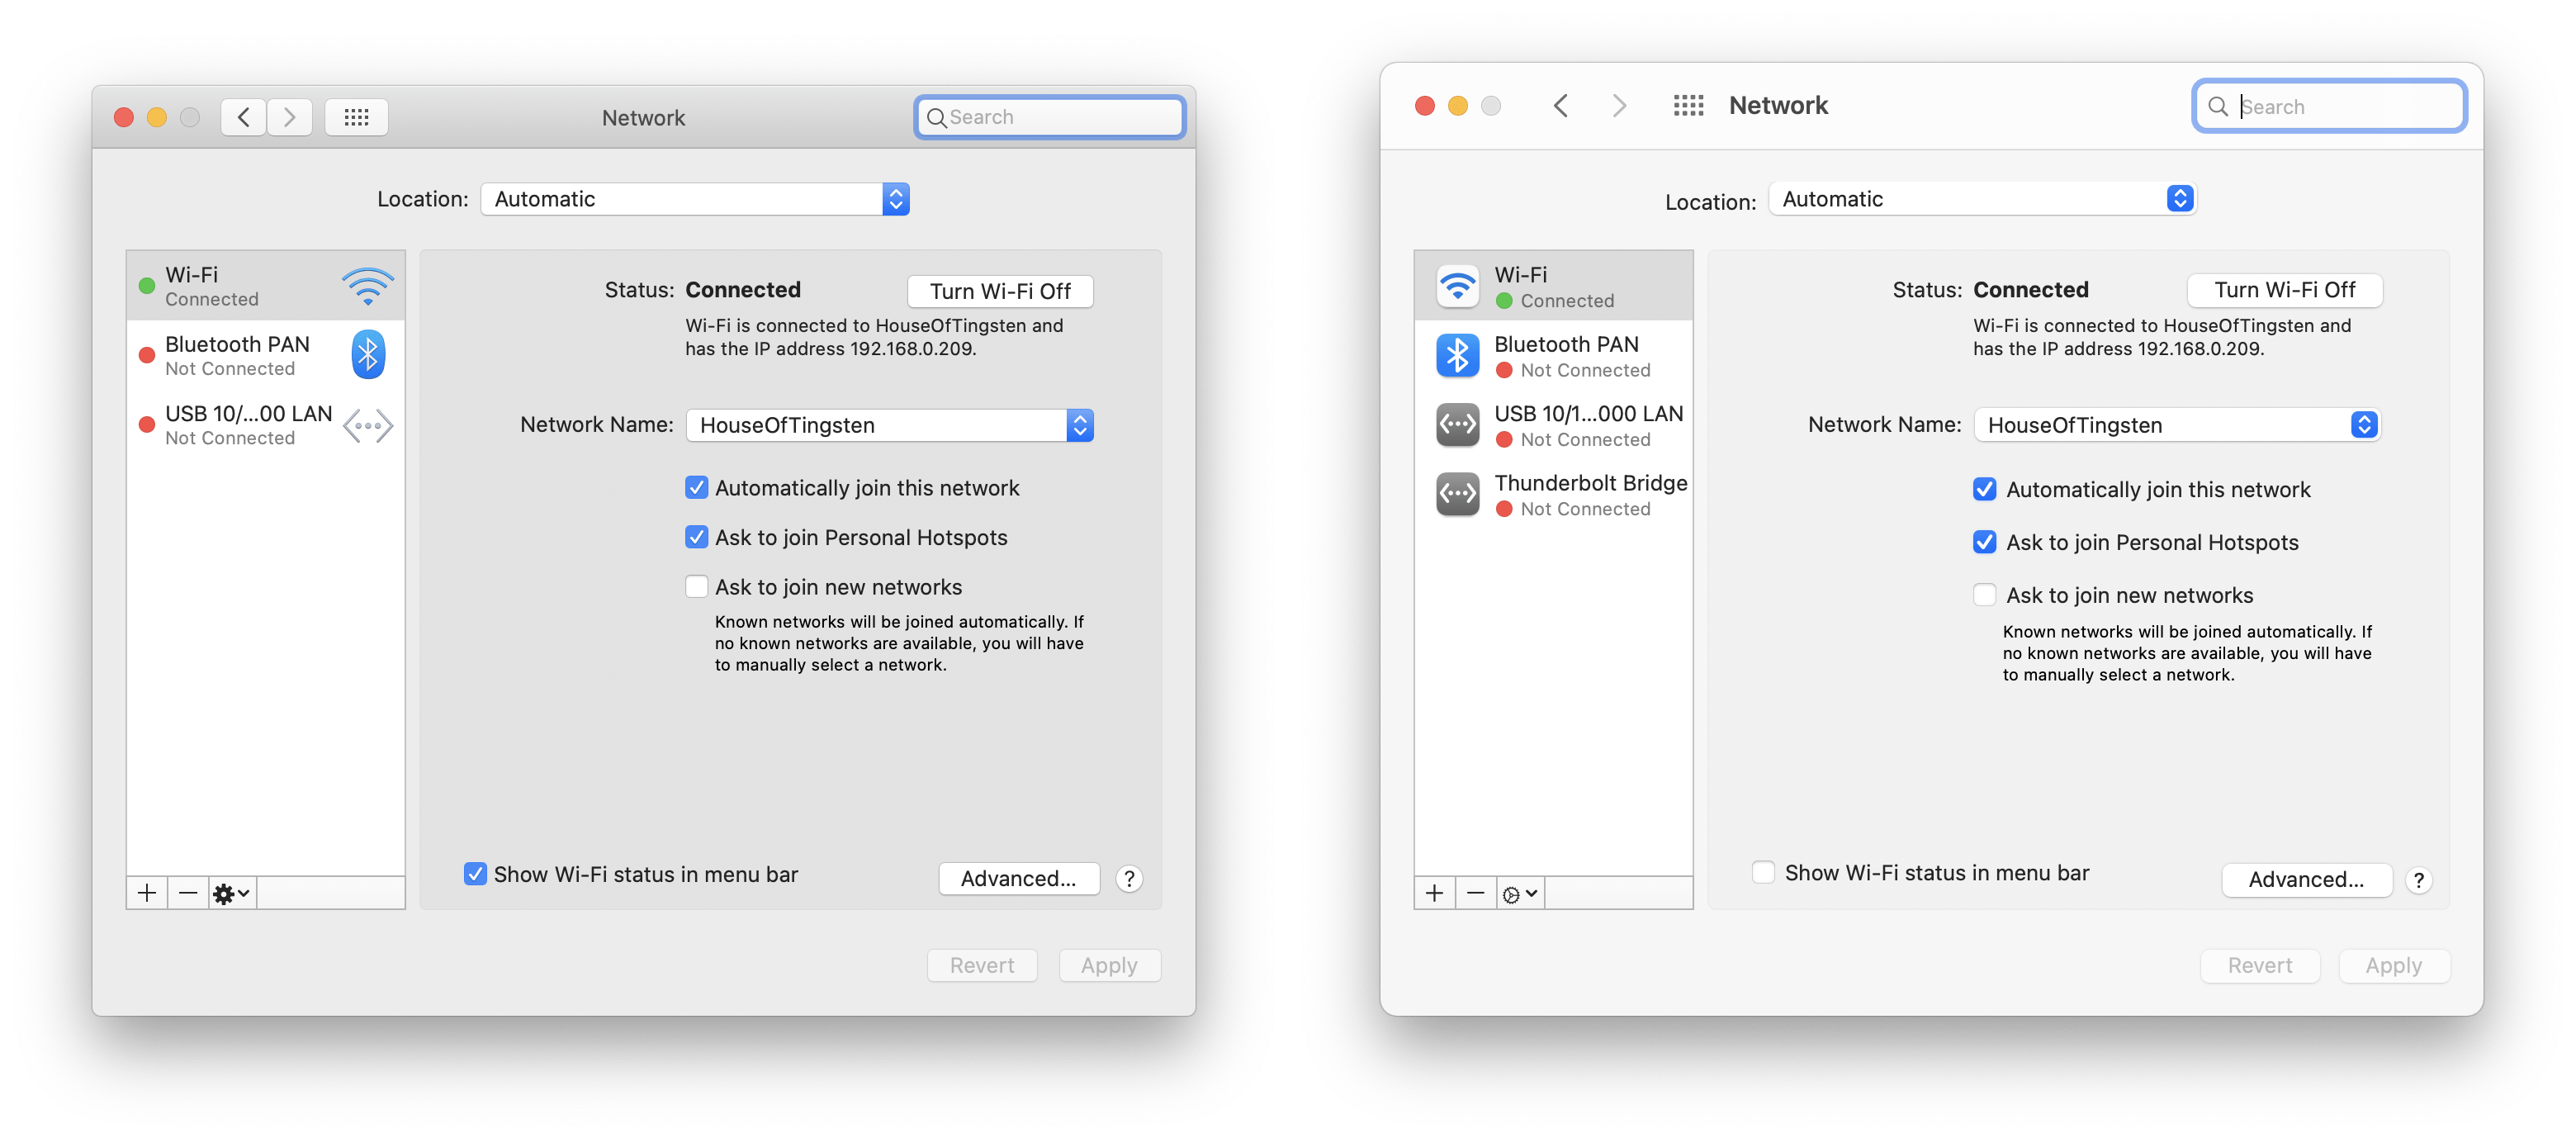
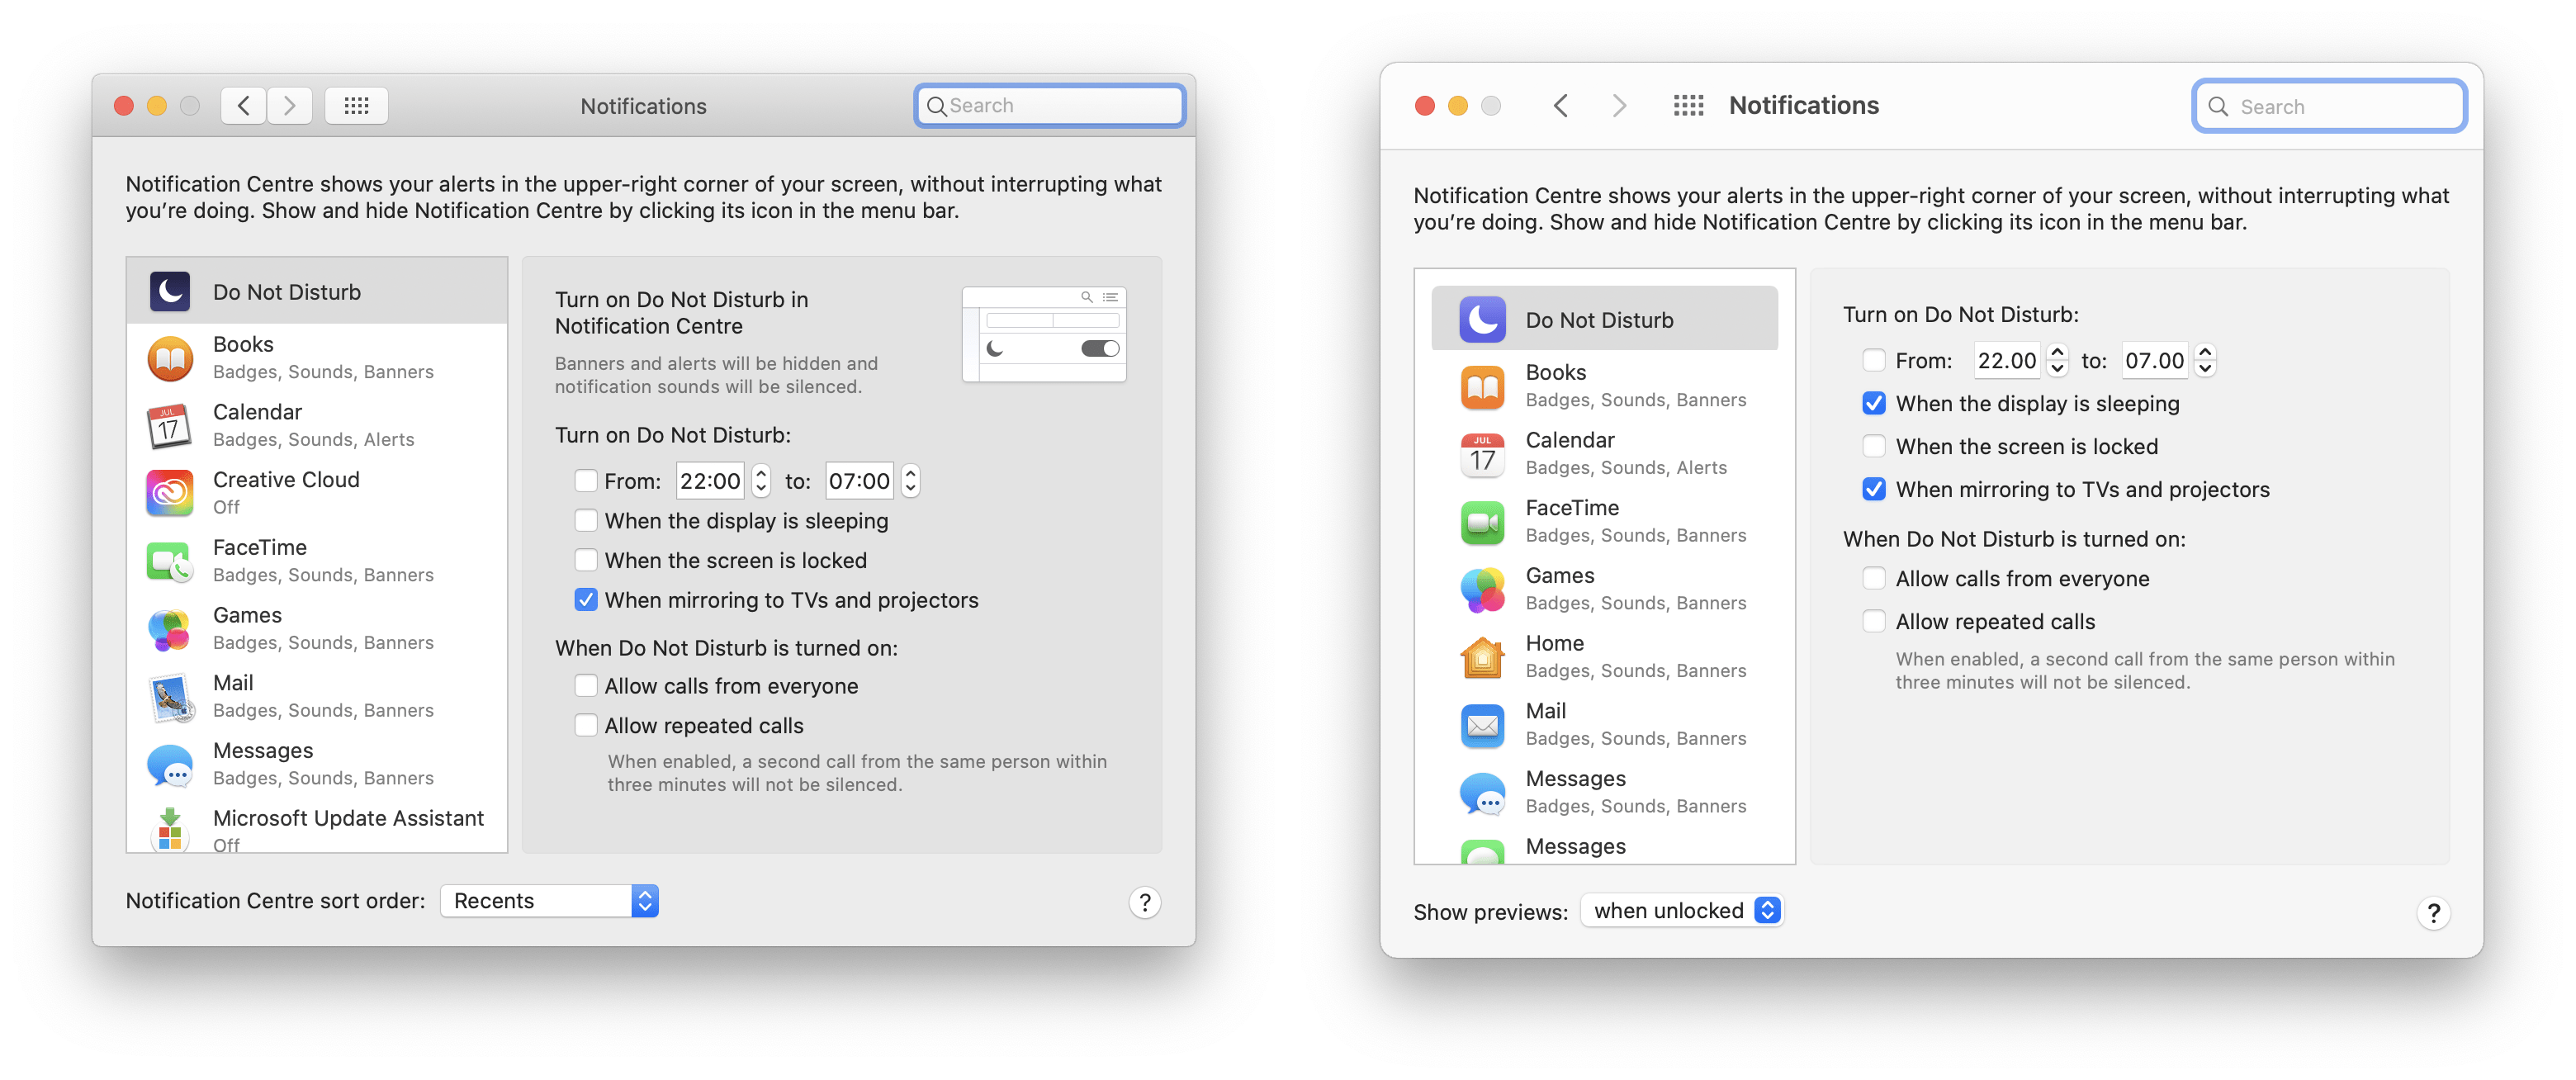
<p>It’s a shame that this sidebar hasn’t yet made it to other parts of the preferences UI with Network and Notifications still using a very old looking sidebar.</p>

<p>One aspect of preferences that has been quite controversial (on Twitter at least) is the new icons. I’m going to hold off judgement for now as they don’t yet look finished. For example, the Notifications icon does not even support retina displays.</p>

<style>
    .image-gallery {overflow: auto; margin-left: -1%!important;}
    .image-gallery li {float: left; display: block; margin: 0 0 0 0; width: 100%;}
    .image-gallery li a {text-align: center; text-decoration: none!important; color: #777;}
    .image-gallery li a span {display: block; text-overflow: ellipsis; overflow: hidden; white-space: nowrap; padding: 3px 0;}
    .image-gallery li a img {width: 100%; display: block;}
</style>

<ul class="image-gallery"><li><a href="/blog/assets/img/macos-new-ui/preferences/1-preferences-macos-catalina-big-sur-comparison.png" title="1-preferences-macos-catalina-big-sur-comparison"><img src="/blog/assets/img/macos-new-ui/preferences/1-preferences-macos-catalina-big-sur-comparison.png" alt="1-preferences-macos-catalina-big-sur-comparison" title="1-preferences-macos-catalina-big-sur-comparison" /></a></li><li><a href="/blog/assets/img/macos-new-ui/preferences/2-dock-preferences-macos-catalina-big-sur-comparison.png" title="2-dock-preferences-macos-catalina-big-sur-comparison"><img src="/blog/assets/img/macos-new-ui/preferences/2-dock-preferences-macos-catalina-big-sur-comparison.png" alt="2-dock-preferences-macos-catalina-big-sur-comparison" title="2-dock-preferences-macos-catalina-big-sur-comparison" /></a></li><li><a href="/blog/assets/img/macos-new-ui/preferences/3-network-preferences-macos-catalina-big-sur-comparison.png" title="3-network-preferences-macos-catalina-big-sur-comparison"><img src="/blog/assets/img/macos-new-ui/preferences/3-network-preferences-macos-catalina-big-sur-comparison.png" alt="3-network-preferences-macos-catalina-big-sur-comparison" title="3-network-preferences-macos-catalina-big-sur-comparison" /></a></li><li><a href="/blog/assets/img/macos-new-ui/preferences/4-notification-preferences-macos-catalina-big-sur-comparison.png" title="4-notification-preferences-macos-catalina-big-sur-comparison"><img src="/blog/assets/img/macos-new-ui/preferences/4-notification-preferences-macos-catalina-big-sur-comparison.png" alt="4-notification-preferences-macos-catalina-big-sur-comparison" title="4-notification-preferences-macos-catalina-big-sur-comparison" /></a></li><li><a href="/blog/assets/img/macos-new-ui/preferences/5-preferences-general-macos-catalina-big-sur-comparison.png" title="5-preferences-general-macos-catalina-big-sur-comparison"><img src="/blog/assets/img/macos-new-ui/preferences/5-preferences-general-macos-catalina-big-sur-comparison.png" alt="5-preferences-general-macos-catalina-big-sur-comparison" title="5-preferences-general-macos-catalina-big-sur-comparison" /></a></li><li><a href="/blog/assets/img/macos-new-ui/preferences/6-power-preferences-macos-catalina-big-sur-comparison.png" title="6-power-preferences-macos-catalina-big-sur-comparison"><img src="/blog/assets/img/macos-new-ui/preferences/6-power-preferences-macos-catalina-big-sur-comparison.png" alt="6-power-preferences-macos-catalina-big-sur-comparison" title="6-power-preferences-macos-catalina-big-sur-comparison" /></a></li><li><a href="/blog/assets/img/macos-new-ui/preferences/7-preferences-startup-disk-dialog-macos-catalina-big-sur-comparison.png" title="7-preferences-startup-disk-dialog-macos-catalina-big-sur-comparison"><img src="/blog/assets/img/macos-new-ui/preferences/7-preferences-startup-disk-dialog-macos-catalina-big-sur-comparison.png" alt="7-preferences-startup-disk-dialog-macos-catalina-big-sur-comparison" title="7-preferences-startup-disk-dialog-macos-catalina-big-sur-comparison" /></a></li></ul>

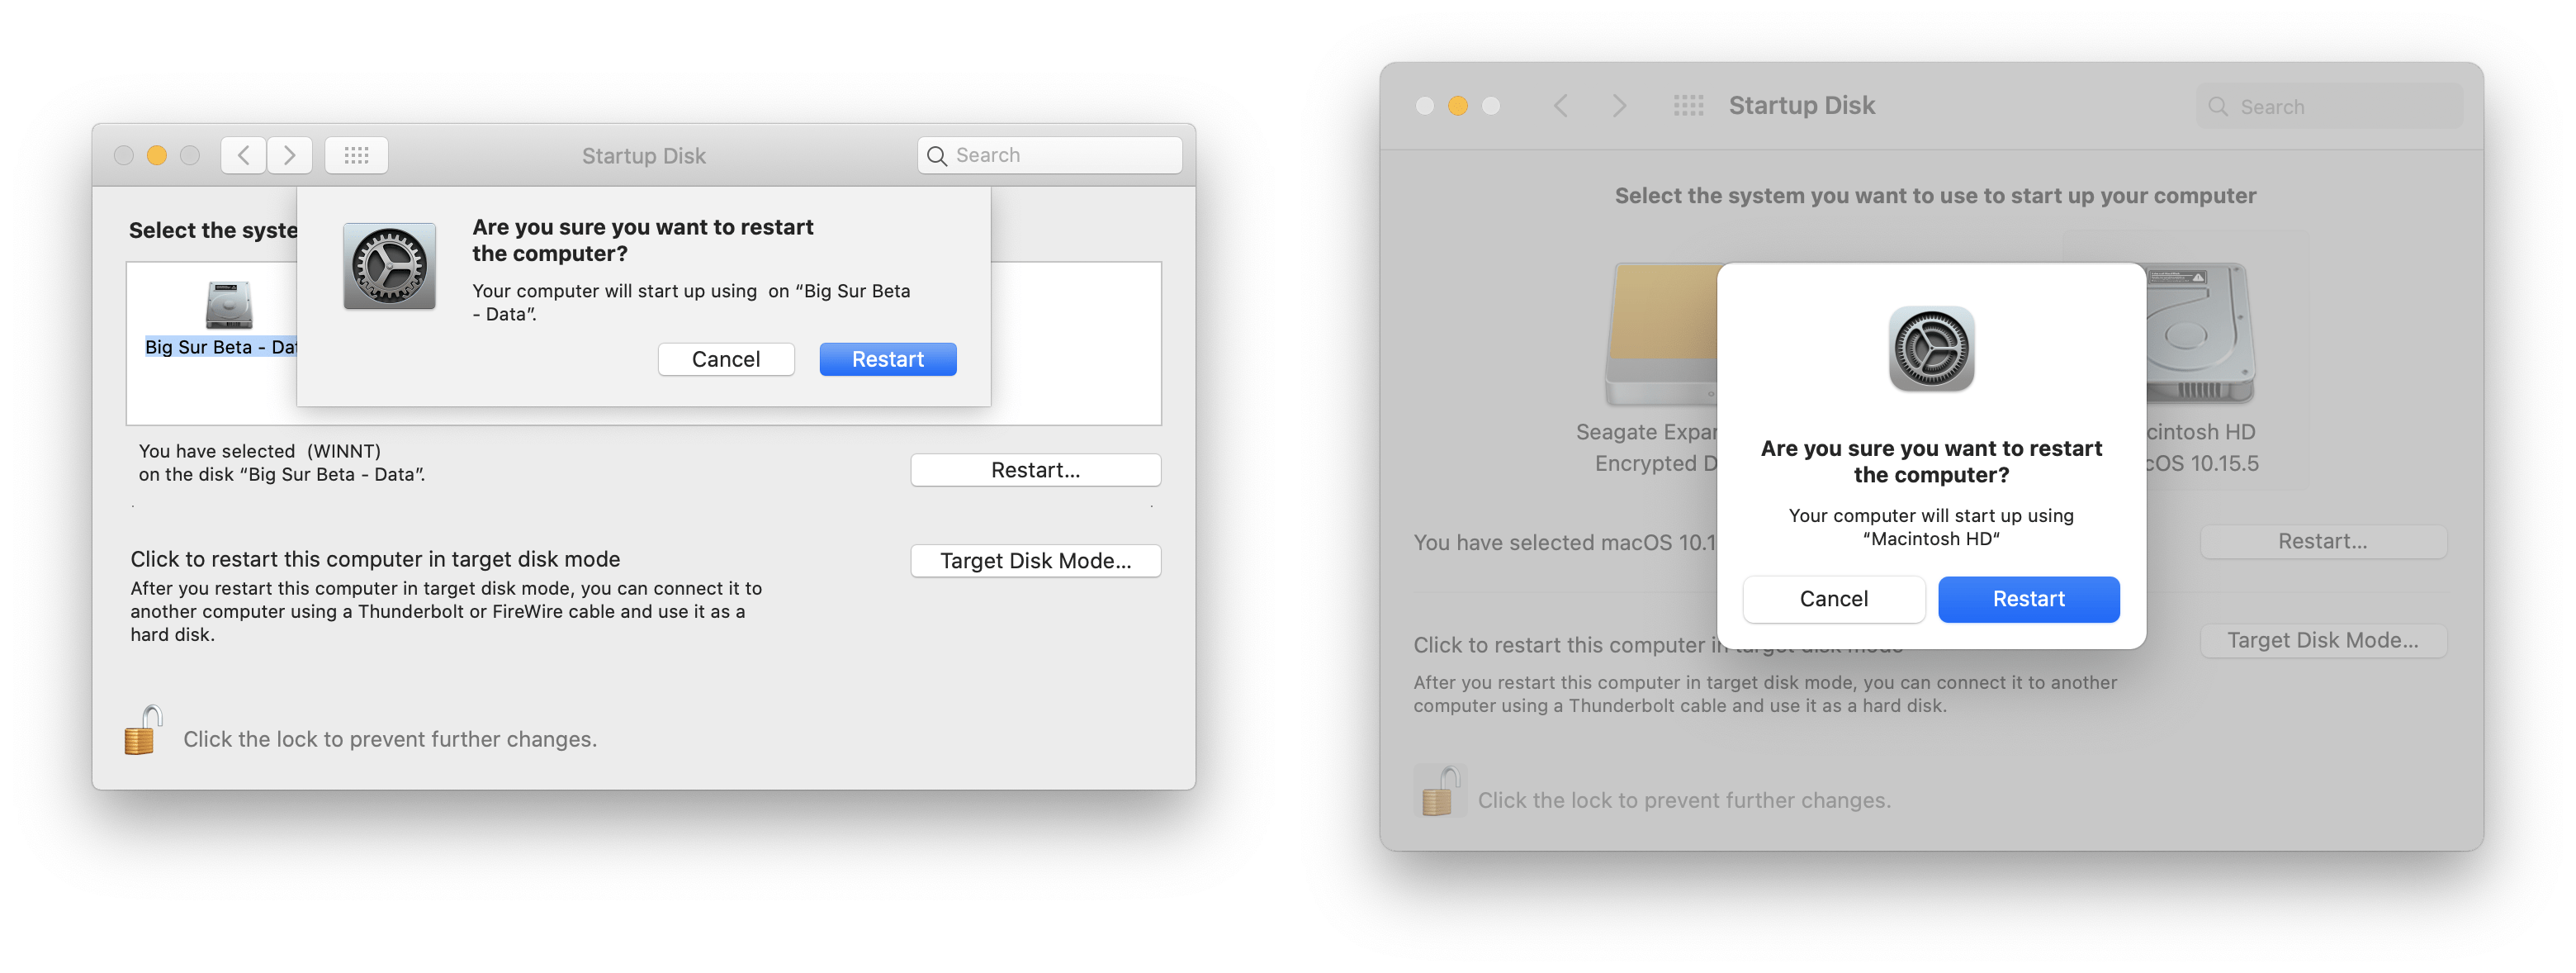
<p>You’ll notice that the Startup Disk pane uses apples new dialog (or sheet) UI. This is quite a departure from the existing sheet drop-down - it feels much more iOS-like.</p>

<h2 id="menu-bar-and-notification-center">Menu Bar and Notification Center</h2>
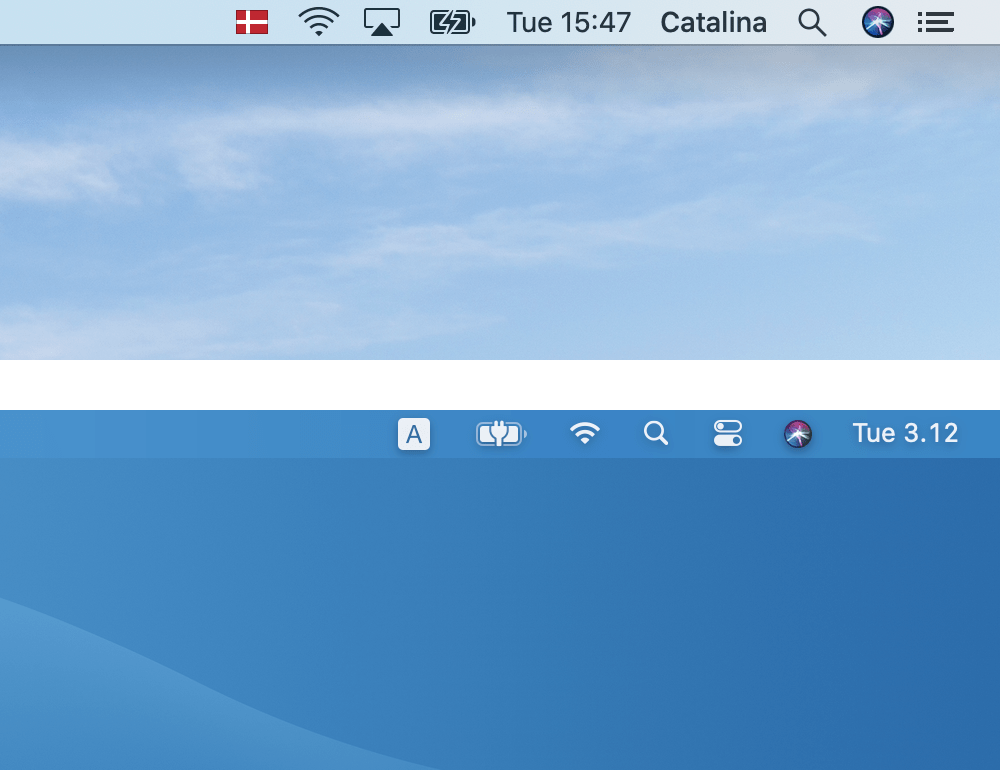
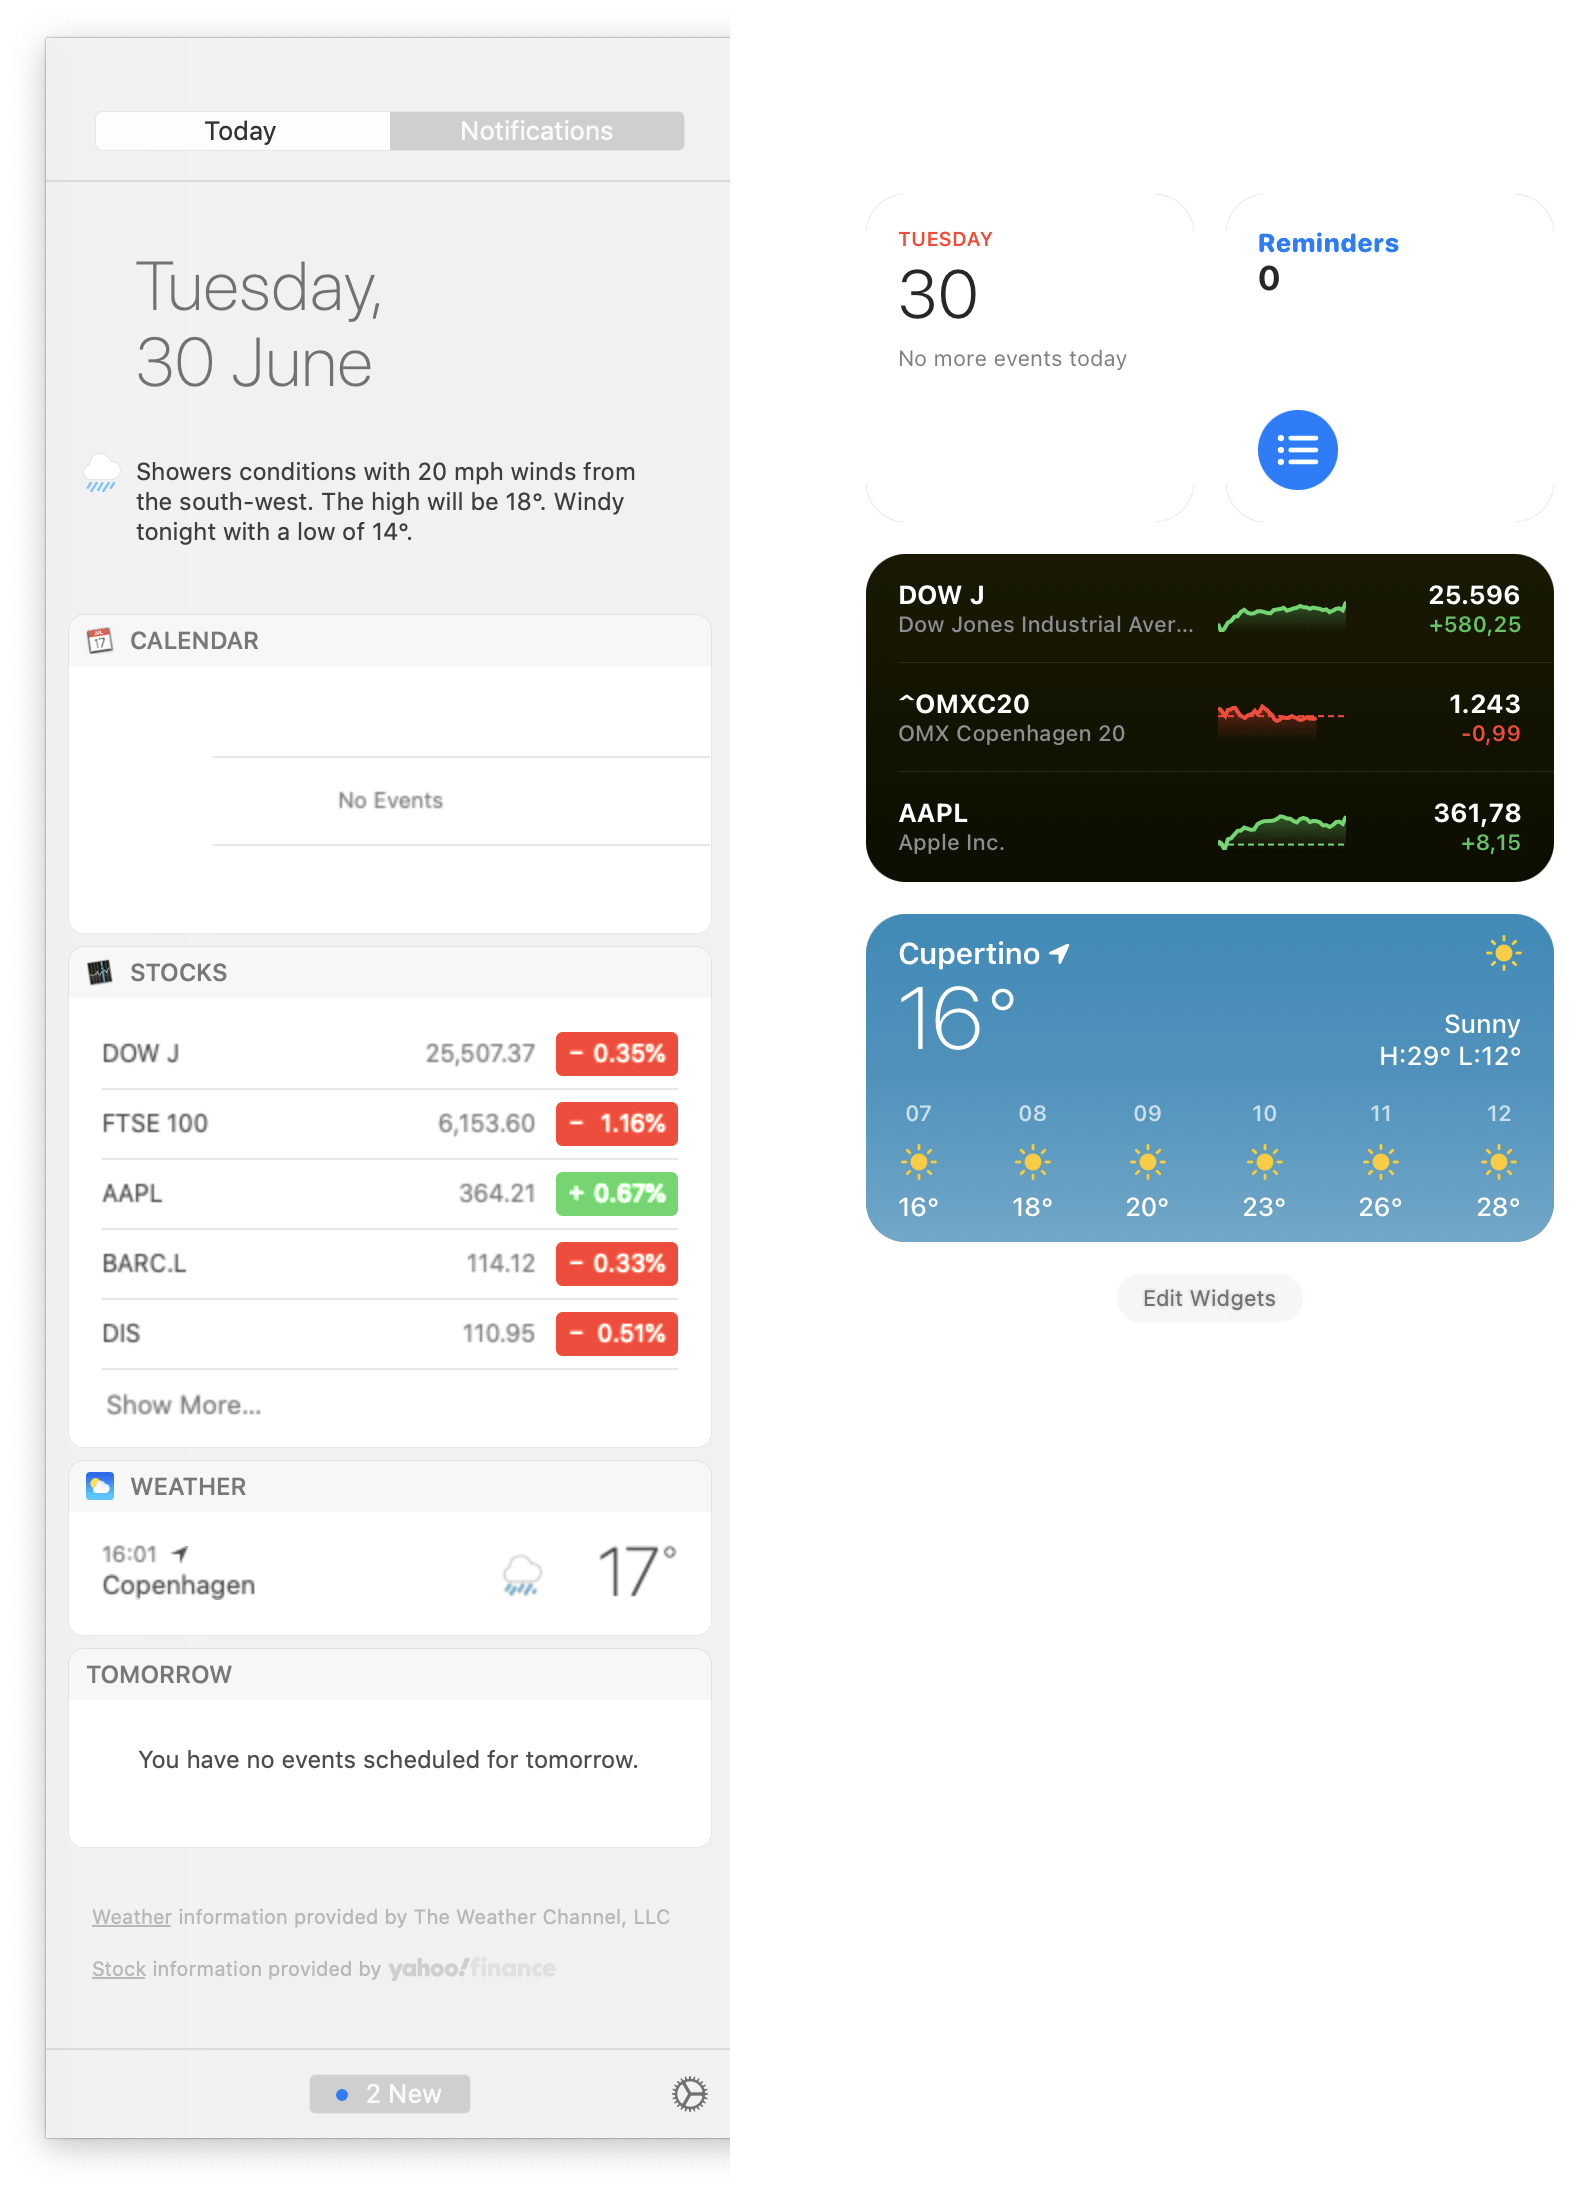
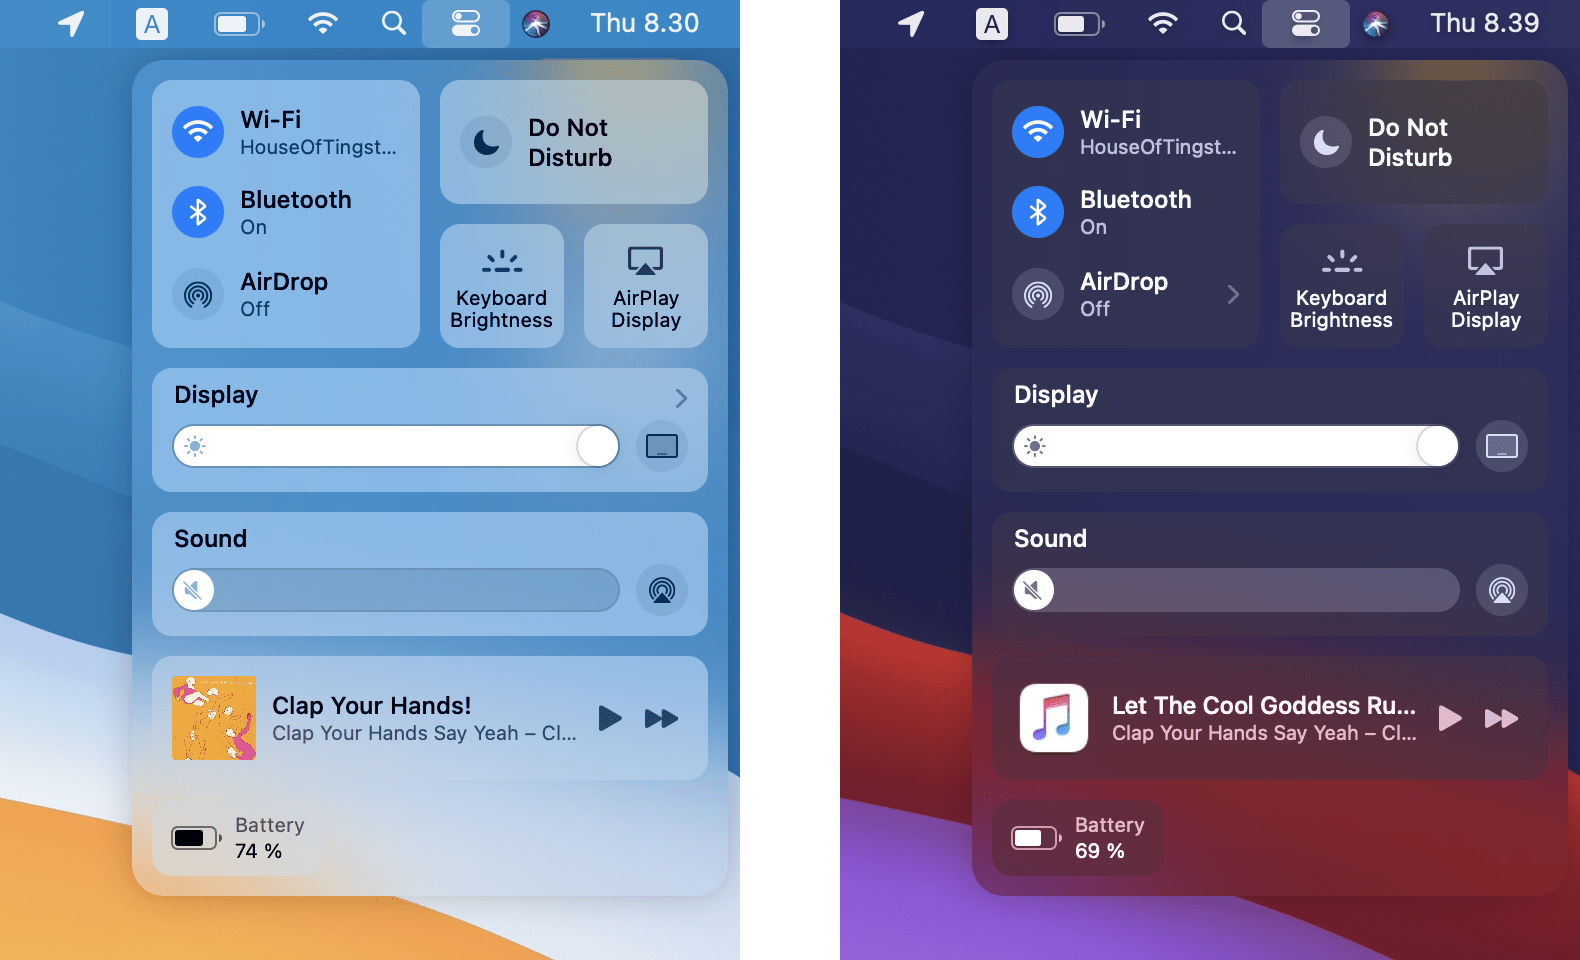
<p>This is one of the areas where macOS has changed the most. It’s also difficult to take decent screenshots of  both of these. Control Center looks like it’s been badly photocopied and the Notification Center in Catalina has a bug whereby it renders at double it’s normal width.</p>

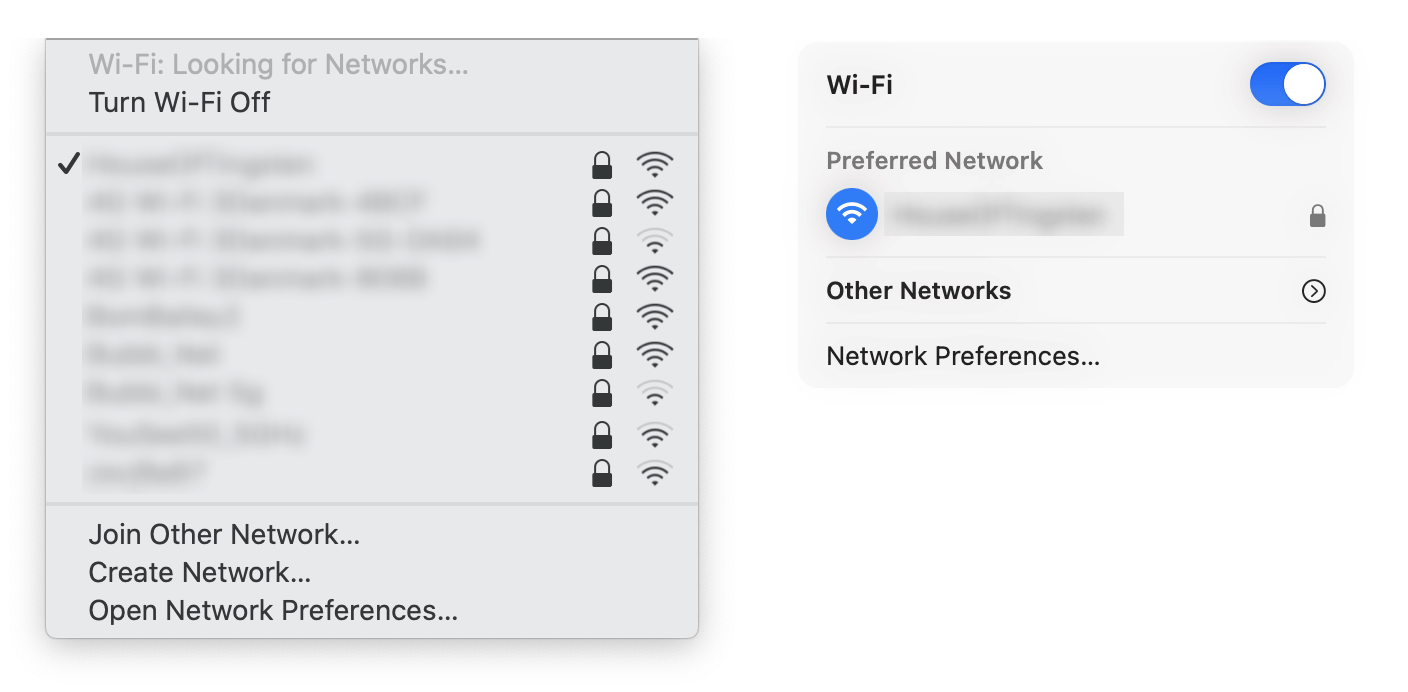
<p>What was obvious within a few minutes of use was that the Control Center is a massive improvement on Catalina’s row of scattered Menu bar icons. The updated WiFi menu is also a massive improvement, as the old list could easily be overwhelming with the number of WiFi networks displayed.</p>

<p>I’m less convinced that the Notification Center is easier to use though. Now it has no background, there is less to separate a list of notifications from my messy desktop!</p>

<p>I will try and get better screenshots for this section and update it in the near future.</p>
<style>
    .image-gallery {overflow: auto; margin-left: -1%!important;}
    .image-gallery li {float: left; display: block; margin: 0 0 0 0; width: 100%;}
    .image-gallery li a {text-align: center; text-decoration: none!important; color: #777;}
    .image-gallery li a span {display: block; text-overflow: ellipsis; overflow: hidden; white-space: nowrap; padding: 3px 0;}
    .image-gallery li a img {width: 100%; display: block;}
</style>

<ul class="image-gallery"><li><a href="/blog/assets/img/macos-new-ui/menubar-and-notification-center/0-menu-bar.png" title="0-menu-bar"><img src="/blog/assets/img/macos-new-ui/menubar-and-notification-center/0-menu-bar.png" alt="0-menu-bar" title="0-menu-bar" /></a></li><li><a href="/blog/assets/img/macos-new-ui/menubar-and-notification-center/1-notification-center-macos-catalina-big-sur-comparison.png" title="1-notification-center-macos-catalina-big-sur-comparison"><img src="/blog/assets/img/macos-new-ui/menubar-and-notification-center/1-notification-center-macos-catalina-big-sur-comparison.png" alt="1-notification-center-macos-catalina-big-sur-comparison" title="1-notification-center-macos-catalina-big-sur-comparison" /></a></li><li><a href="/blog/assets/img/macos-new-ui/menubar-and-notification-center/2-wifi-menu-macos-catalina-big-sur-comparison.png" title="2-wifi-menu-macos-catalina-big-sur-comparison"><img src="/blog/assets/img/macos-new-ui/menubar-and-notification-center/2-wifi-menu-macos-catalina-big-sur-comparison.png" alt="2-wifi-menu-macos-catalina-big-sur-comparison" title="2-wifi-menu-macos-catalina-big-sur-comparison" /></a></li><li><a href="/blog/assets/img/macos-new-ui/menubar-and-notification-center/3-control-center-macos-catalina-big-sur-comparison.png" title="3-control-center-macos-catalina-big-sur-comparison"><img src="/blog/assets/img/macos-new-ui/menubar-and-notification-center/3-control-center-macos-catalina-big-sur-comparison.png" alt="3-control-center-macos-catalina-big-sur-comparison" title="3-control-center-macos-catalina-big-sur-comparison" /></a></li><li><a href="/blog/assets/img/macos-new-ui/menubar-and-notification-center/apple-menu-macos-catalina-big-sur-comparison.jpg" title="apple-menu-macos-catalina-big-sur-comparison"><img src="/blog/assets/img/macos-new-ui/menubar-and-notification-center/apple-menu-macos-catalina-big-sur-comparison.jpg" alt="apple-menu-macos-catalina-big-sur-comparison" title="apple-menu-macos-catalina-big-sur-comparison" /></a></li></ul>

<h2 id="safari">Safari</h2>
<style>
    .image-gallery {overflow: auto; margin-left: -1%!important;}
    .image-gallery li {float: left; display: block; margin: 0 0 0 0; width: 100%;}
    .image-gallery li a {text-align: center; text-decoration: none!important; color: #777;}
    .image-gallery li a span {display: block; text-overflow: ellipsis; overflow: hidden; white-space: nowrap; padding: 3px 0;}
    .image-gallery li a img {width: 100%; display: block;}
</style>

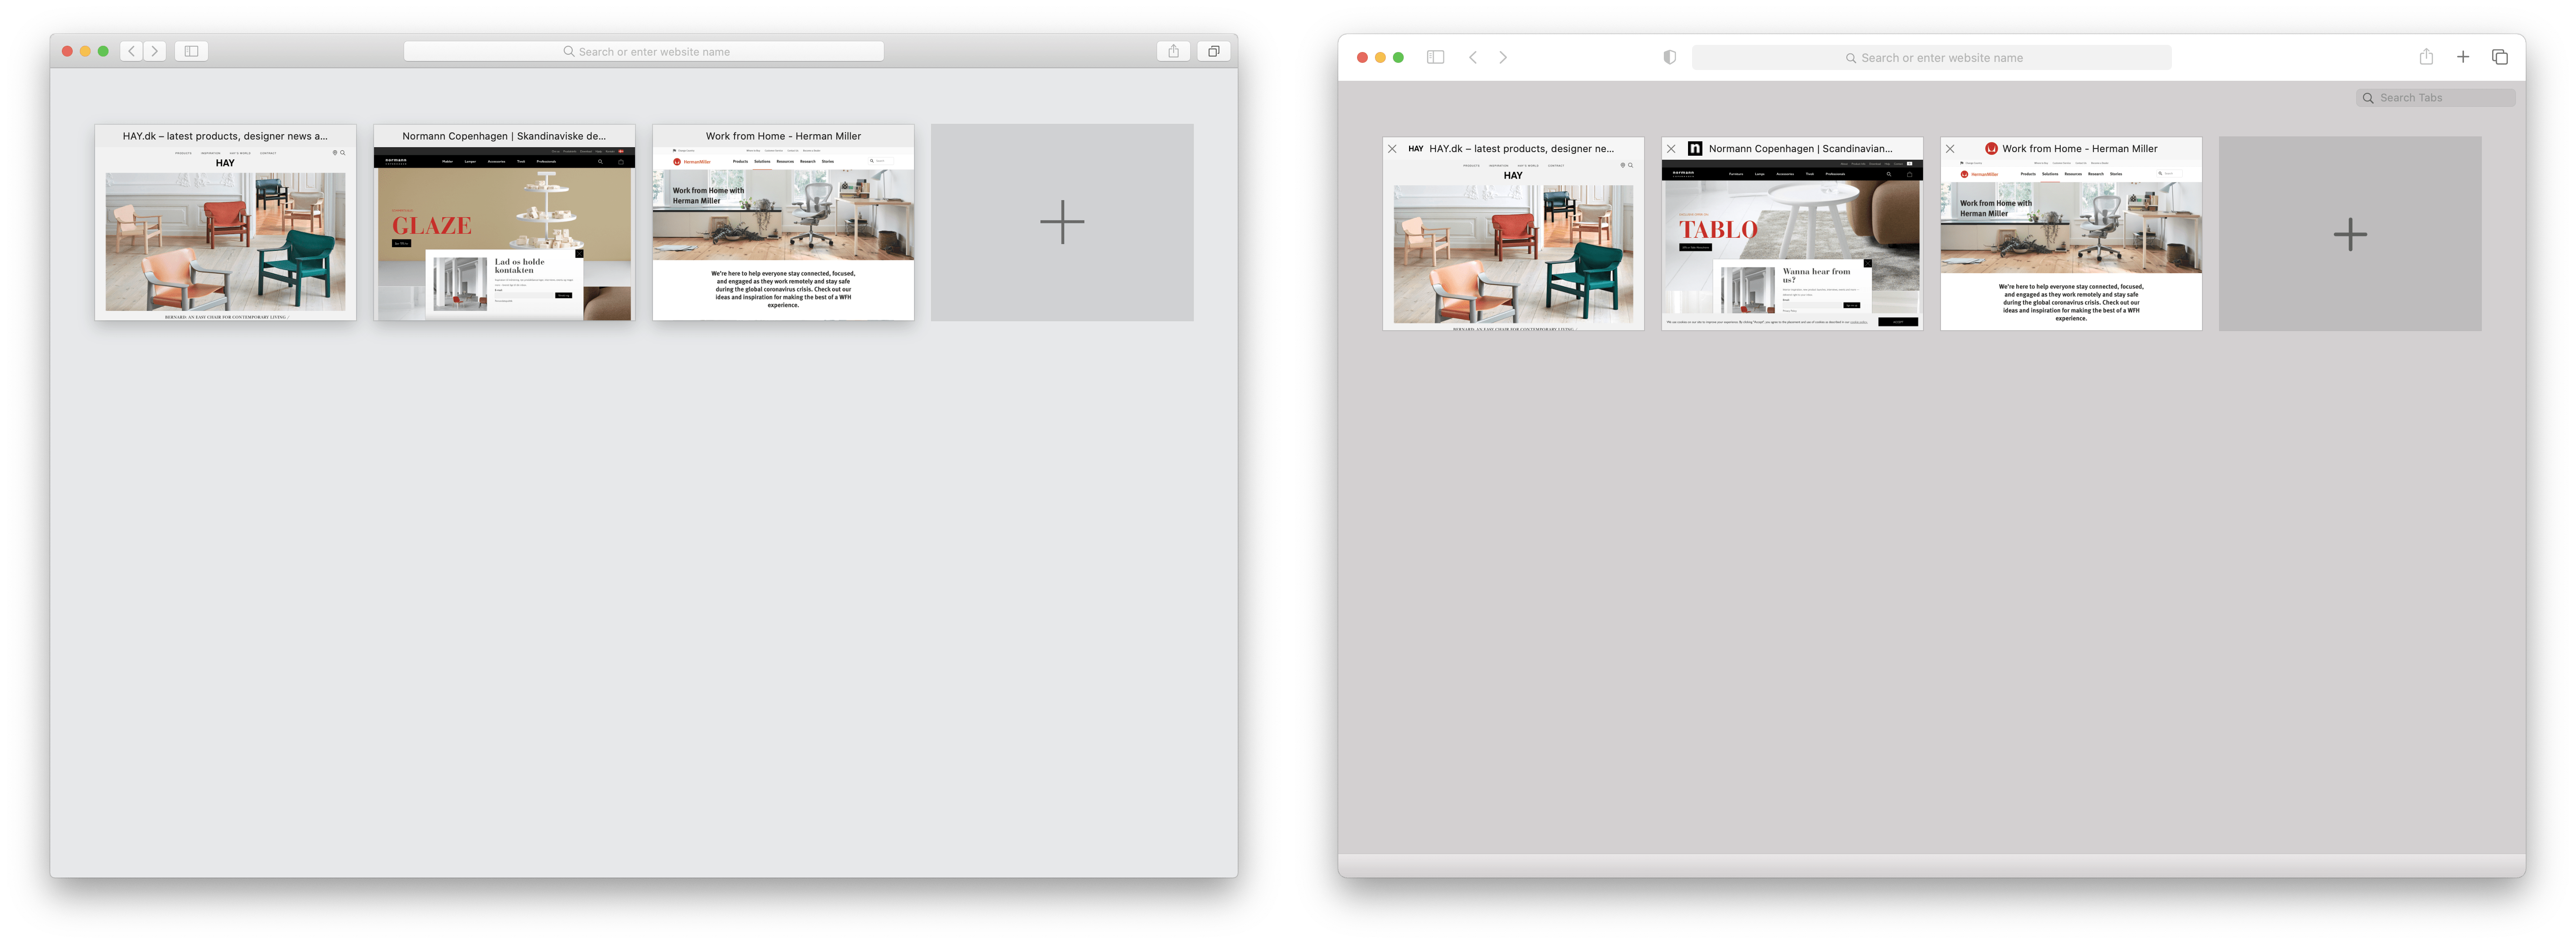
<ul class="image-gallery"><li><a href="/blog/assets/img/macos-new-ui/safari/safari-first-run-macos-catalina-big-sur-comparison.png" title="safari-first-run-macos-catalina-big-sur-comparison"><img src="/blog/assets/img/macos-new-ui/safari/safari-first-run-macos-catalina-big-sur-comparison.png" alt="safari-first-run-macos-catalina-big-sur-comparison" title="safari-first-run-macos-catalina-big-sur-comparison" /></a></li><li><a href="/blog/assets/img/macos-new-ui/safari/safari-preferences-macos-catalina-big-sur-comparison.png" title="safari-preferences-macos-catalina-big-sur-comparison"><img src="/blog/assets/img/macos-new-ui/safari/safari-preferences-macos-catalina-big-sur-comparison.png" alt="safari-preferences-macos-catalina-big-sur-comparison" title="safari-preferences-macos-catalina-big-sur-comparison" /></a></li><li><a href="/blog/assets/img/macos-new-ui/safari/safari-tab-overview-macos-catalina-big-sur-comparison.png" title="safari-tab-overview-macos-catalina-big-sur-comparison"><img src="/blog/assets/img/macos-new-ui/safari/safari-tab-overview-macos-catalina-big-sur-comparison.png" alt="safari-tab-overview-macos-catalina-big-sur-comparison" title="safari-tab-overview-macos-catalina-big-sur-comparison" /></a></li></ul>

<h2 id="calendar-and-contacts">Calendar and Contacts</h2>
<style>
    .image-gallery {overflow: auto; margin-left: -1%!important;}
    .image-gallery li {float: left; display: block; margin: 0 0 0 0; width: 100%;}
    .image-gallery li a {text-align: center; text-decoration: none!important; color: #777;}
    .image-gallery li a span {display: block; text-overflow: ellipsis; overflow: hidden; white-space: nowrap; padding: 3px 0;}
    .image-gallery li a img {width: 100%; display: block;}
</style>

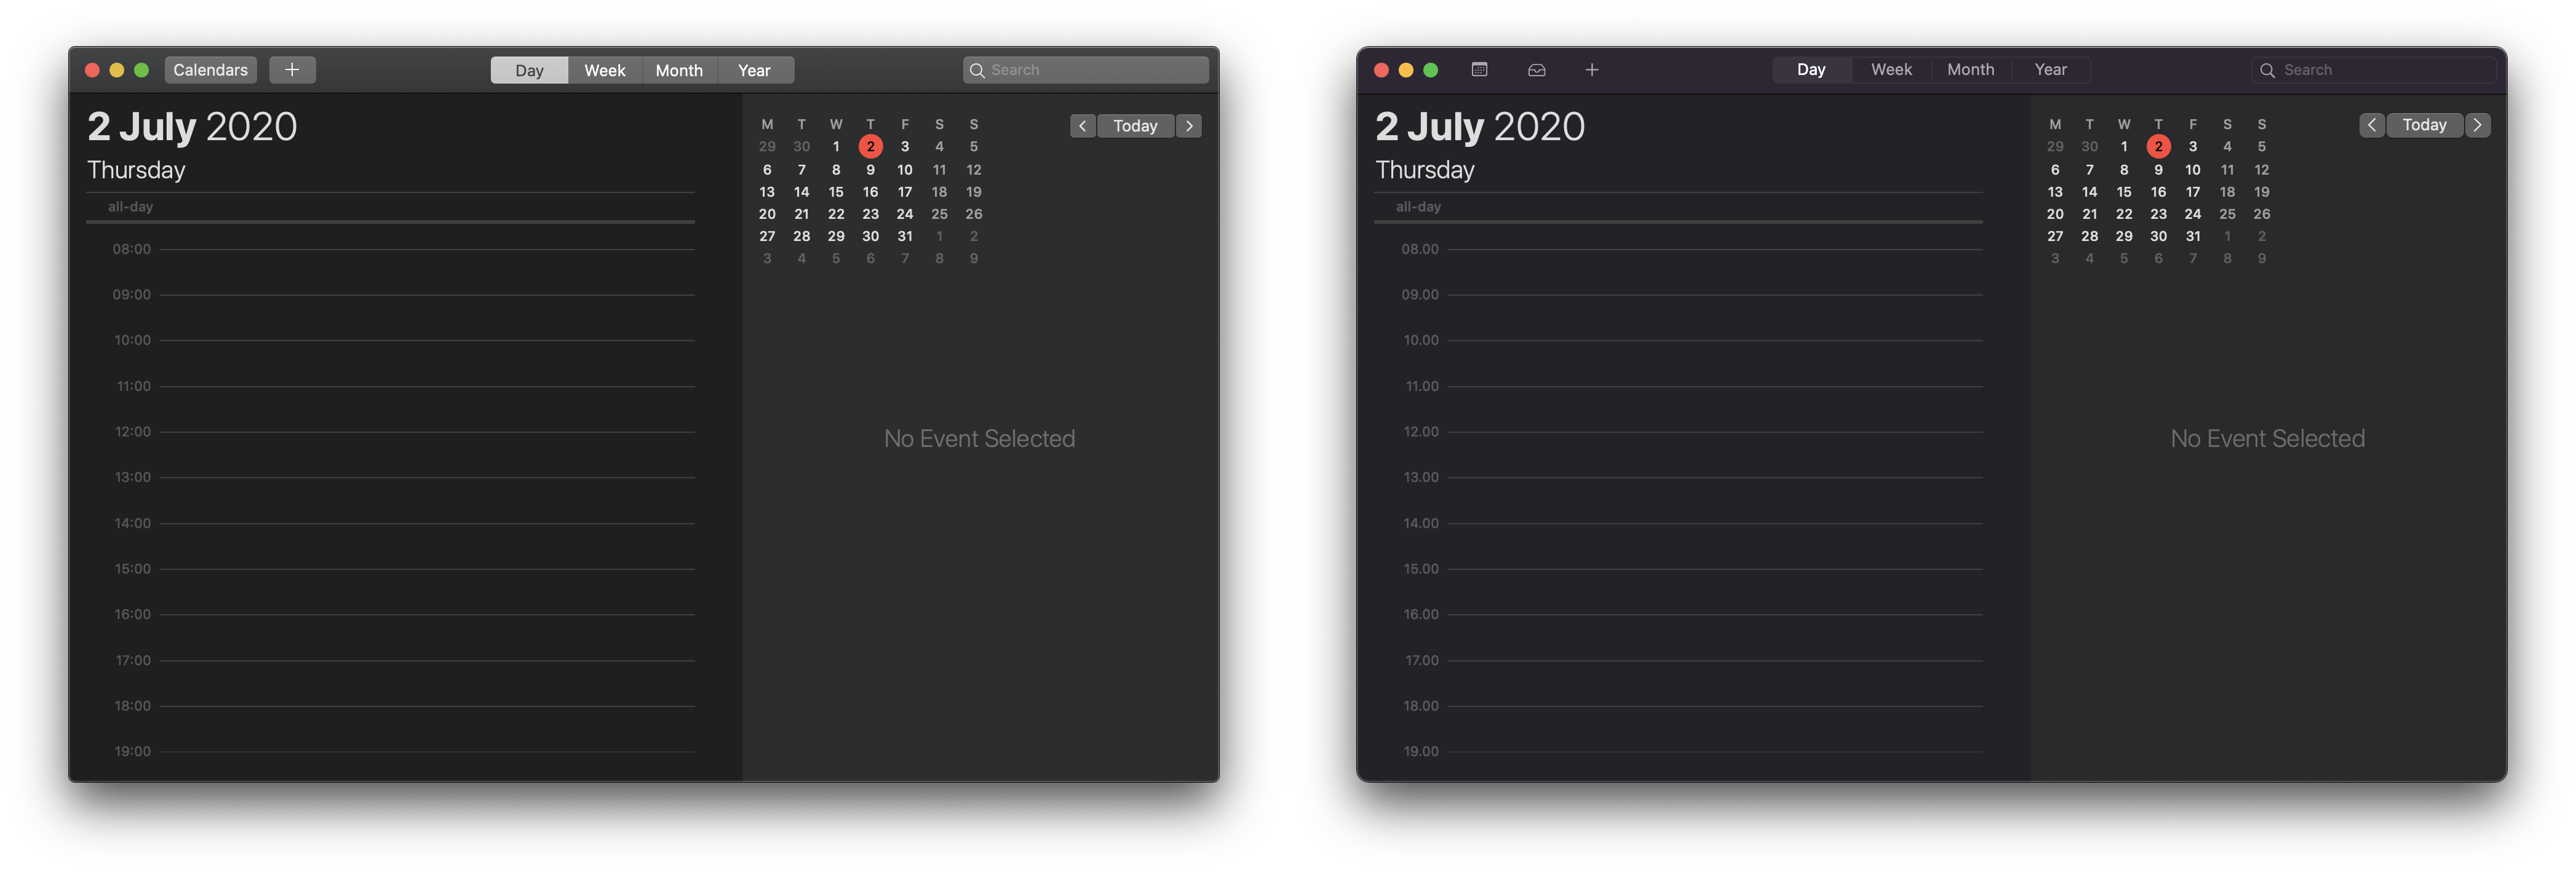
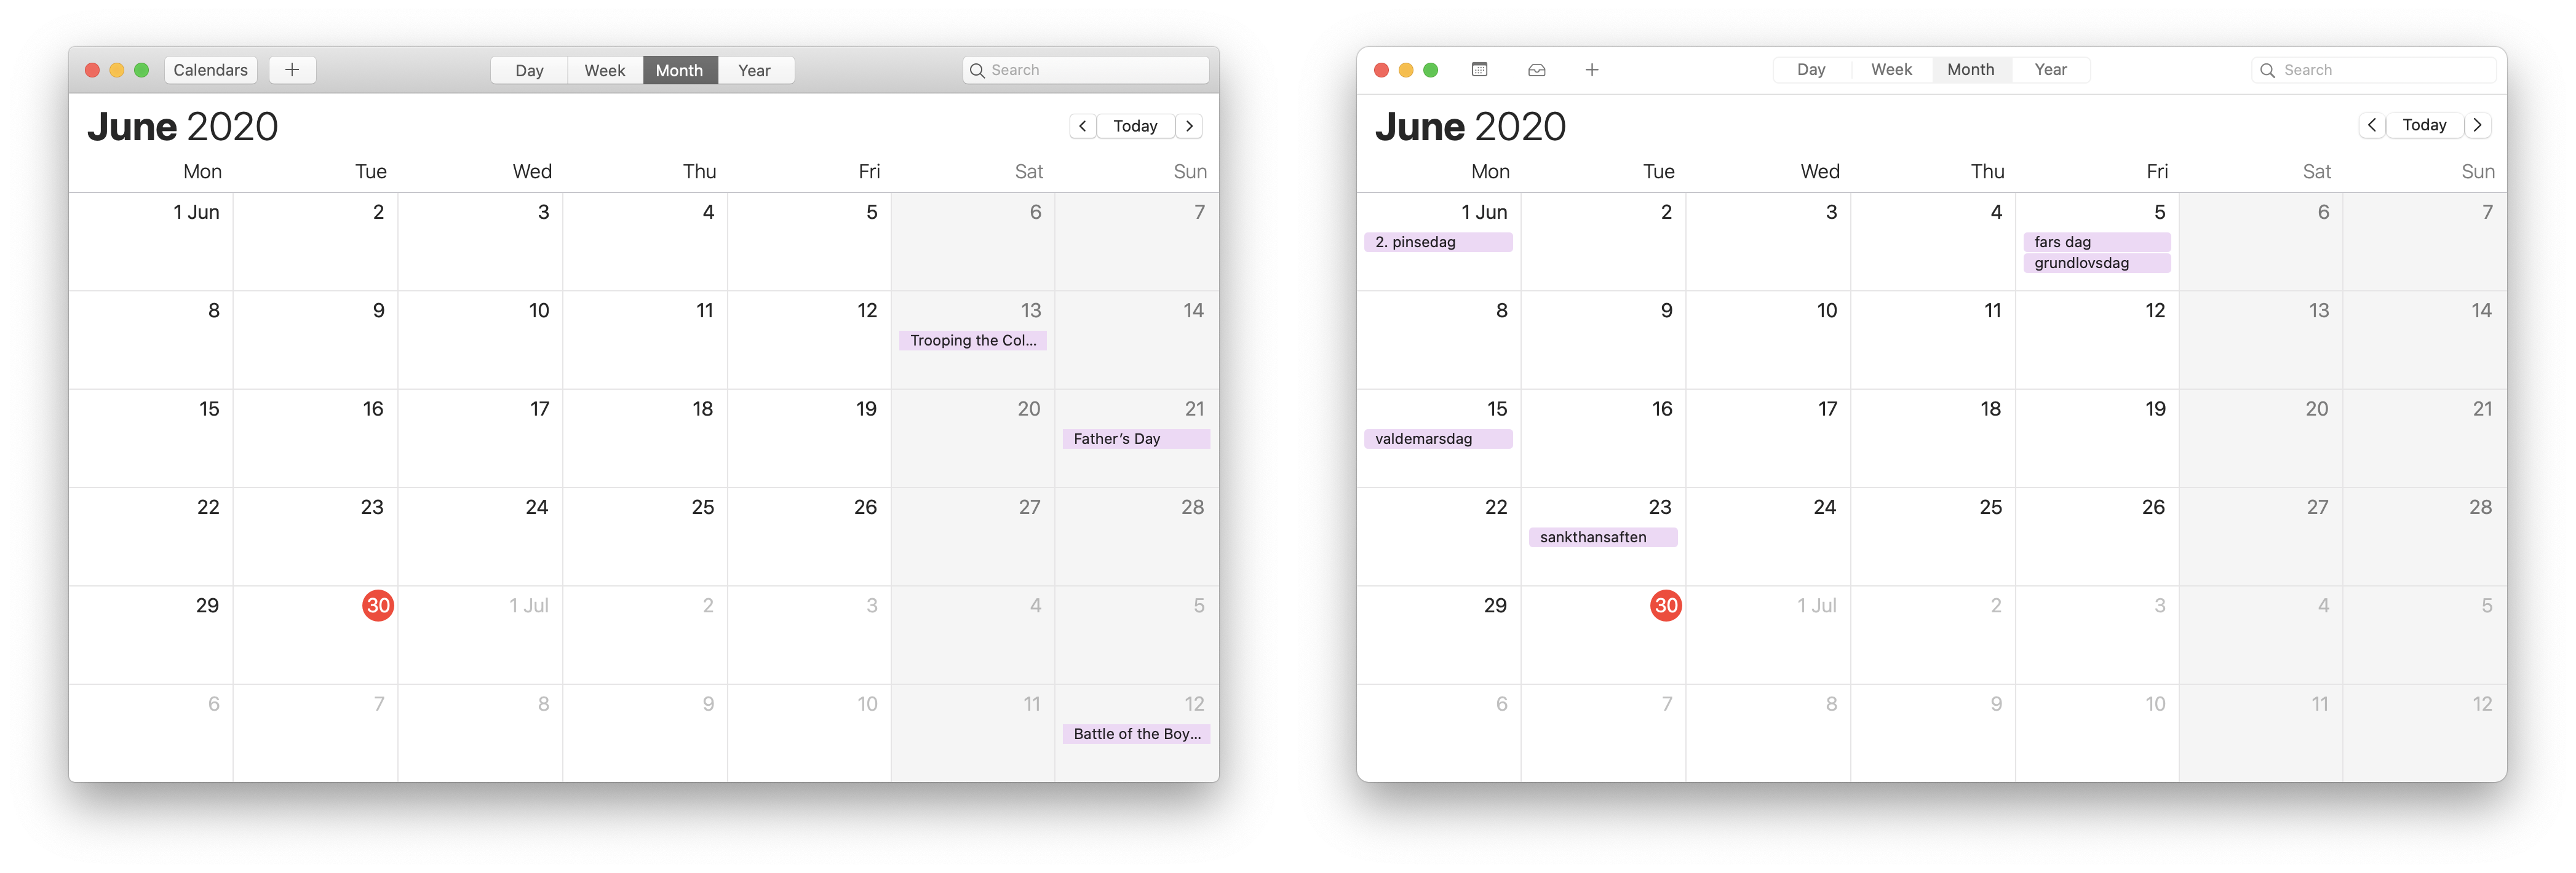
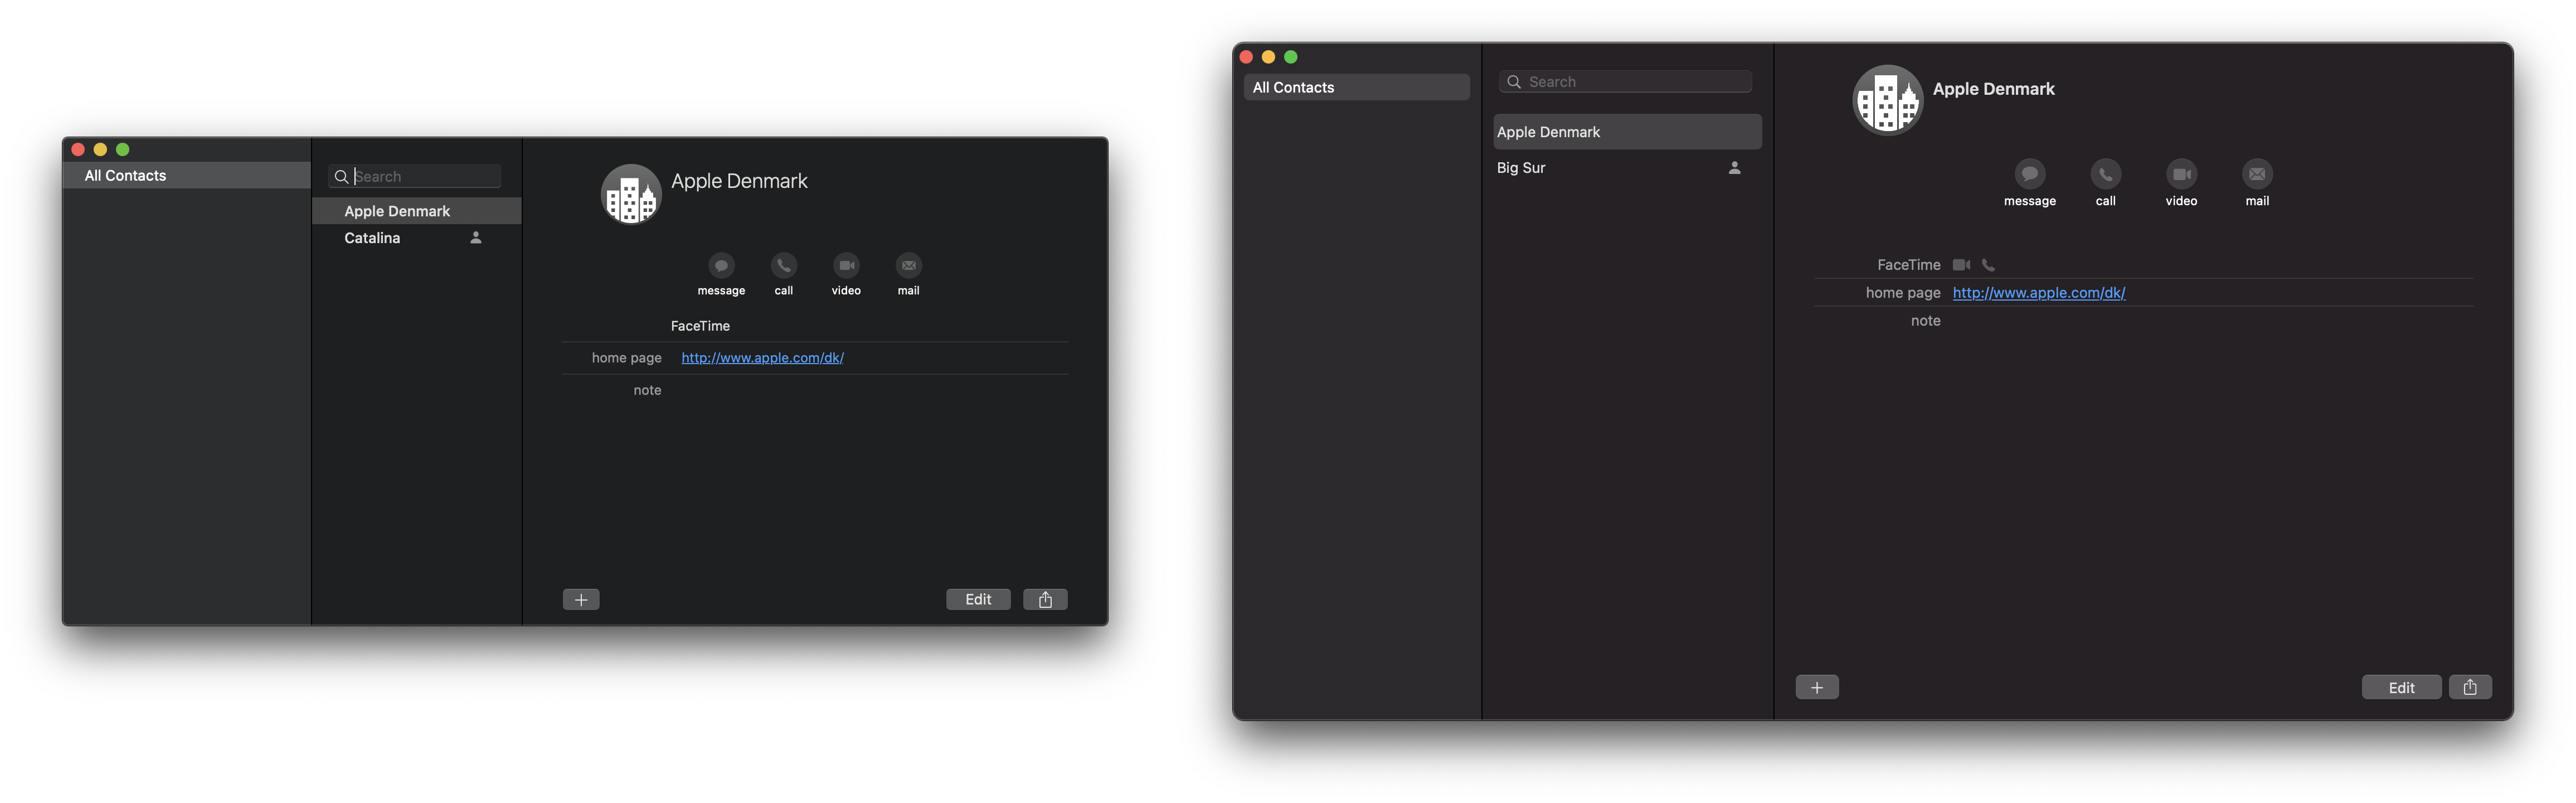
<ul class="image-gallery"><li><a href="/blog/assets/img/macos-new-ui/calendar/calendar-day-dark-mode-macos-catalina-big-sur-comparison.png" title="calendar-day-dark-mode-macos-catalina-big-sur-comparison"><img src="/blog/assets/img/macos-new-ui/calendar/calendar-day-dark-mode-macos-catalina-big-sur-comparison.png" alt="calendar-day-dark-mode-macos-catalina-big-sur-comparison" title="calendar-day-dark-mode-macos-catalina-big-sur-comparison" /></a></li><li><a href="/blog/assets/img/macos-new-ui/calendar/calendar-first-launch-macos-catalina-big-sur-comparison.png" title="calendar-first-launch-macos-catalina-big-sur-comparison"><img src="/blog/assets/img/macos-new-ui/calendar/calendar-first-launch-macos-catalina-big-sur-comparison.png" alt="calendar-first-launch-macos-catalina-big-sur-comparison" title="calendar-first-launch-macos-catalina-big-sur-comparison" /></a></li><li><a href="/blog/assets/img/macos-new-ui/calendar/calendar-month-view-macos-catalina-big-sur-comparison.png" title="calendar-month-view-macos-catalina-big-sur-comparison"><img src="/blog/assets/img/macos-new-ui/calendar/calendar-month-view-macos-catalina-big-sur-comparison.png" alt="calendar-month-view-macos-catalina-big-sur-comparison" title="calendar-month-view-macos-catalina-big-sur-comparison" /></a></li><li><a href="/blog/assets/img/macos-new-ui/calendar/contacts-macos-catalina-big-sur-comparison.png" title="contacts-macos-catalina-big-sur-comparison"><img src="/blog/assets/img/macos-new-ui/calendar/contacts-macos-catalina-big-sur-comparison.png" alt="contacts-macos-catalina-big-sur-comparison" title="contacts-macos-catalina-big-sur-comparison" /></a></li></ul>

<h2 id="reminders">Reminders</h2>
<style>
    .image-gallery {overflow: auto; margin-left: -1%!important;}
    .image-gallery li {float: left; display: block; margin: 0 0 0 0; width: 100%;}
    .image-gallery li a {text-align: center; text-decoration: none!important; color: #777;}
    .image-gallery li a span {display: block; text-overflow: ellipsis; overflow: hidden; white-space: nowrap; padding: 3px 0;}
    .image-gallery li a img {width: 100%; display: block;}
</style>

<ul class="image-gallery"><li><a href="/blog/assets/img/macos-new-ui/reminders/reminders-create-reminder-macos-catalina-big-sur-comparison.png" title="reminders-create-reminder-macos-catalina-big-sur-comparison"><img src="/blog/assets/img/macos-new-ui/reminders/reminders-create-reminder-macos-catalina-big-sur-comparison.png" alt="reminders-create-reminder-macos-catalina-big-sur-comparison" title="reminders-create-reminder-macos-catalina-big-sur-comparison" /></a></li><li><a href="/blog/assets/img/macos-new-ui/reminders/reminders-first-launch-macos-catalina-big-sur-comparison.png" title="reminders-first-launch-macos-catalina-big-sur-comparison"><img src="/blog/assets/img/macos-new-ui/reminders/reminders-first-launch-macos-catalina-big-sur-comparison.png" alt="reminders-first-launch-macos-catalina-big-sur-comparison" title="reminders-first-launch-macos-catalina-big-sur-comparison" /></a></li></ul>

<h2 id="notes">Notes</h2>
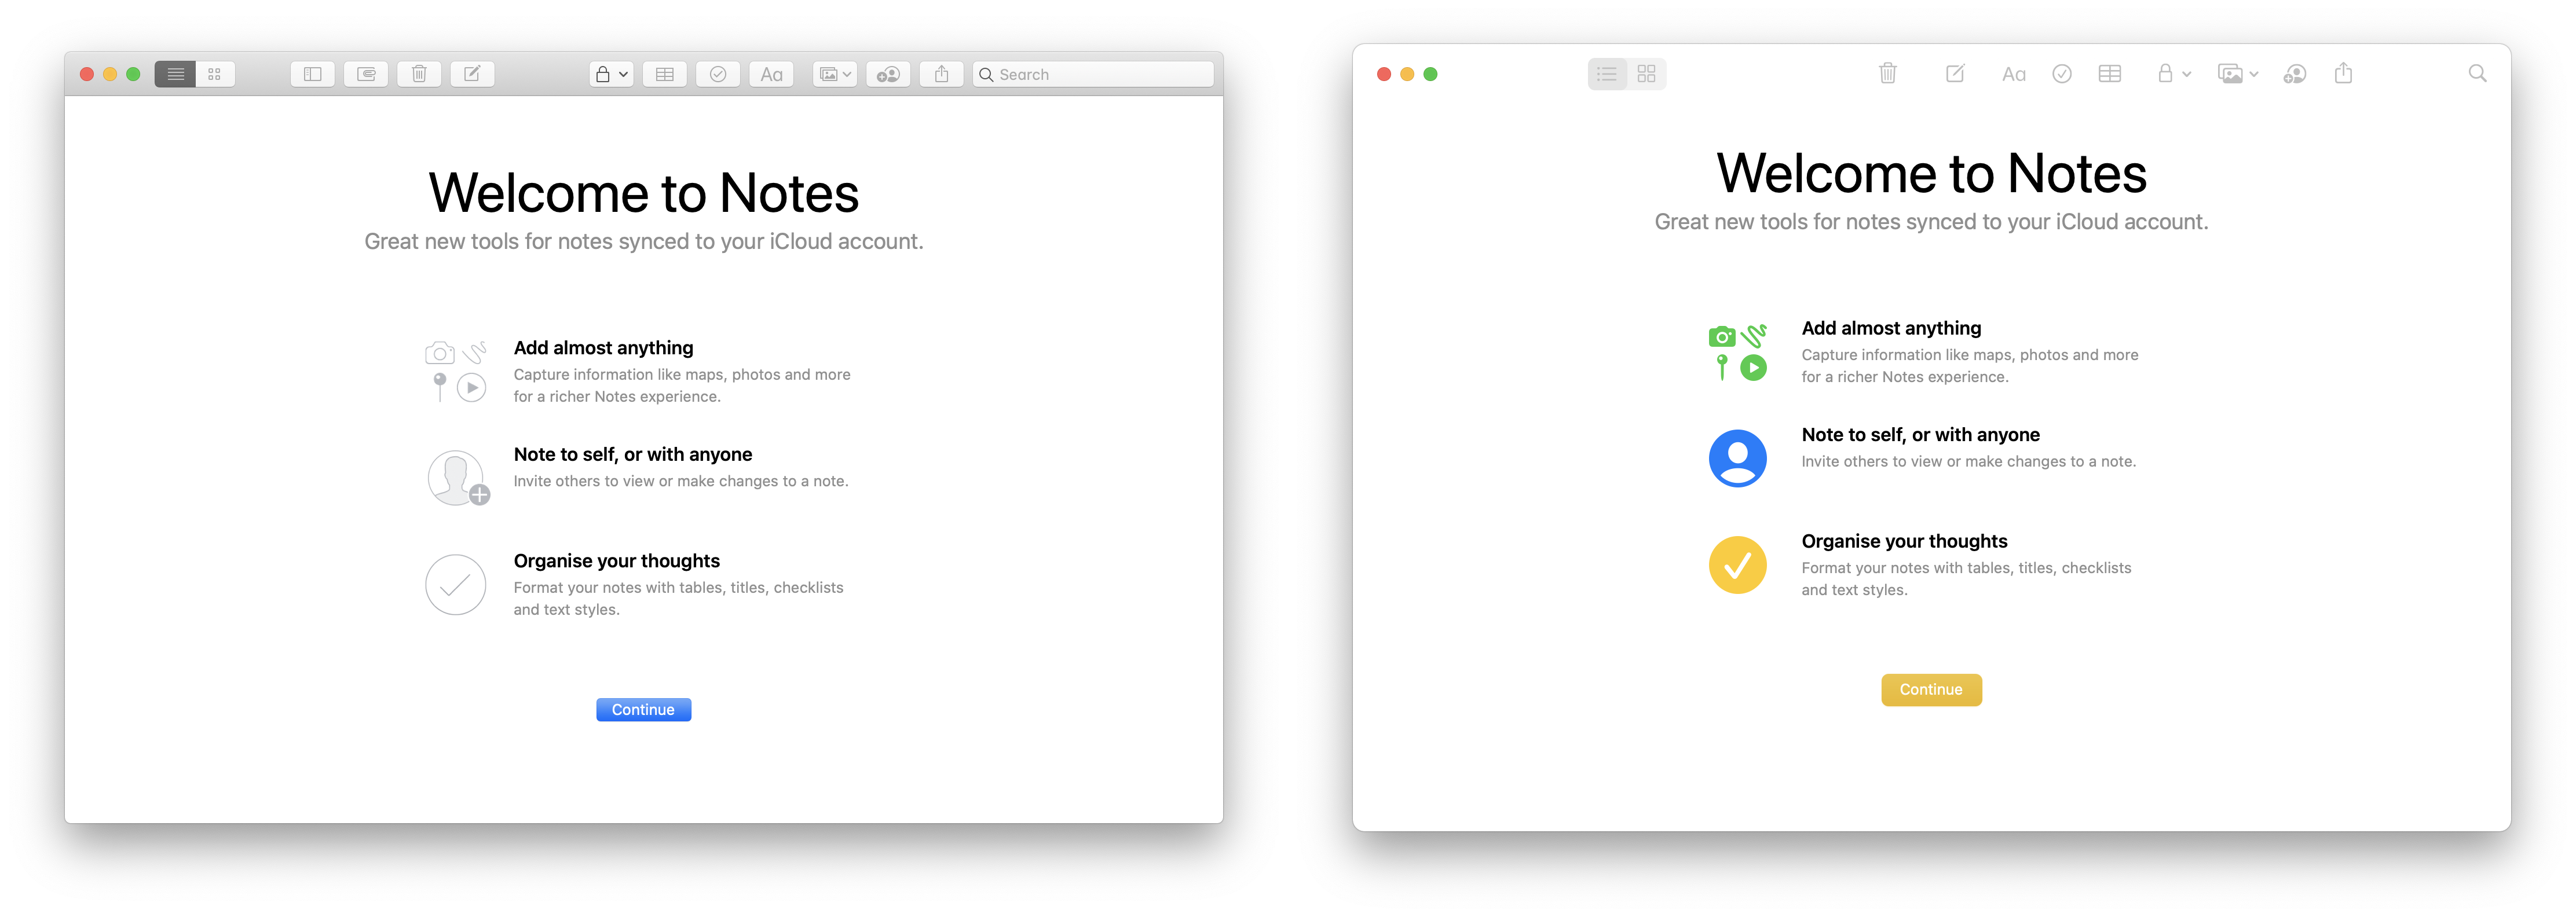
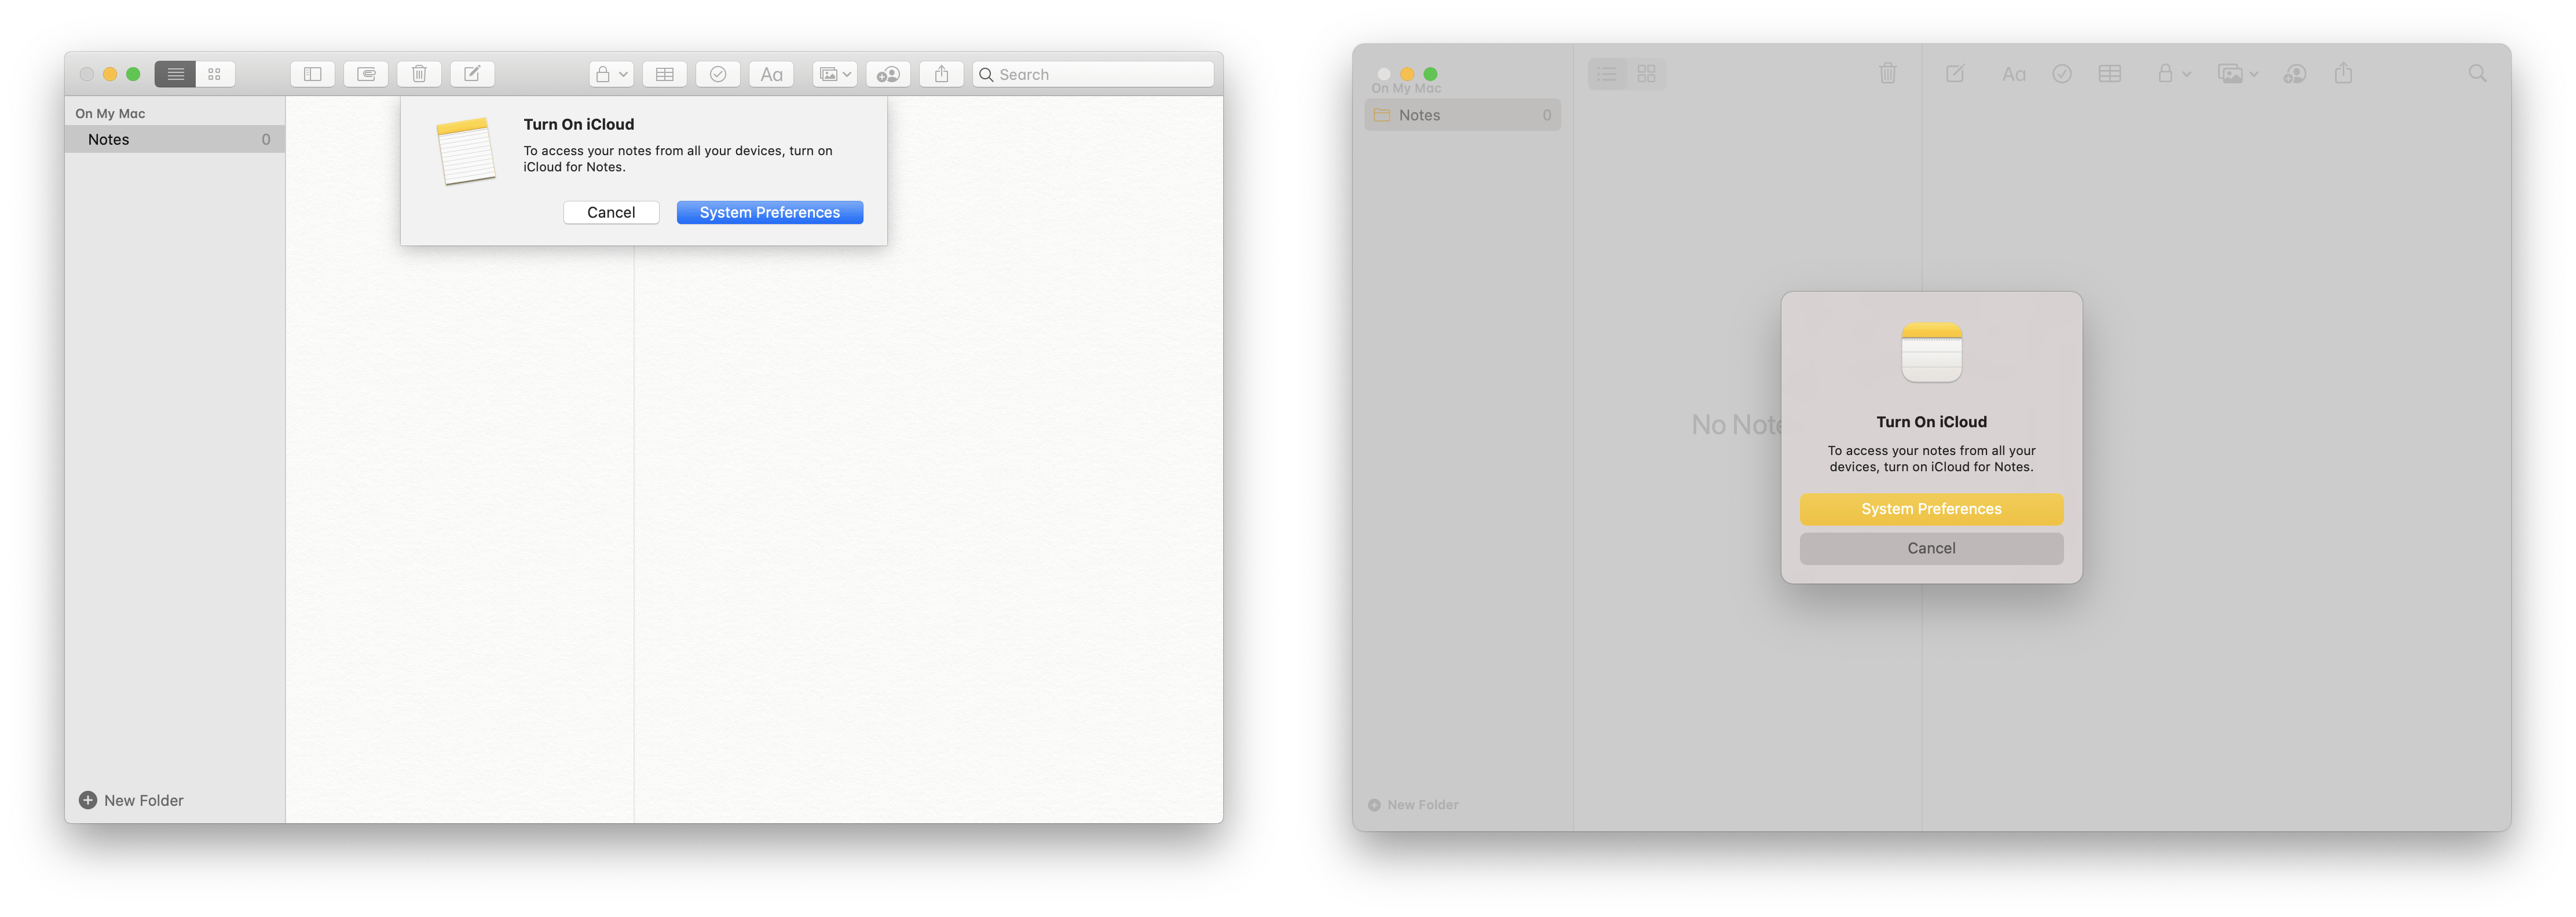
<p>The biggest news in Notes is that after years, the Skeuomorphic paper texture has finally been retired!</p>
<style>
    .image-gallery {overflow: auto; margin-left: -1%!important;}
    .image-gallery li {float: left; display: block; margin: 0 0 0 0; width: 100%;}
    .image-gallery li a {text-align: center; text-decoration: none!important; color: #777;}
    .image-gallery li a span {display: block; text-overflow: ellipsis; overflow: hidden; white-space: nowrap; padding: 3px 0;}
    .image-gallery li a img {width: 100%; display: block;}
</style>

<ul class="image-gallery"><li><a href="/blog/assets/img/macos-new-ui/notes/0-notes-first-launch-macos-catalina-big-sur-comparison.png" title="0-notes-first-launch-macos-catalina-big-sur-comparison"><img src="/blog/assets/img/macos-new-ui/notes/0-notes-first-launch-macos-catalina-big-sur-comparison.png" alt="0-notes-first-launch-macos-catalina-big-sur-comparison" title="0-notes-first-launch-macos-catalina-big-sur-comparison" /></a></li><li><a href="/blog/assets/img/macos-new-ui/notes/1-notes-icloud-macos-catalina-big-sur-comparison.png" title="1-notes-icloud-macos-catalina-big-sur-comparison"><img src="/blog/assets/img/macos-new-ui/notes/1-notes-icloud-macos-catalina-big-sur-comparison.png" alt="1-notes-icloud-macos-catalina-big-sur-comparison" title="1-notes-icloud-macos-catalina-big-sur-comparison" /></a></li><li><a href="/blog/assets/img/macos-new-ui/notes/2-notes-light-mode-macos-catalina-big-sur-comparison.jpg" title="2-notes-light-mode-macos-catalina-big-sur-comparison"><img src="/blog/assets/img/macos-new-ui/notes/2-notes-light-mode-macos-catalina-big-sur-comparison.jpg" alt="2-notes-light-mode-macos-catalina-big-sur-comparison" title="2-notes-light-mode-macos-catalina-big-sur-comparison" /></a></li><li><a href="/blog/assets/img/macos-new-ui/notes/3-notes-dark-mode-macos-catalina-big-sur-comparison.jpg" title="3-notes-dark-mode-macos-catalina-big-sur-comparison"><img src="/blog/assets/img/macos-new-ui/notes/3-notes-dark-mode-macos-catalina-big-sur-comparison.jpg" alt="3-notes-dark-mode-macos-catalina-big-sur-comparison" title="3-notes-dark-mode-macos-catalina-big-sur-comparison" /></a></li></ul>

<h2 id="photos">Photos</h2>
<style>
    .image-gallery {overflow: auto; margin-left: -1%!important;}
    .image-gallery li {float: left; display: block; margin: 0 0 0 0; width: 100%;}
    .image-gallery li a {text-align: center; text-decoration: none!important; color: #777;}
    .image-gallery li a span {display: block; text-overflow: ellipsis; overflow: hidden; white-space: nowrap; padding: 3px 0;}
    .image-gallery li a img {width: 100%; display: block;}
</style>

<ul class="image-gallery"><li><a href="/blog/assets/img/macos-new-ui/photos/1-photos-about-macos-catalina-big-sur-comparison.png" title="1-photos-about-macos-catalina-big-sur-comparison"><img src="/blog/assets/img/macos-new-ui/photos/1-photos-about-macos-catalina-big-sur-comparison.png" alt="1-photos-about-macos-catalina-big-sur-comparison" title="1-photos-about-macos-catalina-big-sur-comparison" /></a></li><li><a href="/blog/assets/img/macos-new-ui/photos/2-photos-first-launch-macos-catalina-big-sur-comparison.png" title="2-photos-first-launch-macos-catalina-big-sur-comparison"><img src="/blog/assets/img/macos-new-ui/photos/2-photos-first-launch-macos-catalina-big-sur-comparison.png" alt="2-photos-first-launch-macos-catalina-big-sur-comparison" title="2-photos-first-launch-macos-catalina-big-sur-comparison" /></a></li><li><a href="/blog/assets/img/macos-new-ui/photos/3-photos-days-view-macos-catalina-big-sur-comparison.png" title="3-photos-days-view-macos-catalina-big-sur-comparison"><img src="/blog/assets/img/macos-new-ui/photos/3-photos-days-view-macos-catalina-big-sur-comparison.png" alt="3-photos-days-view-macos-catalina-big-sur-comparison" title="3-photos-days-view-macos-catalina-big-sur-comparison" /></a></li><li><a href="/blog/assets/img/macos-new-ui/photos/4-photos-single-image-macos-catalina-big-sur-comparison.png" title="4-photos-single-image-macos-catalina-big-sur-comparison"><img src="/blog/assets/img/macos-new-ui/photos/4-photos-single-image-macos-catalina-big-sur-comparison.png" alt="4-photos-single-image-macos-catalina-big-sur-comparison" title="4-photos-single-image-macos-catalina-big-sur-comparison" /></a></li></ul>

<h2 id="apple-music-and-podcasts">Apple Music and Podcasts</h2>
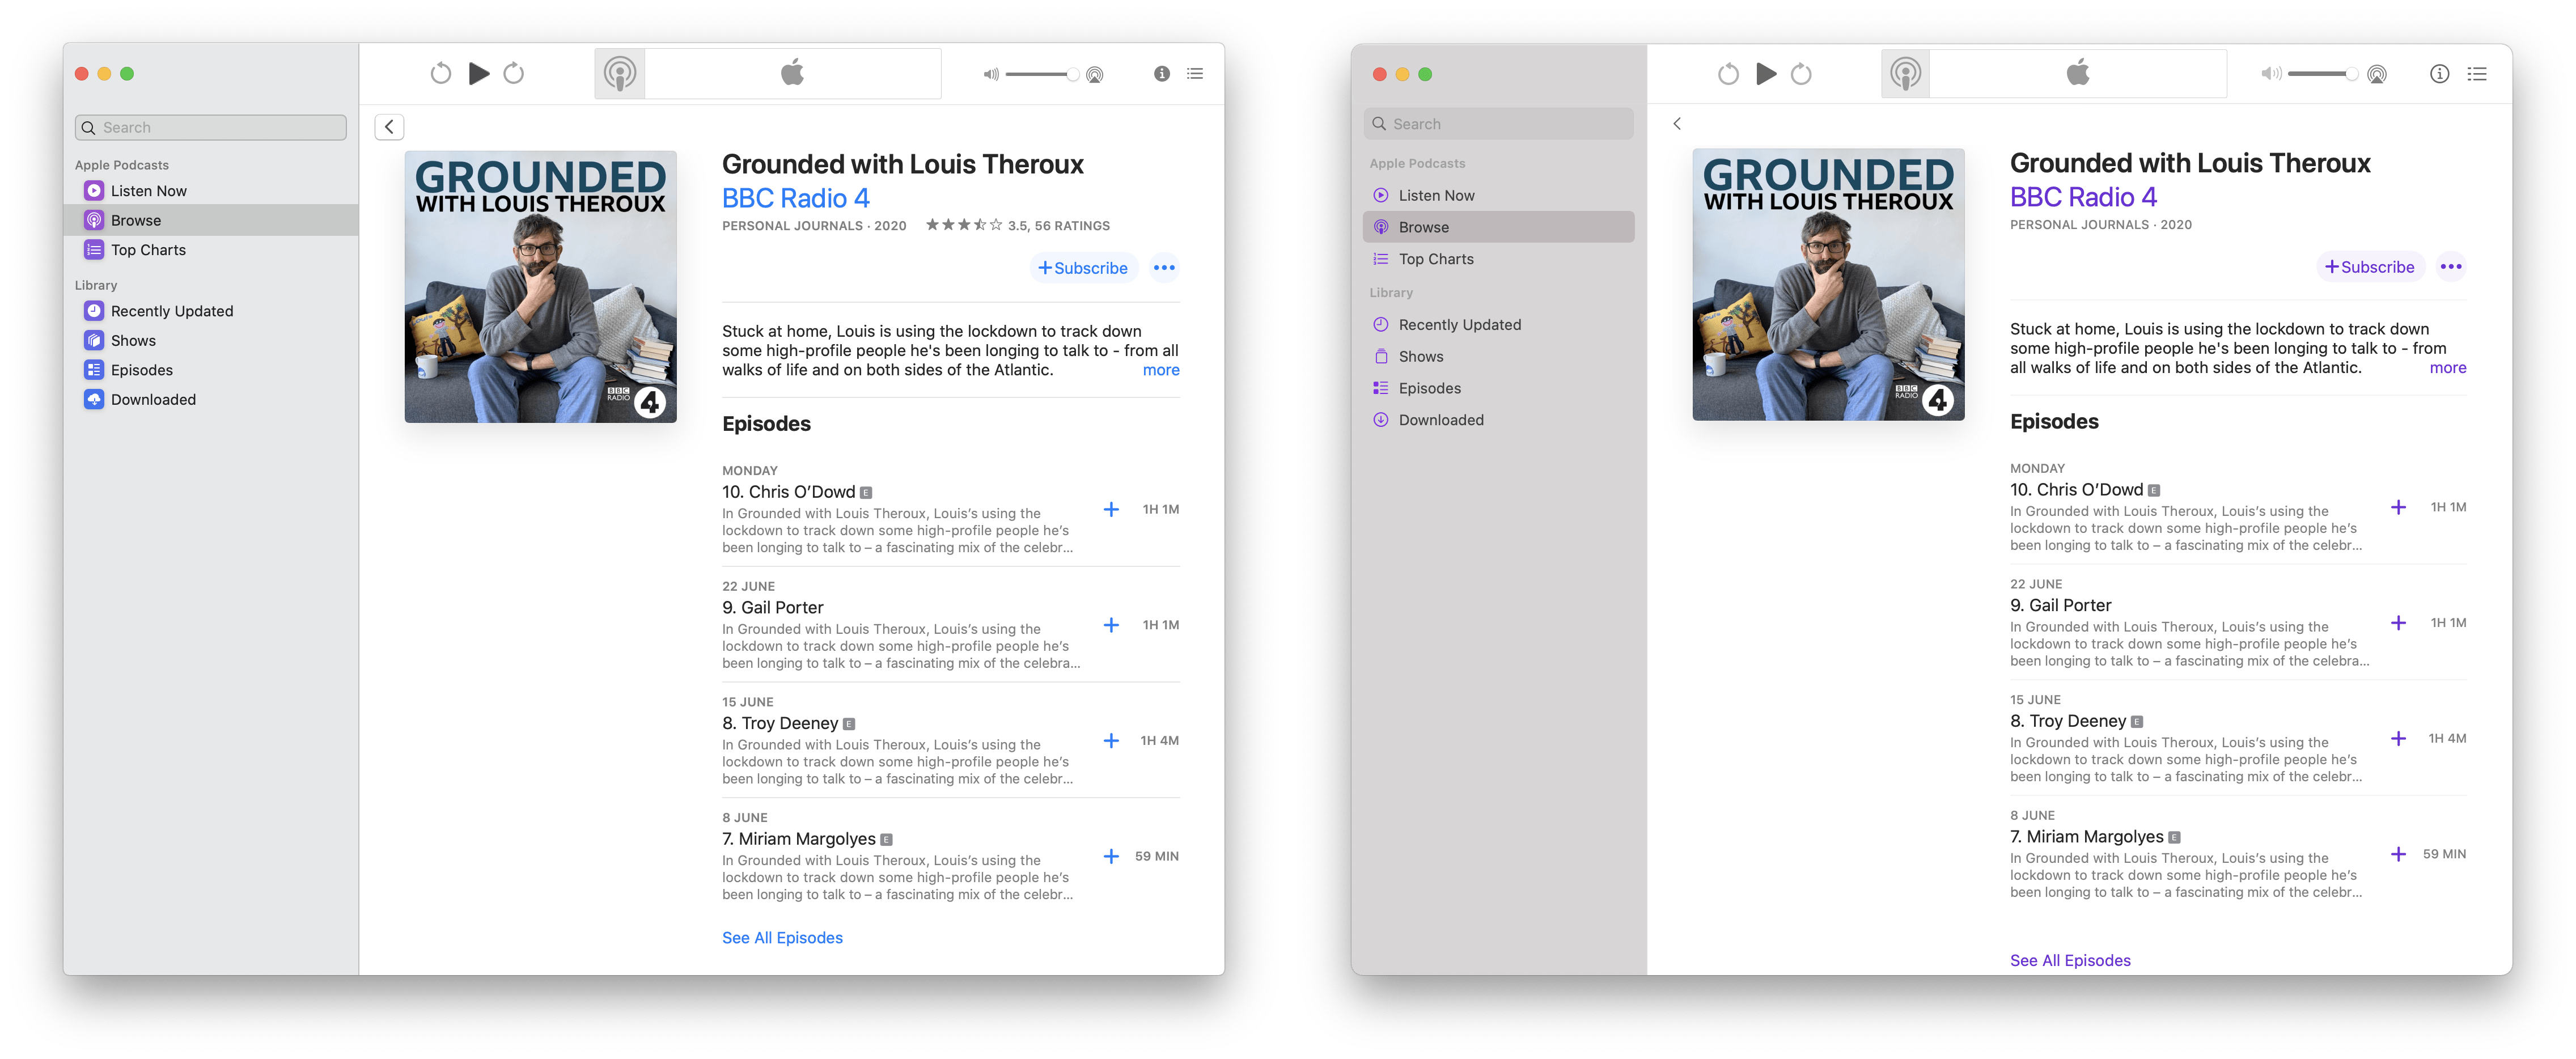
<p>Music and Podcasts were brand new last year with the release of Catalina. It’s obvious that the new UI has been planned for a while as Apple Music and Podcasts are mostly indistinguishable from their initial Catalina release. For example both apps already include the new full height sidebar.</p>

<p>For me this illustrates a bigger point that <a href="https://twitter.com/stevesi/status/1275311056672325633" target="_blank">Steven Sinofsky recently made on Twitter</a> - that Apple is executing a meticulous multi-year strategy.</p>

<style>
    .image-gallery {overflow: auto; margin-left: -1%!important;}
    .image-gallery li {float: left; display: block; margin: 0 0 0 0; width: 100%;}
    .image-gallery li a {text-align: center; text-decoration: none!important; color: #777;}
    .image-gallery li a span {display: block; text-overflow: ellipsis; overflow: hidden; white-space: nowrap; padding: 3px 0;}
    .image-gallery li a img {width: 100%; display: block;}
</style>

<ul class="image-gallery"><li><a href="/blog/assets/img/macos-new-ui/apple-music-podcasts/1-podcasts-first-launch-macos-catalina-big-sur-comparison.png" title="1-podcasts-first-launch-macos-catalina-big-sur-comparison"><img src="/blog/assets/img/macos-new-ui/apple-music-podcasts/1-podcasts-first-launch-macos-catalina-big-sur-comparison.png" alt="1-podcasts-first-launch-macos-catalina-big-sur-comparison" title="1-podcasts-first-launch-macos-catalina-big-sur-comparison" /></a></li><li><a href="/blog/assets/img/macos-new-ui/apple-music-podcasts/2-podcasts-macos-catalina-big-sur-comparison.png" title="2-podcasts-macos-catalina-big-sur-comparison"><img src="/blog/assets/img/macos-new-ui/apple-music-podcasts/2-podcasts-macos-catalina-big-sur-comparison.png" alt="2-podcasts-macos-catalina-big-sur-comparison" title="2-podcasts-macos-catalina-big-sur-comparison" /></a></li><li><a href="/blog/assets/img/macos-new-ui/apple-music-podcasts/3-apple-music-radio-macos-catalina-big-sur-comparison.png" title="3-apple-music-radio-macos-catalina-big-sur-comparison"><img src="/blog/assets/img/macos-new-ui/apple-music-podcasts/3-apple-music-radio-macos-catalina-big-sur-comparison.png" alt="3-apple-music-radio-macos-catalina-big-sur-comparison" title="3-apple-music-radio-macos-catalina-big-sur-comparison" /></a></li><li><a href="/blog/assets/img/macos-new-ui/apple-music-podcasts/4-apple-music-preferences-macos-catalina-big-sur-comparison.png" title="4-apple-music-preferences-macos-catalina-big-sur-comparison"><img src="/blog/assets/img/macos-new-ui/apple-music-podcasts/4-apple-music-preferences-macos-catalina-big-sur-comparison.png" alt="4-apple-music-preferences-macos-catalina-big-sur-comparison" title="4-apple-music-preferences-macos-catalina-big-sur-comparison" /></a></li><li><a href="/blog/assets/img/macos-new-ui/apple-music-podcasts/5-podcasts-preferences-macos-catalina-big-sur-comparison.png" title="5-podcasts-preferences-macos-catalina-big-sur-comparison"><img src="/blog/assets/img/macos-new-ui/apple-music-podcasts/5-podcasts-preferences-macos-catalina-big-sur-comparison.png" alt="5-podcasts-preferences-macos-catalina-big-sur-comparison" title="5-podcasts-preferences-macos-catalina-big-sur-comparison" /></a></li><li><a href="/blog/assets/img/macos-new-ui/apple-music-podcasts/music-playing-macos-catalina-big-sur-comparison.png" title="music-playing-macos-catalina-big-sur-comparison"><img src="/blog/assets/img/macos-new-ui/apple-music-podcasts/music-playing-macos-catalina-big-sur-comparison.png" alt="music-playing-macos-catalina-big-sur-comparison" title="music-playing-macos-catalina-big-sur-comparison" /></a></li></ul>

<p>One area where changes are evident are is in preferences windows. Both apps make use of Apple’s new accent colour and new glyph icon library.</p>

<h2 id="other-bundled-apps">Other bundled apps</h2>
<p>It was impossible to go into depth with every single bundled app. On the whole, the updates to Maps, Books and Mail all look solid with extensive use of the new sidebar.</p>
<style>
    .image-gallery {overflow: auto; margin-left: -1%!important;}
    .image-gallery li {float: left; display: block; margin: 0 0 0 0; width: 100%;}
    .image-gallery li a {text-align: center; text-decoration: none!important; color: #777;}
    .image-gallery li a span {display: block; text-overflow: ellipsis; overflow: hidden; white-space: nowrap; padding: 3px 0;}
    .image-gallery li a img {width: 100%; display: block;}
</style>

<ul class="image-gallery"><li><a href="/blog/assets/img/macos-new-ui/other-apps/app-store-macos-catalina-big-sur-comparison.png" title="app-store-macos-catalina-big-sur-comparison"><img src="/blog/assets/img/macos-new-ui/other-apps/app-store-macos-catalina-big-sur-comparison.png" alt="app-store-macos-catalina-big-sur-comparison" title="app-store-macos-catalina-big-sur-comparison" /></a></li><li><a href="/blog/assets/img/macos-new-ui/other-apps/apple-books-first-launch-macos-catalina-big-sur-comparison.png" title="apple-books-first-launch-macos-catalina-big-sur-comparison"><img src="/blog/assets/img/macos-new-ui/other-apps/apple-books-first-launch-macos-catalina-big-sur-comparison.png" alt="apple-books-first-launch-macos-catalina-big-sur-comparison" title="apple-books-first-launch-macos-catalina-big-sur-comparison" /></a></li><li><a href="/blog/assets/img/macos-new-ui/other-apps/apple-maps-macos-catalina-big-sur-comparison.png" title="apple-maps-macos-catalina-big-sur-comparison"><img src="/blog/assets/img/macos-new-ui/other-apps/apple-maps-macos-catalina-big-sur-comparison.png" alt="apple-maps-macos-catalina-big-sur-comparison" title="apple-maps-macos-catalina-big-sur-comparison" /></a></li><li><a href="/blog/assets/img/macos-new-ui/other-apps/apple-tv-macos-catalina-big-sur-comparison.png" title="apple-tv-macos-catalina-big-sur-comparison"><img src="/blog/assets/img/macos-new-ui/other-apps/apple-tv-macos-catalina-big-sur-comparison.png" alt="apple-tv-macos-catalina-big-sur-comparison" title="apple-tv-macos-catalina-big-sur-comparison" /></a></li><li><a href="/blog/assets/img/macos-new-ui/other-apps/books-store-macos-catalina-big-sur-comparison.jpg" title="books-store-macos-catalina-big-sur-comparison"><img src="/blog/assets/img/macos-new-ui/other-apps/books-store-macos-catalina-big-sur-comparison.jpg" alt="books-store-macos-catalina-big-sur-comparison" title="books-store-macos-catalina-big-sur-comparison" /></a></li><li><a href="/blog/assets/img/macos-new-ui/other-apps/dictionary-macos-catalina-big-sur-comparison.png" title="dictionary-macos-catalina-big-sur-comparison"><img src="/blog/assets/img/macos-new-ui/other-apps/dictionary-macos-catalina-big-sur-comparison.png" alt="dictionary-macos-catalina-big-sur-comparison" title="dictionary-macos-catalina-big-sur-comparison" /></a></li><li><a href="/blog/assets/img/macos-new-ui/other-apps/mail-first-launch-macos-catalina-big-sur-comparison.png" title="mail-first-launch-macos-catalina-big-sur-comparison"><img src="/blog/assets/img/macos-new-ui/other-apps/mail-first-launch-macos-catalina-big-sur-comparison.png" alt="mail-first-launch-macos-catalina-big-sur-comparison" title="mail-first-launch-macos-catalina-big-sur-comparison" /></a></li><li><a href="/blog/assets/img/macos-new-ui/other-apps/voice-memos-macos-catalina-big-sur-comparison.png" title="voice-memos-macos-catalina-big-sur-comparison"><img src="/blog/assets/img/macos-new-ui/other-apps/voice-memos-macos-catalina-big-sur-comparison.png" alt="voice-memos-macos-catalina-big-sur-comparison" title="voice-memos-macos-catalina-big-sur-comparison" /></a></li></ul>

<h2 id="utilities">Utilities</h2>
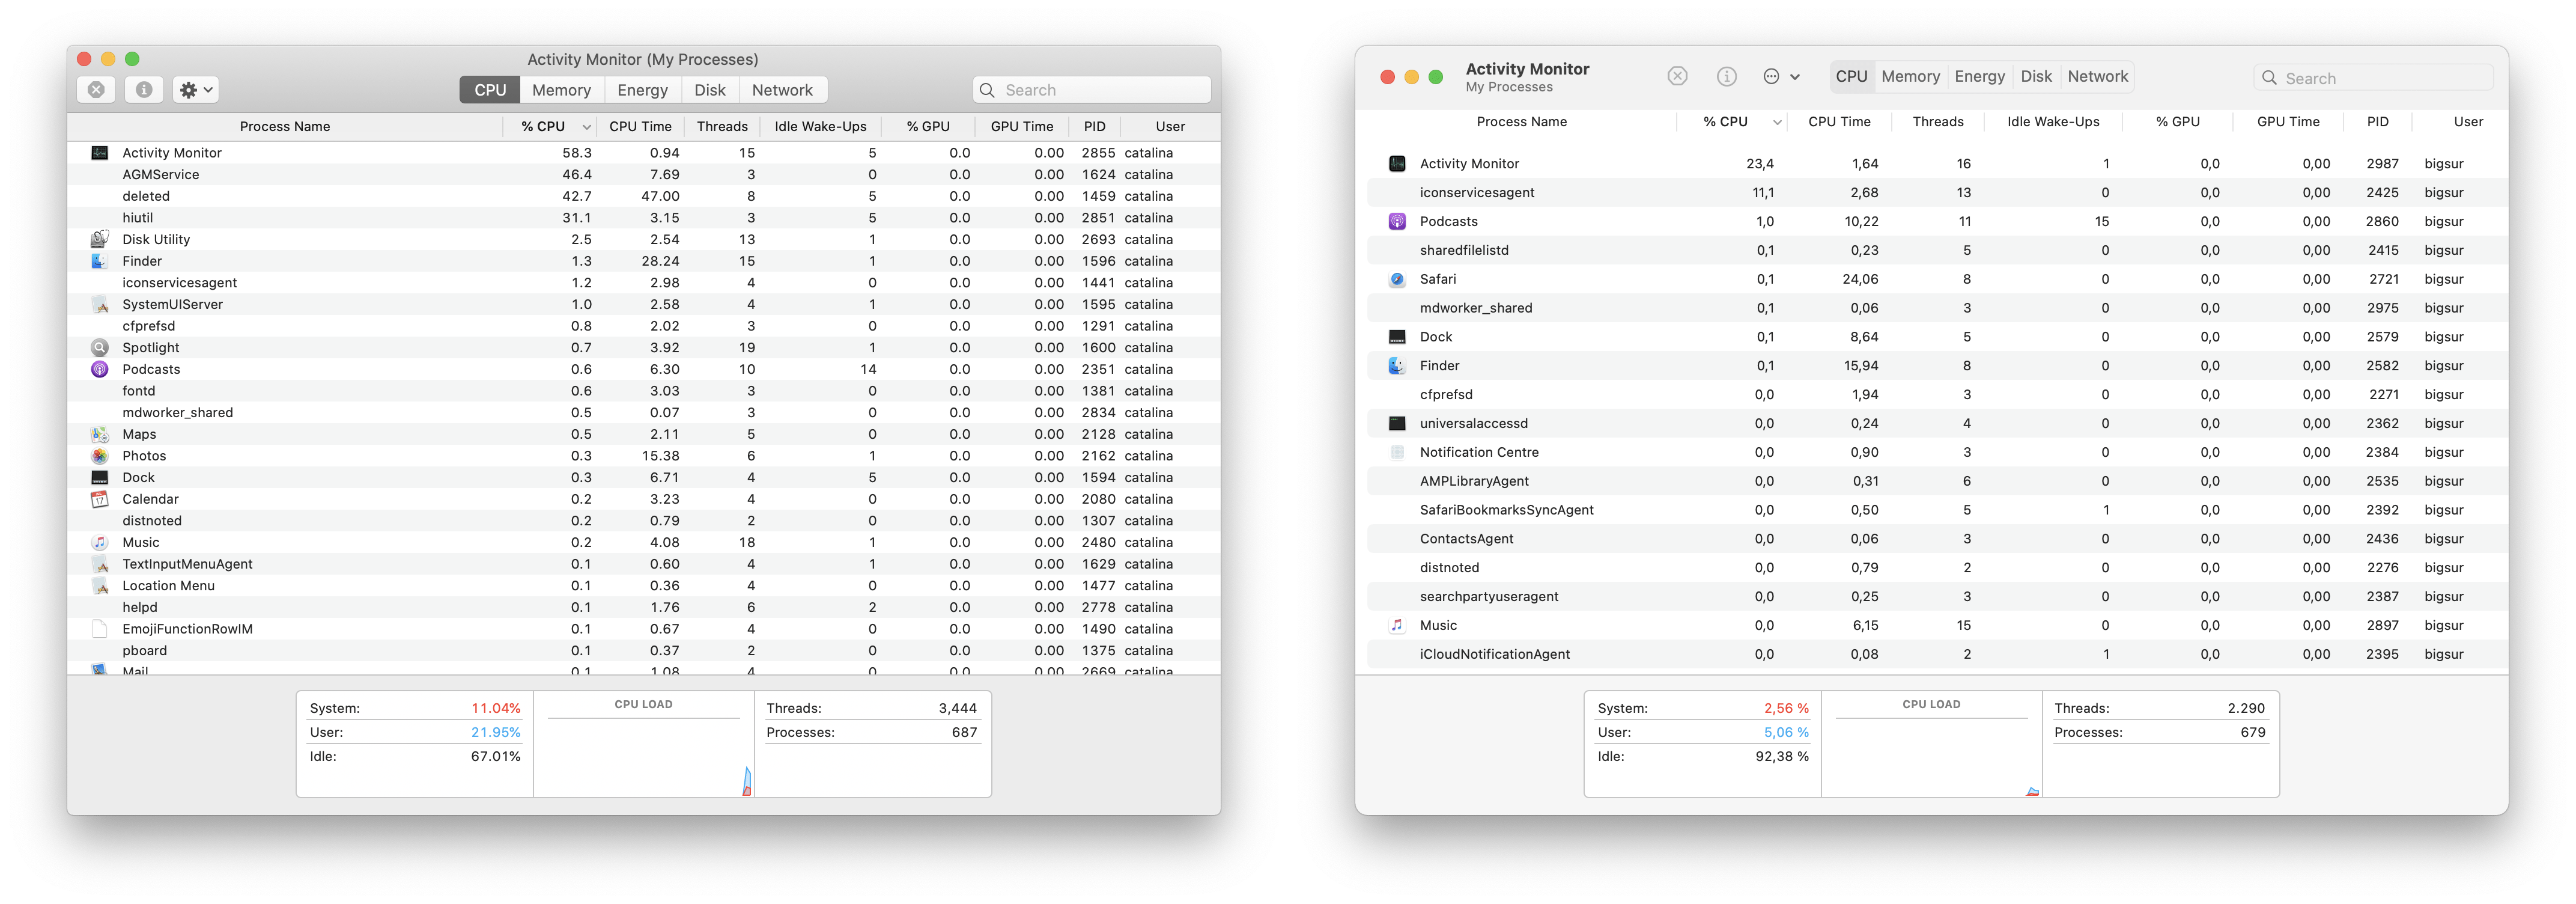
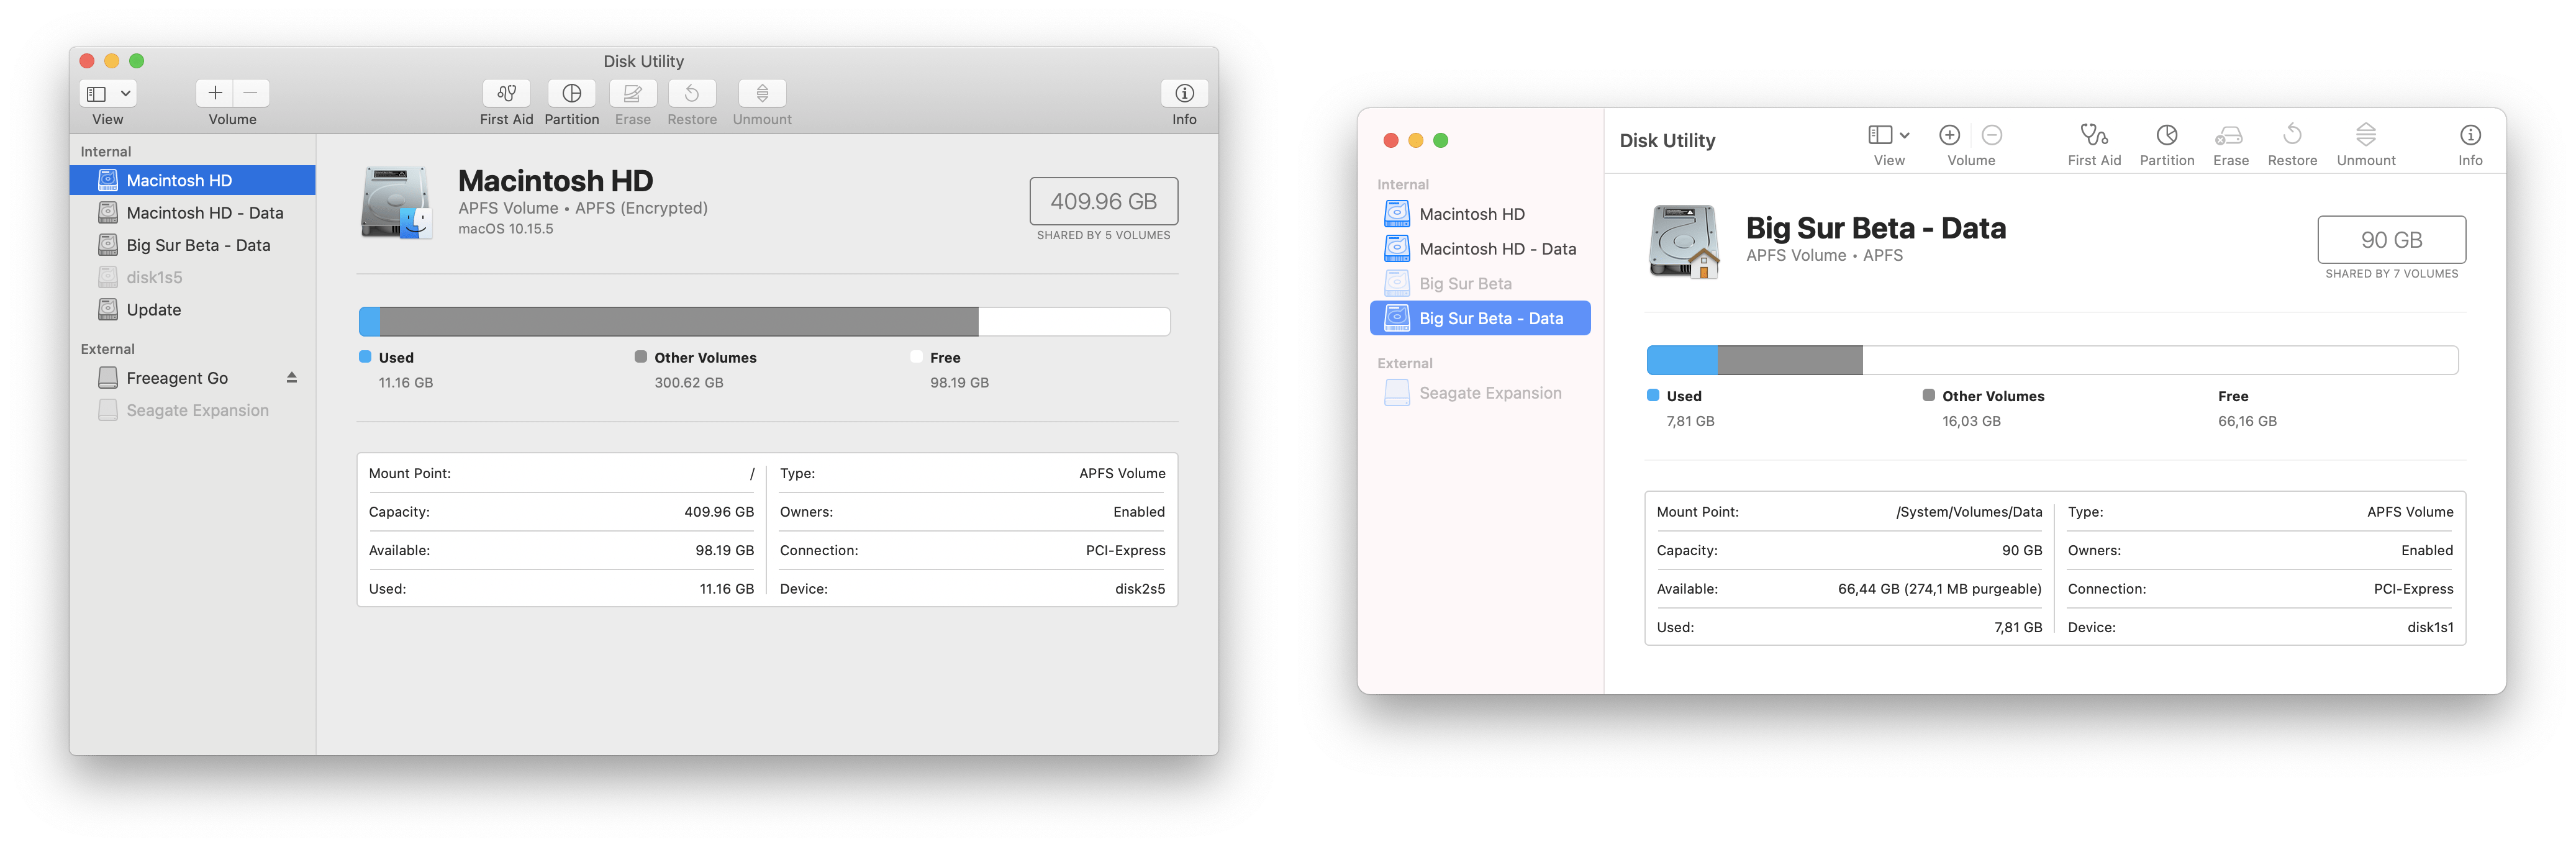
<p>Both Activity Monitor and Disk Utility have received a new style toolbar. As with Finder, there are no longer any rows meaning all elements are at the same level. On first impressions, I feel this is a little visually confusing and makes it harder to scan. The search field also loses a lot of its contrast.</p>

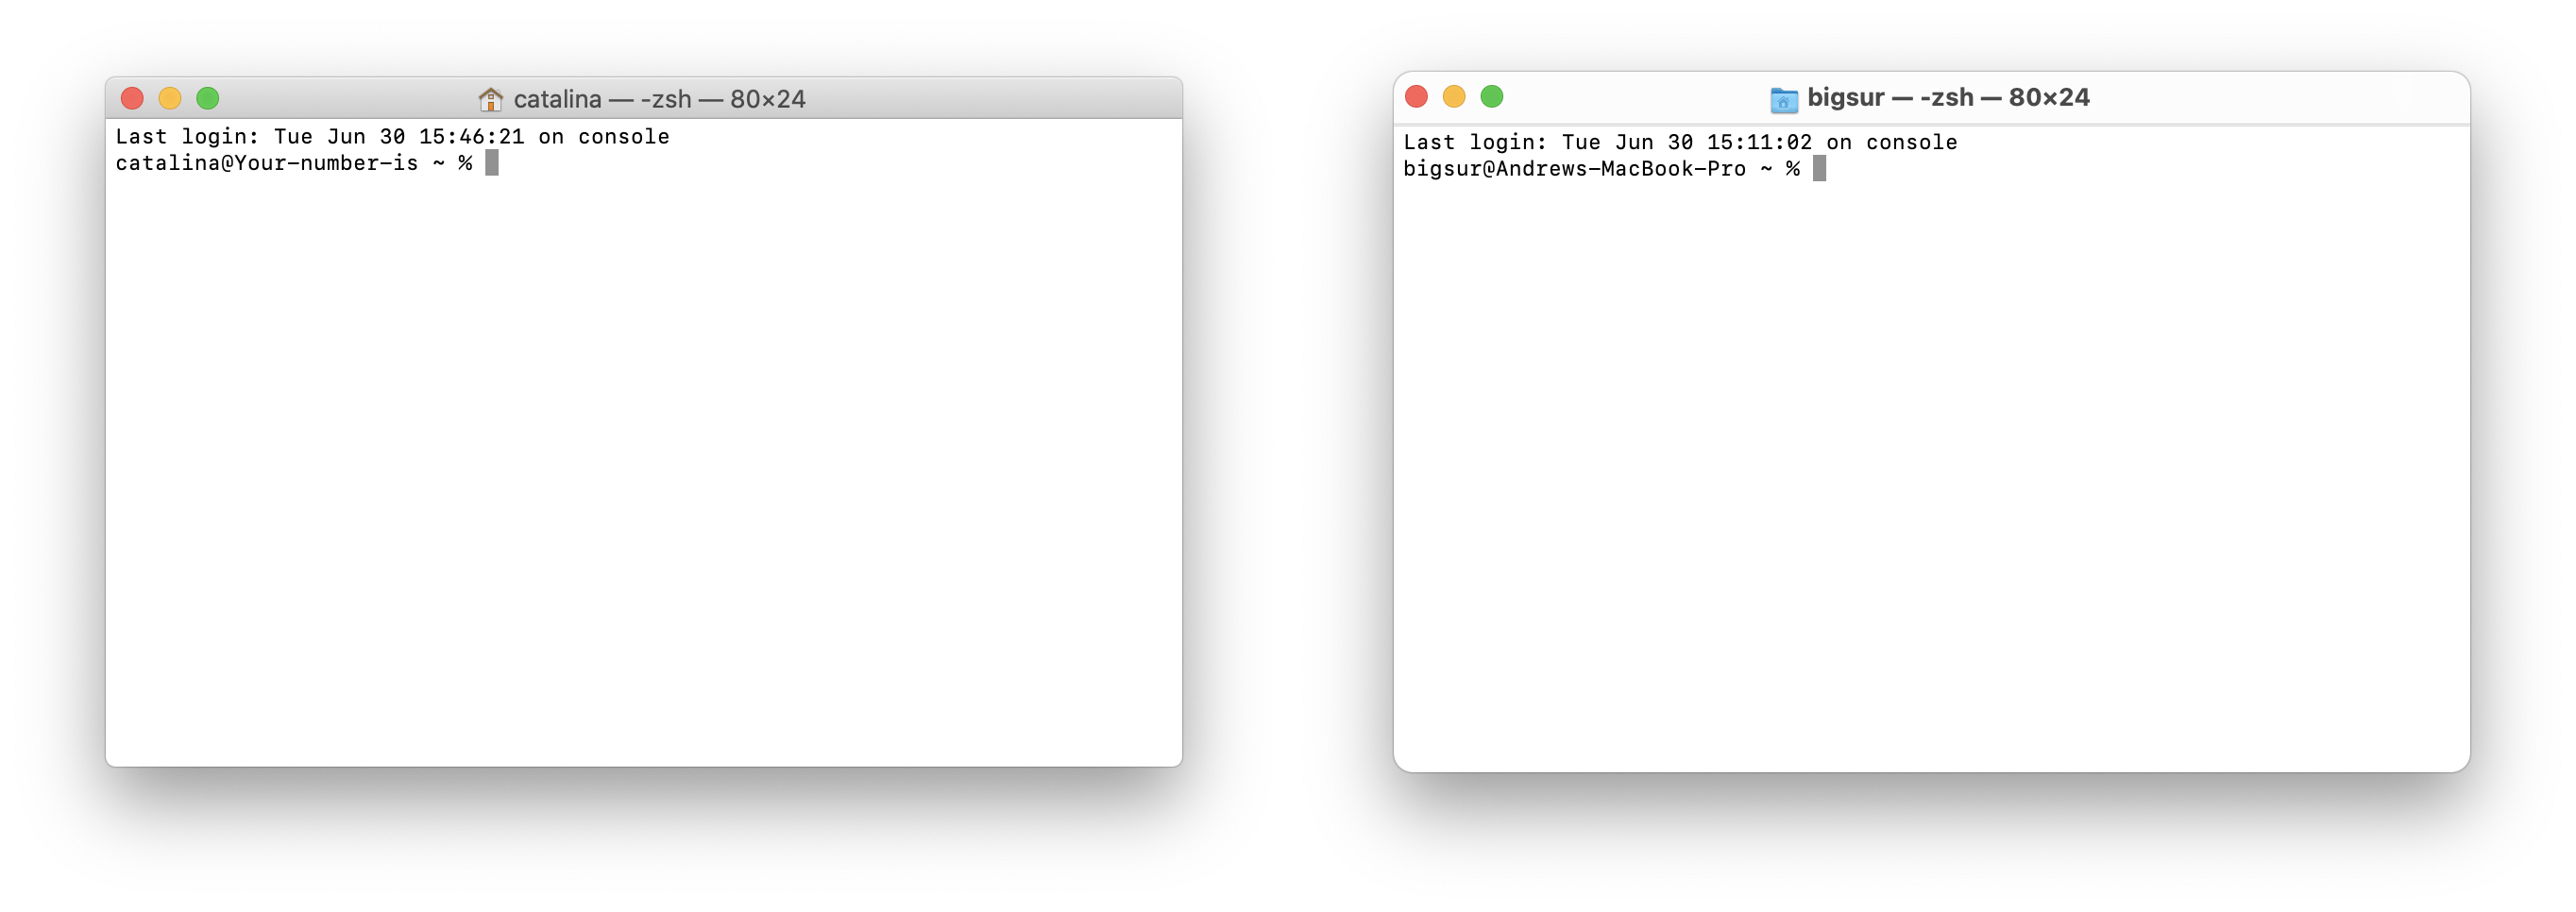
<p>Unsurprisingly Terminal is almost unchanged.</p>

<style>
    .image-gallery {overflow: auto; margin-left: -1%!important;}
    .image-gallery li {float: left; display: block; margin: 0 0 0 0; width: 100%;}
    .image-gallery li a {text-align: center; text-decoration: none!important; color: #777;}
    .image-gallery li a span {display: block; text-overflow: ellipsis; overflow: hidden; white-space: nowrap; padding: 3px 0;}
    .image-gallery li a img {width: 100%; display: block;}
</style>

<ul class="image-gallery"><li><a href="/blog/assets/img/macos-new-ui/utilities/activity-monitor-macos-catalina-big-sur-comparison.png" title="activity-monitor-macos-catalina-big-sur-comparison"><img src="/blog/assets/img/macos-new-ui/utilities/activity-monitor-macos-catalina-big-sur-comparison.png" alt="activity-monitor-macos-catalina-big-sur-comparison" title="activity-monitor-macos-catalina-big-sur-comparison" /></a></li><li><a href="/blog/assets/img/macos-new-ui/utilities/disk-utility-macos-catalina-big-sur-comparison.png" title="disk-utility-macos-catalina-big-sur-comparison"><img src="/blog/assets/img/macos-new-ui/utilities/disk-utility-macos-catalina-big-sur-comparison.png" alt="disk-utility-macos-catalina-big-sur-comparison" title="disk-utility-macos-catalina-big-sur-comparison" /></a></li><li><a href="/blog/assets/img/macos-new-ui/utilities/terminal-macos-catalina-big-sur-comparison.png" title="terminal-macos-catalina-big-sur-comparison"><img src="/blog/assets/img/macos-new-ui/utilities/terminal-macos-catalina-big-sur-comparison.png" alt="terminal-macos-catalina-big-sur-comparison" title="terminal-macos-catalina-big-sur-comparison" /></a></li></ul>

<h2 id="almost-unchanged">Almost unchanged</h2>
<p>On the subject of unchanged apps, there were a number of other apps that are so far relatively unchanged.</p>

<p>Siri in macOS Big Sur shows no apparent changes. I think this is a little strange considering the overhaul Siri is receiving in iOS 14. There don’t even seem to be any radius changes to the borders.</p>

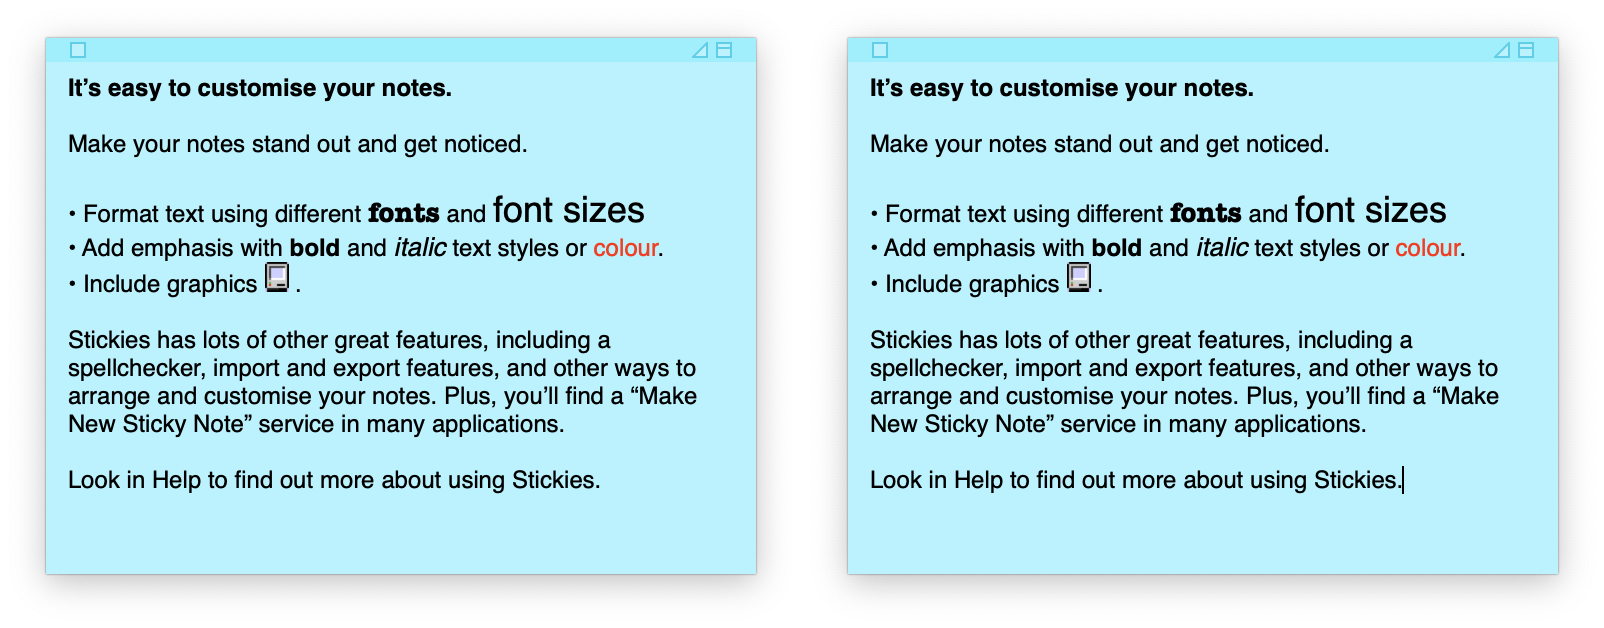
<p>The most extreme case of no change is Stickies. It’s completely identical between both releases. What’s more, I don’t think it’s changed much since MacOS 9 judging from its weird, retro controls.</p>
<style>
    .image-gallery {overflow: auto; margin-left: -1%!important;}
    .image-gallery li {float: left; display: block; margin: 0 0 0 0; width: 100%;}
    .image-gallery li a {text-align: center; text-decoration: none!important; color: #777;}
    .image-gallery li a span {display: block; text-overflow: ellipsis; overflow: hidden; white-space: nowrap; padding: 3px 0;}
    .image-gallery li a img {width: 100%; display: block;}
</style>

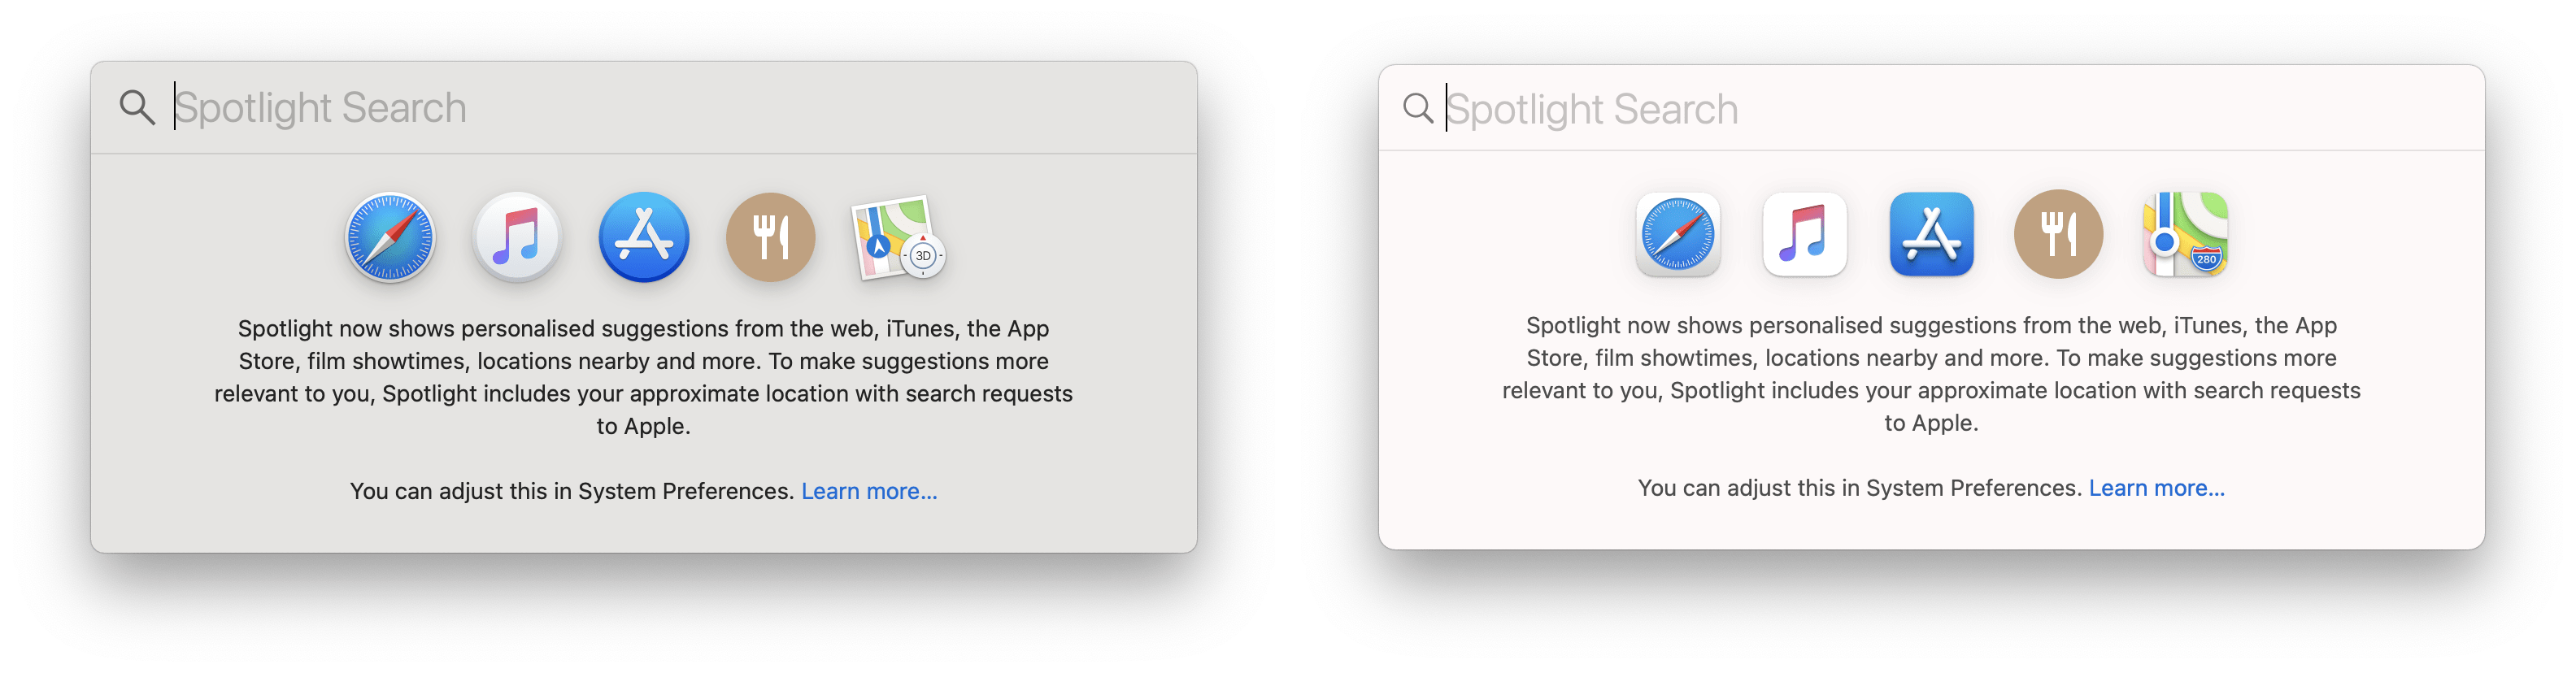
<ul class="image-gallery"><li><a href="/blog/assets/img/macos-new-ui/unchanged/bootcamp-macos-catalina-big-sur-comparison.png" title="bootcamp-macos-catalina-big-sur-comparison"><img src="/blog/assets/img/macos-new-ui/unchanged/bootcamp-macos-catalina-big-sur-comparison.png" alt="bootcamp-macos-catalina-big-sur-comparison" title="bootcamp-macos-catalina-big-sur-comparison" /></a></li><li><a href="/blog/assets/img/macos-new-ui/unchanged/siri-macos-catalina-big-sur-comparison.png" title="siri-macos-catalina-big-sur-comparison"><img src="/blog/assets/img/macos-new-ui/unchanged/siri-macos-catalina-big-sur-comparison.png" alt="siri-macos-catalina-big-sur-comparison" title="siri-macos-catalina-big-sur-comparison" /></a></li><li><a href="/blog/assets/img/macos-new-ui/unchanged/spotlight-macos-catalina-big-sur-comparison.png" title="spotlight-macos-catalina-big-sur-comparison"><img src="/blog/assets/img/macos-new-ui/unchanged/spotlight-macos-catalina-big-sur-comparison.png" alt="spotlight-macos-catalina-big-sur-comparison" title="spotlight-macos-catalina-big-sur-comparison" /></a></li><li><a href="/blog/assets/img/macos-new-ui/unchanged/sticky-notes-macos-catalina-big-sur-comparison.png" title="sticky-notes-macos-catalina-big-sur-comparison"><img src="/blog/assets/img/macos-new-ui/unchanged/sticky-notes-macos-catalina-big-sur-comparison.png" alt="sticky-notes-macos-catalina-big-sur-comparison" title="sticky-notes-macos-catalina-big-sur-comparison" /></a></li></ul>

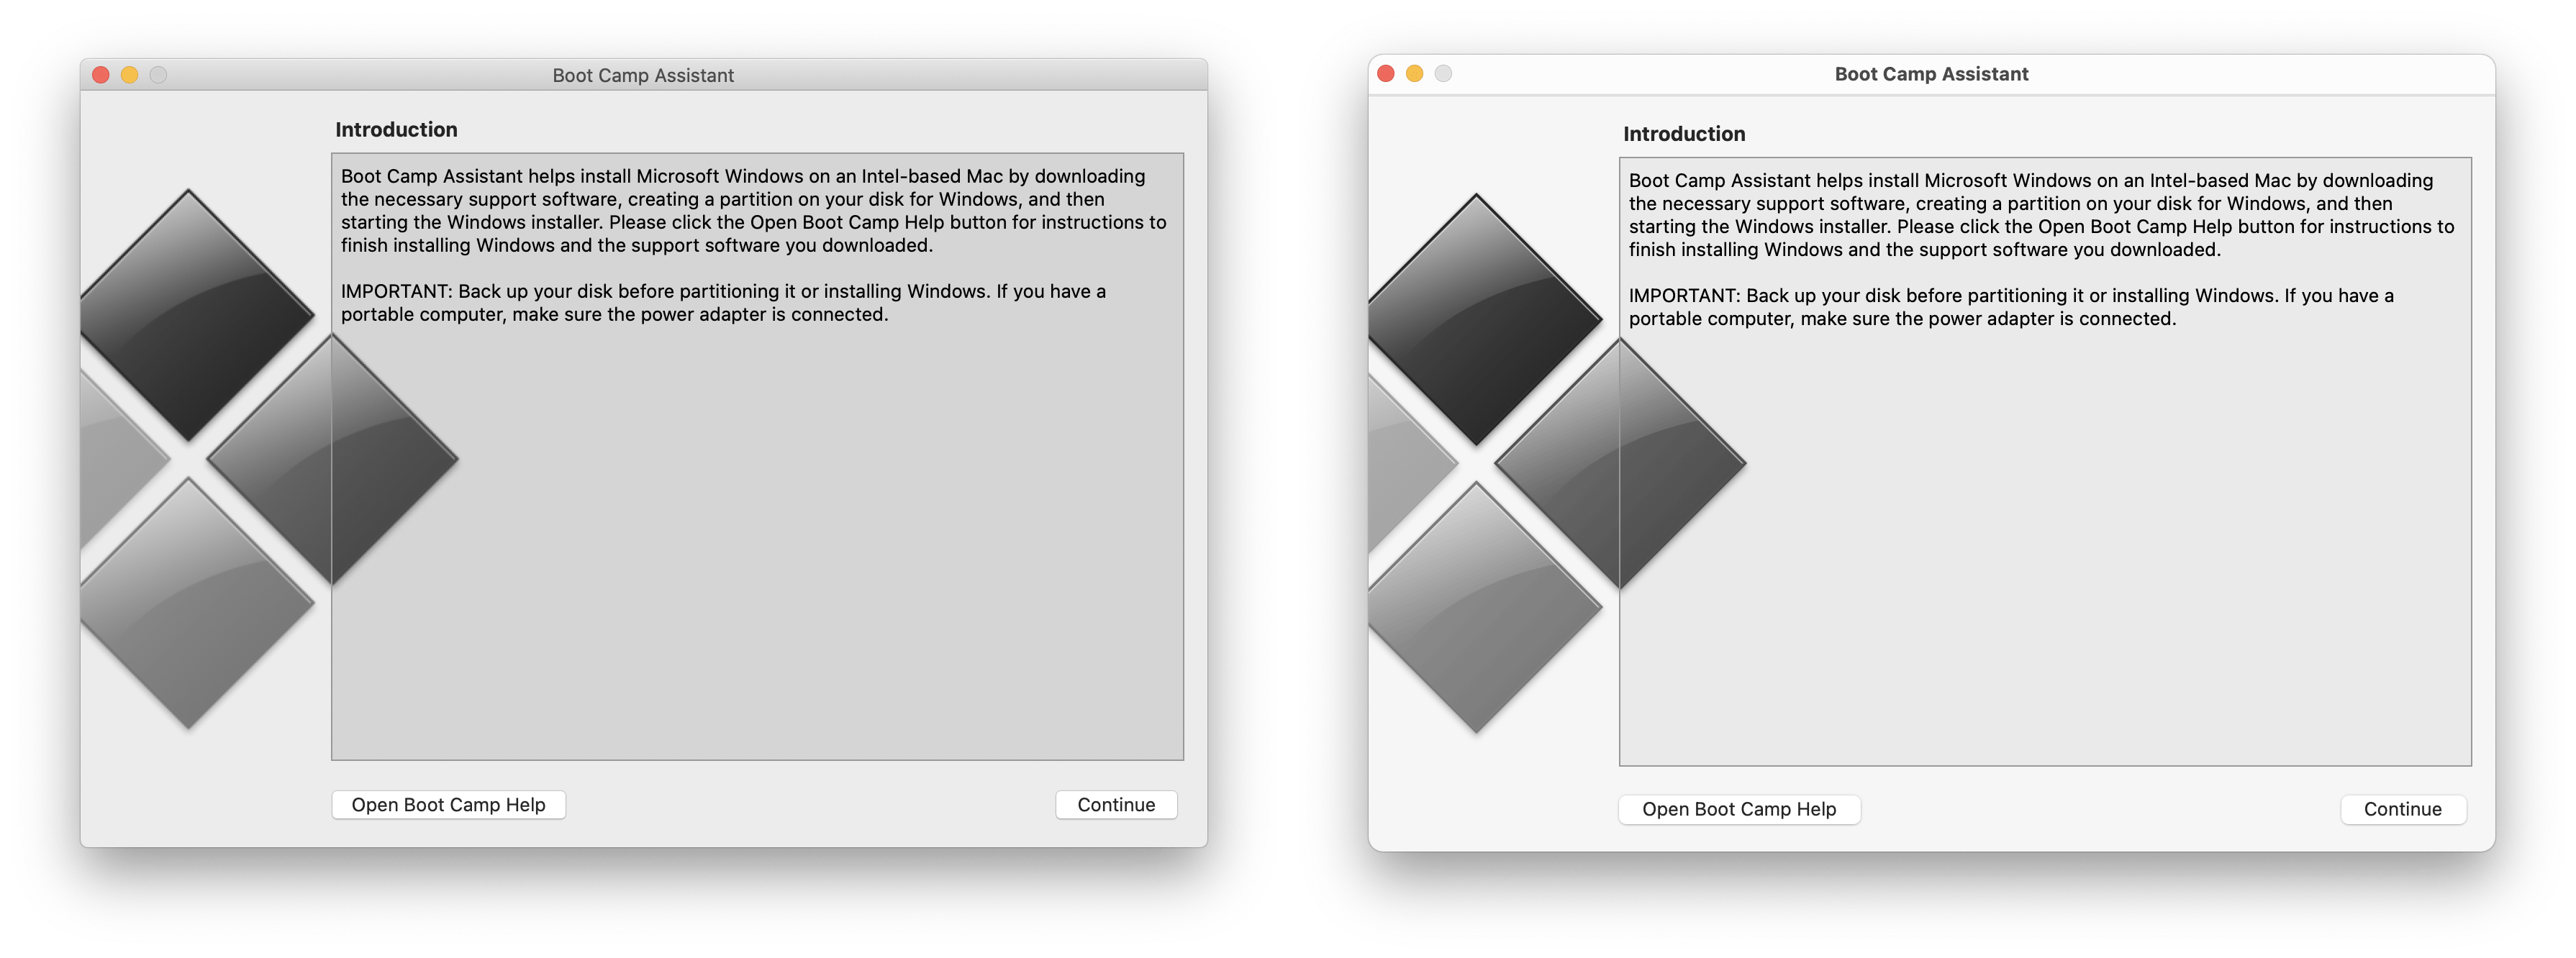
<p>Boot Camp is also practically unchanged, although this is perhaps unsurprising given Apple’s move to Apple Silicon, so presumably Boot Camp’s days are numbered. It did receive a new icon though.</p>

<h2 id="takeaways">Takeaways</h2>
<p>Overall, the UI changes in macOS aren’t as dramatic as I was expecting. Big Sur’s new UI feels like a largely incremental set of changes to make macOS feel more coherent with iOS and iPad OS. Even if there are a few teething issues and the look is a little jarring at first, this has to be a good thing in the long-term.</p>

<p>Having said that, Apple still has a vast amount of work to do to perfect the new macOS UI. It unsurprising as this is the first developer beta, but there are still many rough edges.</p>

<p>I hope in the long term they focus on creating consistent patterns: for example for the first launch experience of apps. Right now there are several different layouts and approaches to this UI. I also hope Apple don’t leave pro users behind. Right now some of the less frequently used UI elements such as status bars and path bars look a little unloved. They don’t feel well integrated into the UI and in some cases lack visual separation.</p>

<p>If you’re interested in reading even more about the design changes in macOS Big Sur, Cult of Mac have <a href="https://www.cultofmac.com/715717/fantastic-fugly-all-new-app-icons-macos-big-sur/" target="_blank">a comprehensive overview of the new icons</a>.</p>]]></content><author><name></name></author><category term="Apple" /><category term="macOS" /><category term="Catalina" /><category term="Big Sur" /><category term="UI" /><category term="Interaction design" /><category term="Visual design" /><summary type="html"><![CDATA[This post is an attempt to provide a visual comparison of pretty dramatic UI changes between macOS Catalina and Big Sur.]]></summary><media:thumbnail xmlns:media="http://search.yahoo.com/mrss/" url="https://www.andrewdenty.com/blog/assets/img/catalina-vs-big-sur.jpg" /><media:content medium="image" url="https://www.andrewdenty.com/blog/assets/img/catalina-vs-big-sur.jpg" xmlns:media="http://search.yahoo.com/mrss/" /></entry><entry><title type="html">Review: Pi-hole on Windows 10</title><link href="https://www.andrewdenty.com/blog/2020/04/24/review-living-with-pi-hole-on-windows-10.html" rel="alternate" type="text/html" title="Review: Pi-hole on Windows 10" /><published>2020-04-24T12:49:00+00:00</published><updated>2020-04-24T12:49:00+00:00</updated><id>https://www.andrewdenty.com/blog/2020/04/24/review-living-with-pi-hole-on-windows-10</id><content type="html" xml:base="https://www.andrewdenty.com/blog/2020/04/24/review-living-with-pi-hole-on-windows-10.html"><![CDATA[<p><img src="/blog/assets/img/review-living-with-pi-hole-on-windows-10.png" alt="Pi-hole shaped heart" /></p>

<p>I’ve been running Pi-hole on my Windows 10 PC for over four months now. When I initially installed Pi-hole on my PC <a href="/blog/2020/01/25/installing-pi-hole-on-windows-10.html">I wrote a short set-up guide</a>. I did this purely so I could remember the steps I took to get it working on Windows 10, but was completely blown away by the reception. This blog which normally gets around twenty visits a week started to get thousands of visits, all to the post about installing Pi-hole on Windows 10.</p>

<p>It’s clear that there’s a lot of interest in this topic, so I thought it was a good time to share some of my day-to-day experiences of running Pi-hole on Windows 10 and review whether it’s actually worth it.  I’ll explore some of the areas that running Pi-hole on Windows 10 excels and then go into some detail of some of the problems I encountered. It’s also worth mentioning that much of this is also applicable if you’re running Pi-hole on a Raspberry Pi, Linux PC or Mac.</p>

<h3 id="an-all-round-better-ad-blocker">An all-round better Ad blocker</h3>

<p>There’s not really much to say about Pi-hole’s ability to block ads other than it’s utterly excellent. It just works. Web browsing with Pi-hole is a faster, less cluttered, cleaner experience. I won’t be going back.</p>

<p>Having said that, Ad blocking is arguably a commoditised feature at this point and this wasn’t my main reason for switching to Pi-hole. For me the biggest appeal of Pi-hole was it’s ability to bypass annoying ad blocker detection. I’d been using a browser based ad blocker, AdblockPlus for years. It was reasonably effective and did a good job of propagating across my different devices because of Google Chrome’s useful (or creepy) sync feature which ports your favourites, history and ad-ons to wherever you’re signed in. The biggest drawback however was the increase in annoying “Ad blocker detected” messages displayed on websites. While Adblock plus makes it pretty straightforward to disable the ad blocking for specific websites, it quickly becomes frustrating. Pi-hole makes this a thing of the past.</p>

<p>In my experience, Pi-hole is 100% effective at bypassing Ad blocker detection.  I’ve seen absolutely no “Ad blocker detected” pop-ups when browsing the since switching to Pi-hole.</p>

<p>Below is an example of the same page when viewed using Pi-hole (left) and AdblockerPlus (right):</p>

<p><img src="/blog/assets/img/pi-hole-vs-adblock-plus.png" alt="The same page viewed using AdblockerPlus and Pi-hole" />
The other main advantage of Pi-hole over other ad blockers is it’s ability to work on all devices on your network. While Android and iOS now support ad blocking functionality through apps and ad-ons, in my experience it’s always been a clunky experience that doesn’t work everywhere. Also, with this approach you’re effectively trusting a 3rd party commercial app with all of your browsing data.</p>
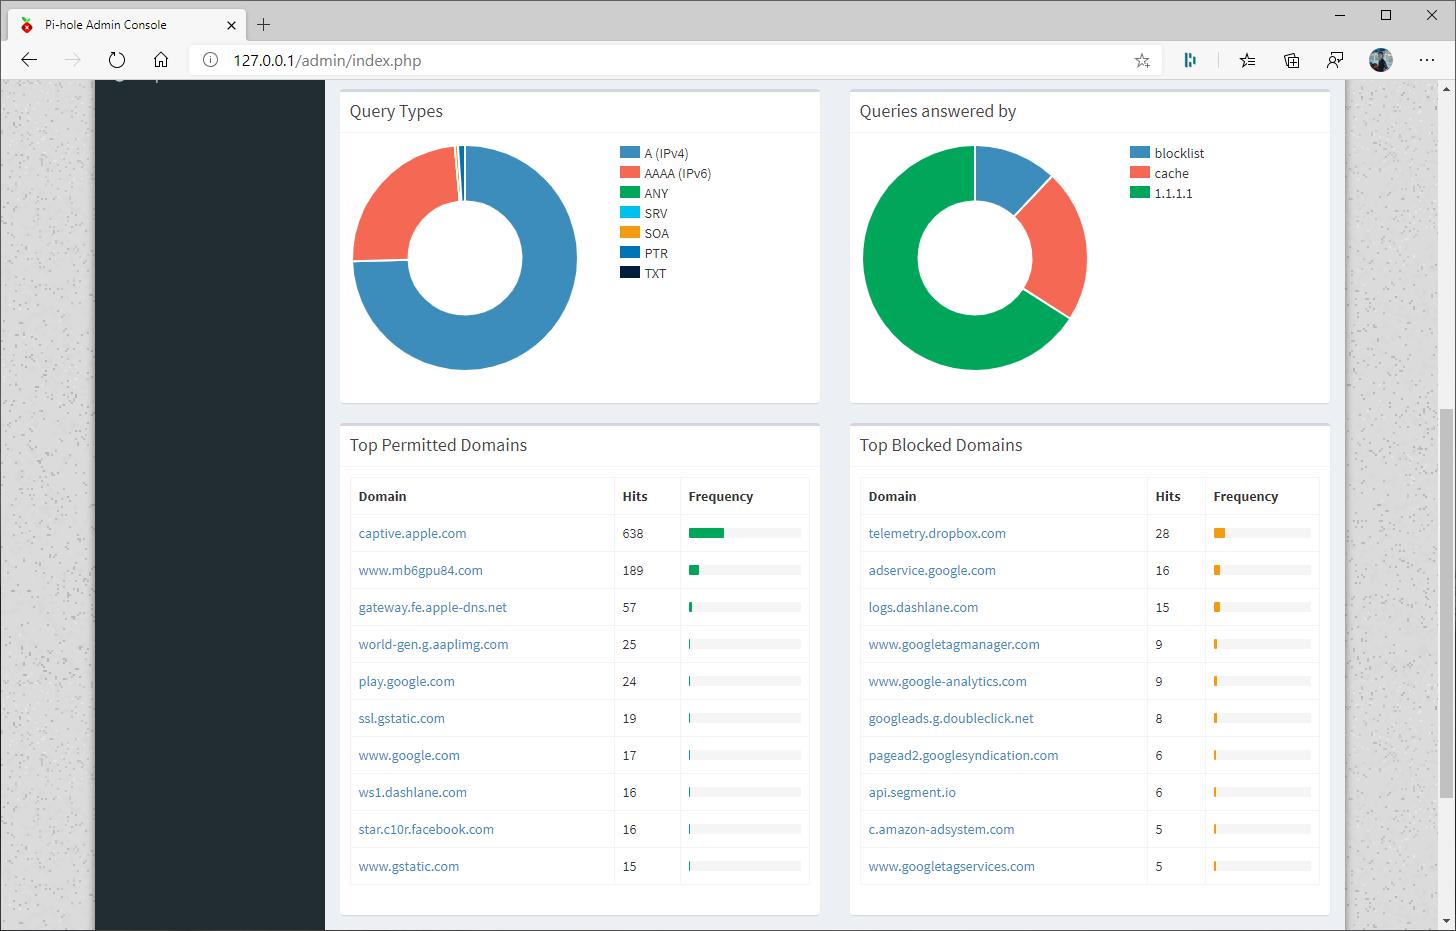
<p>For network-wide ad blocking Pi-hole wins here hands-down as it requires no extra apps, plugins or software. It works on every single device on your network, and you own and manage your own data through the Pi-hole Admin console. This is the perfect segway to talk about what you can do with that data…</p>

<h3 id="use-pi-hole-to-identify-privacy-concerns">Use Pi-hole to identify privacy concerns</h3>

<p>There was one unexpected benefit of using Pi-hole, it helped me identify devices and apps on my network which were invading my privacy. The Pi-hole admin dashboard provides detailed statistics of the traffic flowing through your network which makes it easy to see what is calling home on your network. If this seems like a little too much for you, you can also disable this functionality and tell Pi-hole not to do any logging.</p>

<p><img src="/blog/assets/img/pi-hole-detailed-traffic-statistics.png" alt="Pi-hole Admin console traffic statistics" /></p>

<p>In my case the Pi-hole admin dashboard made it clear to see that our Samsung TV was communicating almost non-stop with Samsung owned domains all day and night. This led me to investigate and it turns out Smart TVs are notorious for collecting data about what you watch with a technology called <a href="https://www.consumerreports.org/privacy/how-to-turn-off-smart-tv-snooping-features/" target="_blank">automatic content recognition, or ACR</a>
. I could find no obvious way of disabling this, and the TV itself didn’t seem to include any privacy settings, so I took the nuclear option of simply blocking its network access. We don’t use the in-built apps to watch tv, so this caused no inconvenience at all.</p>

<p>If you’re interested in learning more about how Smart TVs are increasingly spying on their users, Cheddar has produced a really informative video on the subject:</p>

<iframe width="560" height="315" src="https://www.youtube.com/embed/NWwawTnT7LM" frameborder="0" allow="accelerometer; autoplay; encrypted-media; gyroscope; picture-in-picture" allowfullscreen=""></iframe>

<h3 id="performance-pi-hole-as-a-dns-server">Performance: Pi-hole as a DNS server</h3>

<p>How does Pi-hole perform as a DNS server? It is effectively replacing your DNS server after all. Although could run a ton of benchmarks (and I may actually get round to this if there’s enough interest), I think real world, subjective experience may actually be a better judge in this case.</p>

<p>In my experience using the internet has honestly felt a little faster. I haven’t noticed any awkward DNS resolution hangs when loading websites. I’m talking about the kind of delay where you enter a URL, nothing happens for five seconds and then the page loads instantly. This can happen when a DNS server is slow to respond, or cannot be reached.</p>

<p>Overall I’ve been shocked at how well Pi-hole has functioned as a DNS server. In fact when I first set it up, I was skeptical that it was actually working because it was so fast. This even more surprising given that I run Pi-hole on a PC connected to my network via WiFi.  If you’re a professional, unlike me you’ll run this on a wired connection!</p>

<h3 id="performance-host-pc--performance">Performance: host PC  performance</h3>

<p>What about Windows 10 performance, does running Pi-hole on docker affect my PC’s performance? In my experience, the impact on performance is very modest. My machine is a relatively <a href="https://ark.intel.com/content/www/us/en/ark/products/95067/intel-nuc-kit-nuc7i5bnh.html" target="_blank">low end 2017 Intel NUC</a> with a dual core i5 and a paltry 8GB of ram. Running docker and Pi-hole it still runs smoothly and is completely useable for everything I’d normally use it for such as web browsing, designing with Figma, running a Plex server and playing a few games on Steam. The only impact I have noticed, is that running Docker at startup causes the machine to be a bit less responsive for the first few minutes after boot. This is hardly surprising however as Docker is effectively booting a second OS using Hyper-V. I suspect if you have a more powerful machine with more memory and more cores you won’t even notice this.</p>

<h3 id="maintaining-and-updating-pi-hole">Maintaining and updating Pi-hole</h3>

<p>One of my concerns going into this process was Pi-hole on Docker would be complicated to maintain and update. I think this is partially true as there is no way of automatically updating to new versions. This biggest challenge here was working out how it is done as the process of updating to new versions of Pi-hole on docker doesn’t seem to be widely documented. However if you follow these steps documented in <a href="/blog/2020/01/25/installing-pi-hole-on-windows-10.html">my guide to setting up Pi-hole on Windows 10</a>, it’s not too complicated or time-consuming. It’s also worth pointing out that although Pi-hole is actively maintained, there haven’t been a deluge updates, so you won’t need to do this too frequently.
Link How to update Pi-hole on Docker</p>

<h3 id="reliability-what-can-go-wrong">Reliability: what can go wrong?</h3>

<p>Overall I found Pi-hole running on Windows 10 to be incredibly reliable. It worked for weeks at a time without needing any attention, however there are a few things to be aware of.</p>

<h4 id="windows-10-updates">Windows 10 Updates</h4>
<p>Windows 10 is infamous for its updates. Whether you think this is a good, or a bad thing, the reality is that any Windows 10 PC will restart over night on a relatively frequent basis. In this case, I’d get up in the morning and find my internet wasn’t working.</p>

<p>It is possible to get round this problem however as Microsoft supports a <a href="https://support.microsoft.com/en-us/help/324737/how-to-turn-on-automatic-logon-in-windows" target="_blank">method for automatically logging on to Windows 10</a>. The obvious trade-off with this approach is your PC is no longer secure. Anyone can effectively access your PC by simply turning it off and on again. If this wasn’t bad enough, your password is stored in the Windows registry as plain text. I haven’t enabled this and have opted to put up with the minor inconvenience of occasionally signing into your PC again. I recommend using Windows Remote Desktop to do this. This lets me sign in from whichever device I’m using at the time.</p>

<h4 id="google-shopping-and-adverts-on-google">Google Shopping and Adverts on Google</h4>

<p>This may sound kind of obvious, but Google Shopping and any paid for link on Google will no longer work. This is also the case for services such as Google Analytics, or other B2B analytics services. Although this is exactly what I expected, I often found it surprising as I tend to forget that Pi-hole is running in the background. This can be kind of frustrating. but I have a workaround. Using a VPN service. I use a VPN (<a href="https://www.expressvpn.com/" target="_blank">Express VPN</a>) quite frequently as I’m a Brit living in Denmark and it’s really convenient to be able to visit UK only websites.</p>

<p><img src="/blog/assets/img/pi-hole-blocked-site.png" alt="A site blocked by Pi-hole" /></p>

<h4 id="using-a-vpn-on-your-host-pc">Using a VPN on your host PC</h4>

<p>As I mentioned previously, I use a VPN. One thing I noticed was that if I connected to the VPN on my Windows 10 machine (the same machine which is running Pi-hole) the rest of the devices in my house partially lose internet connectivity. This is because the VPN client makes the Pi-hole DNS server unreachable to other devices on the local network. I found this a little surprising as I’d specified a backup DNS server (<a href="https://1.1.1.1/dns/" target="_blank">Cloudflare’s 1111 service</a>) on my router, and in the case my Pi-hole DNS server is not responding, it should switch to the secondary server. I didn’t investigate this too thoroughly and found the easiest way to get round this is to stop simply stop using the VPN directly on your PC.</p>

<h3 id="what-doesnt-work-right-now">What doesn’t work right now?</h3>

<p>There are two areas where I’ve struggled to get Pi-hole on Docker to work the way I hoped it would.</p>

<p>The first is blocking Youtube ads. Before installing Pi-hole I’d heard rumours that it could be used to block those annoying mid-video ads in Youtube, however this doesn’t seem to be the case. Pi-hole will block the banner ads which sometimes appear in embedded ads, but is currently unable to block video ads on Youtube. If I am able to find a way of blocking these, I’ll write about it.</p>

<p>The second thing I’ve not managed to do with Pi-hole on docker is maintain customised whitelists or blacklists in the Pi-hole docker configuration. This is useful if there are certain websites you wish to allow. For example, I don’t mind certain adverts such as listings on Google Shopping when I’m searching for a product to purchase. Even though you can whitelist certain domains with Pi-hole, this is not advisable if you are running Pi-hole on docker as each time you update to a new version, your whitelist configuration is lost. If anyone has successfully configured whitelists in via the docker command, I’d love to hear how!</p>

<h3 id="conclusions-is-it-worth-running-pi-hole-on-docker">Conclusions, is it worth running Pi-hole on Docker?</h3>

<p>My experience over the past 4 months has completely reinforced my belief that Pi-hole is hands-down, the best ad blocker available. Its ad blocking is unrivalled, it speeds up your web browsing experience across all of your devices and doesn’t require you to install any additional software on those devices.</p>

<p>But, what about running Pi-hole on Docker on a Windows 10 PC? In reflection, I’d definitely recommend turning any spare PC on your network into a Pi-hole server. It makes the internet a slightly nicer place and isn’t too much of a hassle to maintain even if it does have a few niggles. It’s also a great way of evaluating whether Pi-hole is right for you (and everyone else in your household) before purchasing a Raspberry Pi.</p>

<p>If it works out, then I’d recommend purchasing a Raspberry Pi to run it on as you’ll have a dedicated device running your Pi-hole server, easier updates and the ability to maintain custom whitelists and blacklists. My next project will be to set up Pi-hole on a proper <a href="https://www.raspberrypi.org/products/raspberry-pi-4-model-b/" target="_blank">Raspberry Pi 4</a> connected via ethernet and see if the experience is any better.</p>

<p>If you haven’t already tried running Pi-hole on Windows 10, check out my orignal post <a href="/blog/2020/01/25/installing-pi-hole-on-windows-10.html">Install Pi-hole on Windows 10 and live ad-free forever</a>.</p>]]></content><author><name></name></author><category term="Pi-hole" /><category term="Docker" /><category term="Ad-blocking" /><category term="hacker project" /><category term="Windows 10" /><summary type="html"><![CDATA[]]></summary><media:thumbnail xmlns:media="http://search.yahoo.com/mrss/" url="https://www.andrewdenty.com/blog/assets/img/review-living-with-pi-hole-on-windows-10.png" /><media:content medium="image" url="https://www.andrewdenty.com/blog/assets/img/review-living-with-pi-hole-on-windows-10.png" xmlns:media="http://search.yahoo.com/mrss/" /></entry><entry><title type="html">Install Pi-hole on Windows 10 and live ad-free forever</title><link href="https://www.andrewdenty.com/blog/2020/01/25/installing-pi-hole-on-windows-10.html" rel="alternate" type="text/html" title="Install Pi-hole on Windows 10 and live ad-free forever" /><published>2020-01-25T13:45:00+00:00</published><updated>2020-01-25T13:45:00+00:00</updated><id>https://www.andrewdenty.com/blog/2020/01/25/installing-pi-hole-on-windows-10</id><content type="html" xml:base="https://www.andrewdenty.com/blog/2020/01/25/installing-pi-hole-on-windows-10.html"><![CDATA[<p><img src="/blog/assets/img/install-pihole-on-windows-10-using-docker.png" alt="Pi-hole on Windows 10" /></p>

<h3 id="what-is-pi-hole-and-why-run-it-on-windows">What is Pi-hole and why run it on Windows?</h3>

<p><a href="https://pi-hole.net/" target="_blank">Pi-hole</a> is hands-down, the best ad blocker available.</p>

<p>That’s because it acts as a network wide ad-blocker. This means it blocks ads on every single device on your network without any browser extensions clogging up your browser. It even blocks ads inside apps.</p>

<p>What’s more, unlike browser based ad-blockers which just prevent ads from being displayed in your browser, Pi-hole speeds up your browsing experience as it blocks ads from being downloaded in the first place. If that wasn’t enough, it even prevents those annoying “<em>it looks like you’re using an ad-blocker</em>” pop-ups.</p>

<p>All of these benefits did come with one major drawback though. It was originally designed to run on Raspberry Pis. So, unless you had a Raspberry Pi, or a computer running Linux, you were out of luck. However, it’s now available for <a href="https://www.docker.com" target="_blank">Docker</a>. This means it can be installed on any device which will run Docker, such as Windows PCs or Macs.</p>

<p>I recently set up Pi-hole on my home network on a Windows PC and so far it’s worked flawlessly.</p>

<p>Anyway, here’s a step by step guide to block ads on all of our devices by installing Pi-hole on Windows 10.</p>

<h3 id="what-youll-need">What you’ll need</h3>
<p>A Windows 10 PC (Pro or Enterprise edition) which you’re happy to leave on all of the time. Preferably a power efficient, quiet PC. In my case I’m using an Intel NUC.</p>

<p>If you have a Mac, you can also install Pi-hole on MacOS using a similar process to the one described below.</p>

<h3 id="step-by-step-instructions">Step by step instructions</h3>

<h4 id="step-1---download-docker">Step 1 - Download Docker</h4>
<p><a href="https://www.docker.com/products/docker-desktop" target="_blank">Download Docker for Windows</a>. As part of this, you will need to create a Docker account.</p>
<h4 id="step-2---install-docker">Step 2 - Install Docker</h4>
<p>Install Docker, keeping “enable required Windows Features” selected as Docker needs Microsoft Hyper-V which is not enabled by default.</p>

<p>Avoid clicking the “Use Windows Containers” option. Pi-hole will require Linux containers which is the default.</p>

<p><img src="/blog/assets/img/1-install-docker-windows.png" alt="Installing Docker for Windows Desktop" /></p>
<h4 id="step-3---configure-docker">Step 3 - Configure Docker</h4>
<p>When docker is installed the first thing  you will need to do is sign in. Docker lives in the task bar notification area.</p>

<p>After signing in I recommend tweaking some settings in Docker. You can access docker settings from the docker menu in the task bar tray. I reduced the available Memory to 1GB. Pi-hole doesn’t actually need 2GB, so reducing it to 1GB frees up more memory for your PC. Click ‘Apply and restart’.</p>

<p><img src="/blog/assets/img/2-docker-windows-resources-configuration.png" alt="Docker for Windows rescource settings" />
<strong>Update June 2020</strong> - If you don’t see these options, just skip to step 4. Docker is releasing a new version with a technology called WSL 2. This is a new way of emulating Linux within Windows and replaces the existing Hyper-V setup. The main advantage is that WSL 2 uses less resources and dynamically uses memory instead of preassigning a chunk of your PC’s memory. This means there is now nothing to configure. You can read more about it on the <a href="https://docs.docker.com/docker-for-windows/wsl/" target="_blank">Docker website</a>.</p>

<h4 id="step-4---download-pi-hole">Step 4 - Download Pi-hole</h4>
<p>To download the Pi-hole container, open Windows Command Prompt as an administrator and type the following command: <code class="language-plaintext highlighter-rouge">docker pull pihole/pihole</code></p>
<h4 id="step-5---give-your-pc-a-static-ip-address">Step 5 - Give your PC a static IP address</h4>
<p>Next, let’s ensure our PC has a static IP address. This will ensure other devices can always reach your Pi-hole server without any issues. To do this:</p>
<ul>
  <li>Navigate to <strong>Start menu</strong> &gt; <strong>Settings</strong> &gt; <strong>Network and internet</strong> &gt; <strong>Network and Sharing Center</strong> &gt; <strong>Change adapter settings</strong> &gt; Right click on your active network connection and click <strong>Properties</strong>. Double click on <strong>Internet Protocol Version 4 (TCP/IPv4)</strong> and select <strong>Use the following IP address</strong>.</li>
  <li>Set a manual IP address. If you are unsure what to use for the subnet mask or default gateway, type <code class="language-plaintext highlighter-rouge">ipconfig</code> in the command prompt and reuse the same values for the IP address.</li>
  <li>I recommend increasing the last number of your IP address by 50 or so to make IP address conflicts less likely on your network. For example, if your IP address was 192.168.0.5 try 192.168.0.55.</li>
  <li>For DNS settings, use the IP address of your machine you have just set and for an alternative use <code class="language-plaintext highlighter-rouge">1.1.1.1.</code> (this is <a href="https://1.1.1.1/dns/" target="_blank">Cloudflare’s DNS service</a>).</li>
</ul>

<p><img src="/blog/assets/img/3-windows-change-to-static-ip.png" alt="Windows 10 IP address settings" /></p>

<h4 id="step-6---create-a-customized-docker-command">Step 6 - create a customized Docker command</h4>
<p>Now Docker is running and Pi-hole is downloaded we can configure and start it. You will need to customise your script. Here’s a base:</p>

<p><code class="language-plaintext highlighter-rouge">docker run -d --name pihole -e ServerIP=172.16.154.130 -e WEBPASSWORD=password -e TZ=Europe/Copenhagen -e DNS1=127.17.0.1 -e DNS2=1.1.1.1 -e DNS3=1.0.0.1 -p 80:80 -p 53:53/tcp -p 53:53/udp -p 443:443 --restart=unless-stopped pihole/pihole:latest</code></p>

<p><strong>You will need to replace:</strong></p>
<ul>
  <li><code class="language-plaintext highlighter-rouge">ServerIP</code> with your IP address</li>
  <li><code class="language-plaintext highlighter-rouge">WEBPASSWORD</code> with a password of your choosing (you’ll use this to access Pi-hole’s settings)</li>
  <li><code class="language-plaintext highlighter-rouge">TZ=</code> this is optional. You can specify your timezone in the <a href="https://en.wikipedia.org/wiki/List_of_tz_database_time_zones" target="_blank">TZ format</a></li>
</ul>

<p>Note: <code class="language-plaintext highlighter-rouge">DNS1</code> needs to be left as <code class="language-plaintext highlighter-rouge">127.17.0.1</code> in order for Pi-hole to work. If you’re curious, 127.17.0.1 is the IP address for Localhost (or in other words <em>this computer</em>). You can change <code class="language-plaintext highlighter-rouge">DNS2</code> and <code class="language-plaintext highlighter-rouge">DNS3</code> to whatever you like.</p>

<p>The base script above will get you up and running, however if you want to customise how Pi-hole works, there are a <a href="https://github.com/pi-hole/docker-pi-hole#environment-variables" target="_blank">number of variables you can set as part of this script</a>.</p>

<p>You’ll also find more information and documentation on the <a href="https://github.com/pi-hole/docker-pi-hole" target="_blank">Docker Pi-hole Docker Github page</a>.</p>

<h4 id="step-7---run-your-script-and-start-your-pi-hole-server">Step 7 - run your script and start your Pi-hole server</h4>
<p>Open command prompt as an administrator again and paste in your customised command and press enter. This will create your Pi-hole Docker container and run it.</p>

<h4 id="step-8---check-pi-hole-is-up-and-running">Step 8 - Check Pi-hole is up and running</h4>

<p>Go to your web browser and type - <a href="http://127.17.0.1/admin/" target="_blank">http://127.17.0.1/admin/</a> or http://localhost/admin/  you should see the Pi-hole admin console. This means you’re up and running!</p>

<p><img src="/blog/assets/img/4-pi-hole-admin-console.png" alt="Pi-hole admin interface" /></p>

<p>The Pi-hole admin console lets you configure the advanced settings of Pi-hole, see which domains have been blocked as well as  blacklisting or whitelisting new domains.</p>

<h4 id="step-9---configure-your-router">Step 9 - Configure your router</h4>
<p>The final step is to change the DNS server on your router to point to your PC. In my case this is <code class="language-plaintext highlighter-rouge">172.16.154.130</code>. This will ensure all of the devices on your network get Pi-hole’s ad blocking magic.</p>

<p>Congratulations! At this point, provided everything has worked you should have an ad-free home!</p>

<h3 id="faqs">FAQs</h3>
<p>When I shared this post on <a href="https://www.reddit.com/r/pihole/comments/eu6qnj/installing_pihole_using_docker_on_windows_10/" target="_blank">Reddit</a> I got lots of really useful feedback and questions, so I’ve put together a short FAQ section:</p>

<h4 id="does-the-pc-have-to-be-connected-via-an-ethernet-connection">Does the PC have to be connected via an ethernet connection?</h4>
<p>At first I thought this would be a problem, but apparently not. My setup works really well over WiFi. Because of where my PC is located in my apartment it’s pretty much impossible for it to use a wired connection. Like always ethernet is preferable though.</p>

<h4 id="can-i-do-this-on-macos">Can I do this on MacOS?</h4>
<p>Yes - you absolutely can. The process is very similar. I’ve tested this on Mac OS Catalina and it works.</p>

<h4 id="why-use-docker-and-not-just-a-linux-virtual-machine-vm">Why use Docker and not just a Linux Virtual Machine (VM)?</h4>
<p>This could be a whole article, but in a nutshell Docker is easier to set up and maintain compared to a VM. With a VM you need to ensure your Linux installation is correctly configured and kept up to date. This takes time, and in the case where you encounter a problem, reinstalling everything takes a long time. Whereas using Docker, Pi-hole is kept in an isolated container and Docker takes care of everything else. What’s more all of the configuration settings are kept in your Docker script, so you can easily delete the container and recreate it if you run into problems.</p>

<h4 id="what-if-the-pi-hole-stops-working-or-i-restart-my-pc">What if the Pi-hole stops working, or I restart my PC?</h4>
<p>Restarting your PC is not a problem. By default Docker for Windows is configured to run automatically when you start your PC and the <code class="language-plaintext highlighter-rouge">--restart=unless-stopped</code> string in the Docker script I’ve provided means your Pi-hole Docker container will automatically start up. Your internet will also continue to work if your PC is turned off as you can specify a secondary DNS server on your router. In this case your router will simply use this backup DNS server if your Pi-hole is unreachable.</p>

<h4 id="can-i-install-this-on-windows-10-home-edition">Can I install this on Windows 10 Home Edition?</h4>
<p>Not easily. Docker for Windows relies on using Hyper-V, a virtualisation technology only included in Windows 10 Pro or Enterprise. For this reason it’s not straightforward to install Docker on Windows 10 Home. It is technically possible, but it does require you to jump through a lot of hoops. Mark Cameron wrote a guide on <a href="https://medium.com/@mbyfieldcameron/docker-on-windows-10-home-edition-c186c538dff3" target="_blank">Installing Docker on Windows 10 Home</a>  which might help.</p>

<h4 id="how-to-update-pi-hole-on-docker">How to update Pi-hole on Docker</h4>
<p>Occasionally you will notice in the Pi-hole admin interface that a new version is available.</p>

<p>With Docker you don’t update the installed version of Pi-hole, but rather delete it and reinstall it with the variables you created in your customized docker command. This is essentially has the same effect as upgrading, but ensures you have a clean, new environment each time.</p>

<p>In order to do this, head to the ‘Docker dashboard’. You can access the dashboard from the docker menu in the Windows notification tray. Once you’re in the Docker dashboard, click the delete icon next to your Pi-hole container. This will stop and delete the docker container.</p>

<p>The next step is to head to an elevated Command Prompt and type:</p>

<p><code class="language-plaintext highlighter-rouge">docker image prune -a</code></p>

<p>This command clears out the Docker cache and all unused images (i.e. the out of date version of Pi-hole).</p>

<p>Once this has completed, you can reinstall Pi-hole using the instructions in this article.</p>

<p>Essentially all you have to do is run <code class="language-plaintext highlighter-rouge">docker pull pihole/pihole</code> in the Command Prompt, and when it has completed downloading, run your customized docker command to restore your Pi-hole instance. Congratulations, you should now be running the latest version of Pi-hole!</p>

<h4 id="what-is-this-set-up-like-to-use-on-a-daily-basis">What is this set-up like to use on a daily basis?</h4>
<p>See my follow up post where I share my experiences after four months <a href="/blog/2020/04/24/review-living-with-pi-hole-on-windows-10.html">Review: living with Pi-hole on Windows 10</a>.</p>

<h4 id="pi-hole-keeps-crashing---whats-going-on-updated-june-2020">Pi-hole keeps crashing - what’s going on? (updated June 2020)</h4>
<p>In the latest version of Pi-hole (version 5.0) there is a bug which can cause Pi-hole to crash meaning you’re left without an ad-blocker or DNS server. I haven’t run into this myself, and I’m running Pi-hole 5.0 on Docker with no problems. However, if you do have problems Angel-Panda Diaz has helpfully shared a workaround which may prevent this problem. This workaround increases the size of the Docker container’s shared memory (SHM) to 5 gigabytes. I haven’t attempted this workaround myself, but let me know if it helps!</p>

<p>If you’re experiencing crashing, try the following script:
<code class="language-plaintext highlighter-rouge">docker run -d --name pihole -e ServerIP=172.16.154.130 -e WEBPASSWORD=password -e TZ=Europe/Copenhagen -e DNS1=127.17.0.1 -e DNS2=1.1.1.1 -e DNS3=1.0.0.1 -p 80:80 -p 53:53/tcp -p 53:53/udp -p 443:443 --shm-size="5g" --restart=unless-stopped pihole/pihole:latest</code></p>

<p>I’ll update this post when this bug is fixed.</p>]]></content><author><name></name></author><category term="Pi-hole" /><category term="Docker" /><category term="Ad-blocking" /><category term="hacker project" /><category term="Windows 10" /><summary type="html"><![CDATA[]]></summary><media:thumbnail xmlns:media="http://search.yahoo.com/mrss/" url="https://www.andrewdenty.com/blog/assets/img/install-pihole-on-windows-10-using-docker.png" /><media:content medium="image" url="https://www.andrewdenty.com/blog/assets/img/install-pihole-on-windows-10-using-docker.png" xmlns:media="http://search.yahoo.com/mrss/" /></entry></feed>